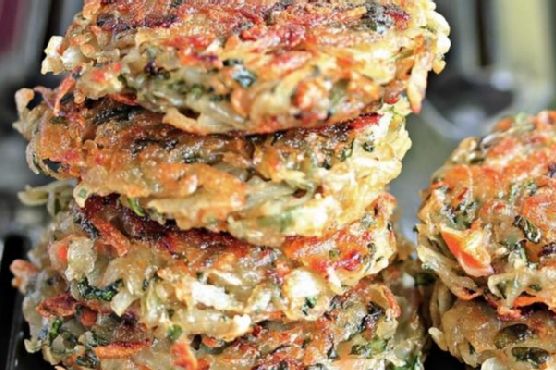
Tag: American Classics

  • Spiced Apple Cider Brioche with Maple-Cinnamon Glaze | Made by Meaghan Moineau

    Spiced Apple Cider Brioche with Maple-Cinnamon Glaze | Made by Meaghan Moineau

    Spiced Apple Cider Brioche with Maple-Cinnamon Glaze

    Picture a chilly autumn morning, leaves crunching underfoot, and the air filled with the sweet, spicy aroma of apple cider. Now imagine that fragrance is wafting from your own kitchen as you pull a loaf of Spiced Apple Cider Brioche with Maple-Cinnamon Glaze out of the oven. It’s a sensory delight that wraps you in a warm culinary hug.

    Personal Story

    I still remember the first time I tried to make brioche. My kitchen looked like a flour bomb had gone off, and let’s just say I underestimated the power of yeast. But, like with most of my culinary adventures, it was a learning experience, and eventually, I got the hang of it. That initial attempt, albeit messy, was the springboard for my now beloved Spiced Apple Cider Brioche.

    The inspiration for this recipe came from an autumn visit to an apple orchard. Surrounded by trees heavy with ripe fruit, I sipped on warm cider and knew I needed to capture that essence in a bake. This brioche became my ode to autumn — the perfect blend of cozy spices and the natural sweetness of apples.

    One memorable evening, as the sun set and the kitchen filled with the scent of baking dough and bubbling apples, I knew this recipe was something special. Friends gathered around the table, tearing pieces of the fluffy brioche, still warm from the oven, and dipping them in extra glaze. The room was filled with laughter and full bellies — the true measure of a successful dish.

    From that day on, Spiced Apple Cider Brioche has been a staple in my recipe collection, a reminder of crisp autumn days and the joy of sharing delicious food with loved ones.

    What Makes This Version Special

    What sets this Spiced Apple Cider Brioche apart from your standard brioche recipe is the infusion of warm spices and a touch of autumn. By incorporating ground nutmeg into the dough, you elevate the flavor profile, adding depth and warmth. But the real pièce de résistance is the luxurious maple-cinnamon glaze. Brushed on while the brioche is still warm, it creates a glossy, sweet finish that perfectly complements the spiced dough. This glaze doesn’t just add flavor; it adds a visual allure that makes the brioche look as irresistible as it tastes.

    Flavor Profile

    Biting into this brioche is like a journey through an autumn landscape. The first taste is all about the buttery, tender crumb, laced with the subtle warmth of cinnamon and nutmeg. As you continue, the rich maple sweetness of the glaze comes through, harmonizing beautifully with the soft spiced dough. Each bite offers a hint of tart apple that cuts through the richness, making it a symphony of flavors dancing on your palate.

    Ingredients

    • 3/4 cup warm water
    • 1/4 cup vegetable oil
    • 1/4 cup **runny honey**
    • 2 1/4 teaspoons dried/instant yeast
    • 3 1/2 cups flour
    • 1 teaspoon salt
    • 2 large eggs
    • 1/2 cup **apple cider**
    • 1/2 teaspoon ground nutmeg
    • 1 teaspoon ground cinnamon
    • 1 tablespoon **orange zest**
    • 1 teaspoon vanilla extract
    • 1/2 cup **maple syrup**
    • 2 tablespoons butter, melted
    • 1 cup diced **apples**
    • 1/4 cup sugar
    • 1 cup powdered sugar

    Instructions

    1. Mix the warm (not hot) water with the vegetable oil, runny honey, and yeast. Allow it to foam for 10 minutes.
    2. Meanwhile, bloom the ground cinnamon and nutmeg by melting the butter in a small pan and stirring in the spices. This will deepen their flavor.
    3. Add the foamy yeast mixture, flour, salt, eggs, apple cider, orange zest, and vanilla extract to a large bowl. Stir in the butter-spice mixture.
    4. Mix and knead the dough using a mixer with a bread hook, or by hand, until you have a soft, smooth, and elastic dough (about 8-10 minutes).
    5. Place the dough in an oiled bowl and let it rise, covered, for about 2 hours or until it’s puffy and nearly doubled in size.
    6. While the dough rises, toss the apple chunks with sugar and cinnamon.
    7. Gently deflate the dough, transfer it to a lightly greased work surface, and flatten it into a rough rectangle, about 8 x 10 inches.
    8. Spread half the apple chunks in the center of the dough. Fold a short edge of the dough over the apples, patting firmly to seal them. Spread the remaining apples on top and fold the other side over, sealing well.
    9. Cut the apple-filled dough into 16 pieces, arranging them in a greased 9-inch round cake pan.
    10. Cover the pan with lightly greased plastic wrap or a damp towel and let it rise for about 1-1 1/2 hours, until it’s a generous 2 inches high.
    11. Preheat the oven to 325°F. Bake the brioche in the lower third of the oven for 55 minutes, or until the top is at least light golden brown all over.
    12. Remove from the oven and let cool for 5 minutes. Loosen the edges and carefully transfer to a rack.
    13. Whisk together the maple syrup and powdered sugar. Brush the warm glaze over the brioche, allowing it to drizzle down the sides for a glossy finish.

    Pro Tips from Meaghan’s Kitchen

    • Make sure your yeast is fresh; if it’s not foaming after 10 minutes, start again with a new batch.
    • Blooming spices in butter enhances their natural oils, giving the brioche a more aromatic flavor.
    • Don’t skip the resting period; it’s crucial for developing the dough’s gluten structure.
    • If the top is browning too quickly, tent it with foil during the last 15 minutes of baking.
    • For a slightly sweeter dough, add an extra tablespoon of honey.

    Variations & Dietary Swaps

    Looking to mix things up? Try these variations:

    • Vegetarian Swap: Substitute the honey with agave syrup to make it vegan-friendly.
    • Spice-It-Up Version: Add a pinch of cayenne pepper to the glaze for a subtle kick.
    • Kids-Friendly Version: Leave out the nutmeg and opt for a chocolate glaze instead of maple.

    What to Serve With It

    This brioche is a treat on its own, but if you want to elevate your experience, pair it with a warm mug of chai tea or a creamy vanilla latte. The spices in the chai will complement the brioche beautifully, while the smoothness of a latte will balance the sweetness of the glaze.

    Storage & Meal Prep

    To store, wrap the brioche tightly in plastic wrap and keep it at room temperature for up to 3 days. For longer storage, wrap it in aluminum foil and freeze for up to 2 months. To reheat, thaw at room temperature and warm in a 300°F oven for 10 minutes.

    FAQ

    Can I make this dough ahead of time?

    Yes! You can prepare the dough, let it rise once, then punch it down and refrigerate overnight. Bring it back to room temperature before the second rise.

    What type of apples work best?

    Granny Smith apples are great for their tartness, but you can also use Honeycrisp or Fuji for a sweeter touch.

    How do I know if my dough has risen enough?

    The dough should be puffy and nearly doubled in size. If you gently press it with a finger, the indentation should slowly spring back.

    Why is my glaze not sticking?

    Ensure the brioche is still warm when you brush on the glaze, as this helps it adhere better and creates a glossy finish.

    Can I use whole wheat flour?

    You can replace up to half of the all-purpose flour with whole wheat, but the texture will be denser.

    Final Thoughts

    There you have it — your very own Spiced Apple Cider Brioche with Maple-Cinnamon Glaze, a delightful autumnal treat that’s sure to impress. I hope you enjoy making and sharing this recipe as much as I do. Don’t forget to leave a comment below with your thoughts or share your own variations. Happy baking!

    Related update: Spiced Apple Cider Brioche with Maple-Cinnamon Glaze

    Related update: Meyer Lemon Ricotta Pancakes with Vanilla-Infused Blackberry-Cardamom Compote

  • Truffle-Infused Macaroni and Cheese with Crispy Pancetta Crumble | Made by Meaghan Moineau

    Truffle-Infused Macaroni and Cheese with Crispy Pancetta Crumble | Made by Meaghan Moineau

    Truffle-Infused Macaroni and Cheese with Crispy Pancetta Crumble

    Imagine a chilly evening with a comforting blanket of warmth enveloping your kitchen, the air heavy with the decadent aroma of truffle oil mingling with bubbling cheese. As the golden-brown crust of your macaroni and cheese forms and crisps under a blanket of pancetta crumble, anticipation builds for that first creamy, savory bite.

    Personal Story

    The first time I tasted truffle oil, I was in a cozy bistro in Paris, where the chef drizzled it over a simple risotto. The earthy, luxurious aroma transported me to a place of pure culinary bliss. Since then, I’ve been on a quest to incorporate that same level of indulgence into my own cooking. Truffle oil, with its distinct and irresistible fragrance, became my secret weapon in transforming everyday dishes into gourmet experiences.

    Macaroni and cheese, a beloved American classic, was one of the first dishes I experimented with. I recall a time when, as a child, Kraft’s boxed version was a staple in our household, a quick and easy comfort after long school days. The ritual of mixing in the powdered cheese with milk and butter holds a nostalgic charm, but my grown-up palate craved more sophistication.

    On a rainy Saturday afternoon, I decided to take the plunge and experiment. The idea was simple: elevate my childhood favorite by marrying its comforting aspects with the luxurious notes of truffle and the salty, crispy delight of pancetta. The result was far beyond my expectations, and it quickly became a signature dish at gatherings, always met with wide-eyed approval and requests for seconds.

    Since then, this truffle-infused macaroni and cheese with crispy pancetta crumble has become a staple in my repertoire, a testament to the comforting power of home-cooked food elevated with a few gourmet touches. It’s a dish that never fails to impress and satisfy, and I’m thrilled to share it with you.

    What Makes This Version Special

    This version stands out not just for its rich, creamy texture but for the luxurious addition of truffle oil. By incorporating this ingredient just before serving, we preserve its aromatic qualities, ensuring that each bite carries its full, earthy essence. The crispy pancetta crumble isn’t just a garnish; it adds a savory, salty crunch that perfectly contrasts the smoothness of the cheese sauce. The combination transforms a standard macaroni and cheese into a gourmet delight, worthy of any dinner party or cozy night in.

    Flavor Profile

    This dish offers an indulgent taste experience. The creamy cheese sauce, enriched with Gruyere and white cheddar, blankets each piece of macaroni in a velvety embrace. The subtle heat from cayenne pepper and the aromatic nutmeg enhance the cheese’s complexity without overpowering it. The truffle oil’s distinct, earthy aroma complements the cheese, creating an olfactory symphony. Finally, the topping of crispy pancetta and fresh thyme adds a delightful crunch and a savory note, creating a perfect balance of flavors and textures.

    Ingredients

    • 1 pound elbow macaroni
    • 8 tablespoons unsalted butter, divided
    • 2 cups whole milk
    • 1/4 cup all-purpose flour
    • **1 tablespoon truffle oil**
    • **1/2 cup diced pancetta**
    • 3 cups sharp white cheddar cheese, shredded
    • 2 cups Gruyere cheese, shredded
    • 1/2 cup Parmesan cheese, grated
    • 1/4 teaspoon cayenne pepper
    • 1/4 teaspoon grated nutmeg
    • Kosher salt, to taste
    • Freshly ground black pepper, to taste
    • **1 cup white bread, torn into small pieces**
    • 2 tablespoons fresh thyme leaves

    Instructions

    1. Preheat your oven to 375 degrees Fahrenheit. Butter a 3-quart casserole dish and set it aside.
    2. In a medium bowl, place the torn pieces of white bread. In a small saucepan over medium heat, melt 2 tablespoons of butter. Pour the melted butter over the bread pieces, tossing to coat evenly. Set the breadcrumbs aside.
    3. Heat the whole milk in a medium saucepan over medium heat until it is hot but not boiling. Keep it warm.
    4. In a high-sided skillet over medium heat, melt the remaining 6 tablespoons of butter. Once the butter starts bubbling, add the flour and cook, stirring constantly, for about 1 minute to form a roux.
    5. Slowly pour the hot milk into the roux, whisking vigorously to prevent lumps. Continue cooking and whisking until the mixture starts to bubble and thickens to a smooth, creamy consistency.
    6. Remove the pan from the heat and stir in the salt, nutmeg, black pepper, cayenne pepper, 3 cups of white cheddar cheese, and 1 1/2 cups of Gruyere cheese. Mix until the cheese is fully melted and the sauce is smooth. Set the cheese sauce aside.
    7. Fill a large saucepan with salted water and bring it to a boil. Add the macaroni and cook for 2 to 3 minutes less than the package instructions, ensuring the pasta is slightly undercooked. Drain the macaroni and rinse it under cold water to stop the cooking process.
    8. Gently fold the drained macaroni into the cheese sauce until all the pasta is well coated. Add the truffle oil, stirring just before transferring the mixture to the casserole dish to preserve its aromatic quality.
    9. Pour the macaroni and cheese mixture into the prepared casserole dish. Sprinkle the remaining 1 1/2 cups of cheddar and 1/2 cup of Gruyere over the top, followed by the buttered breadcrumbs.
    10. Fry the diced pancetta in a skillet over medium heat until crispy. In a small bowl, toss the crispy pancetta with breadcrumbs and fresh thyme.
    11. Scatter the pancetta crumble over the macaroni and cheese. Bake in the oven for about 30 minutes, or until the top is golden-brown and crispy.
    12. Transfer the dish to a wire rack and let it cool for 5 minutes before serving. Enjoy your gourmet creation!

    Pro Tips from Meaghan’s Kitchen

    • Don’t overcook your pasta; it will continue cooking in the oven and absorb more flavor from the cheese sauce.
    • Use freshly grated cheese for the best melting quality. Pre-shredded cheese often contains anti-caking agents that can affect the sauce’s texture.
    • Adjust the amount of truffle oil to your taste. A little goes a long way, so start with less and add more if desired.
    • If you want a more pronounced truffle flavor, consider adding a bit of truffle salt in addition to the kosher salt.
    • For a richer topping, mix some Parmesan cheese with the breadcrumbs before baking.

    Variations & Dietary Swaps

    • Vegetarian Version: Simply omit the pancetta and opt for a mix of sautéed mushrooms to complement the truffle oil’s earthy notes.
    • Spicy Version: Amp up the heat by adding finely diced jalapeños or a sprinkle of red pepper flakes to the cheese sauce.
    • Kids-Friendly Version: Skip the truffle oil and pancetta, focusing on a creamy, cheesy core with a breadcrumb topping for a milder approach that’s sure to please young palates.

    What to Serve With It

    This truffle-infused macaroni and cheese pairs beautifully with a crisp, chilled glass of Sauvignon Blanc, whose acidity cuts through the rich creaminess of the dish. Alternatively, a light, fruity Pinot Noir makes a great companion, enhancing the earthy, savory notes. For a non-alcoholic option, consider serving it with a refreshing glass of iced tea or sparkling water with a twist of lemon.

    Storage & Meal Prep

    Leftovers can be stored in an airtight container in the refrigerator for up to 3 days. To reheat, cover with foil and warm in a 350-degree oven until heated through. If freezing, do so before baking—assemble the dish in a freezer-safe container, cover tightly, and freeze for up to 2 months. When ready to serve, thaw overnight in the refrigerator, then bake as directed, adding an extra 5-10 minutes to the cooking time.

    FAQ

    Can I make this dish ahead of time?

    Yes, you can assemble the macaroni and cheese without baking it, cover it, and refrigerate it for up to 24 hours before baking. Just remember to add a few extra minutes to the baking time if it’s coming straight from the fridge.

    What can I substitute for truffle oil if I don’t have any?

    If you don’t have truffle oil, you can omit it or substitute it with truffle salt or a touch of mushroom powder for a similar earthy flavor.

    How do I prevent my cheese sauce from becoming grainy?

    To keep your cheese sauce smooth, make sure to whisk constantly when adding the milk to the roux and use low heat to melt the cheese slowly, preventing it from seizing up.

    Can I use a different type of pasta?

    Absolutely! While elbow macaroni is traditional, shell pasta or cavatappi are excellent alternatives, as their shapes hold the cheese sauce well.

    Is there a lower-fat version of this recipe?

    You can reduce the fat content by using reduced-fat cheese and milk, though this may slightly alter the creamy texture. Consider adding a bit more seasoning to compensate for the reduced richness.

    Final Thoughts

    This truffle-infused macaroni and cheese with crispy pancetta crumble is more than just a meal; it’s an experience to be savored. I hope you enjoy making and sharing this dish as much as I have. Please leave a comment and let me know how it turns out for you—or share your own creative twist! Happy cooking, friends.

    Related update: Truffle-Infused Macaroni and Cheese with Crispy Pancetta Crumble

    Related update: Szechuan-Style Spicy Chicken Lo Mein with Crunchy Cashews

  • Hazelnut Espresso Cream Martinis with Cinnamon-Sugar Rim | Made by Meaghan Moineau

    Hazelnut Espresso Cream Martinis with Cinnamon-Sugar Rim | Made by Meaghan Moineau

    Hazelnut Espresso Cream Martinis with Cinnamon-Sugar Rim

    Imagine stepping into a cozy evening where the air is filled with the rich, inviting aroma of freshly brewed espresso, mingling with a hint of nutty sweetness and warm spices. This isn’t just a dream — it’s the enchanting experience of sipping a Hazelnut Espresso Cream Martini with a Cinnamon-Sugar Rim, a luxurious twist on the classic espresso martini.

    Personal Story

    There’s something about the ritual of cocktail-making that feels almost sacred to me. It takes me back to an unforgettable evening when I first tried my hand at crafting martinis. My kitchen was transformed into a mini speakeasy, complete with dimmed lights and my favorite jazz playlist in the background. I was eager to impress a dear friend with a perfectly shaken espresso martini. Little did I know, it would turn into a bit of a comedy act.

    The first attempt was a frothy mess, with coffee grounds scattered across the counter like confetti. I had forgotten to secure the shaker lid — a rookie mistake, but one that left us in fits of laughter. By the third attempt, I’d finally perfected the technique, and the result was a silky, chilled concoction that won us over with its bold coffee flavor.

    That evening sparked a newfound love for experimenting with cocktail recipes. I started playing around with flavors, trying to capture the essence of cozy, decadent evenings. That’s when I discovered the magic of hazelnut liqueur and cinnamon in an espresso martini. The combination was nothing short of revelatory.

    Now, whenever I want to evoke that same sense of warmth and indulgence, I whip up a Hazelnut Espresso Cream Martini. It’s a blend of nostalgia and creativity in a glass — a drink that turns any night into a special occasion.

    What Makes This Version Special

    This Hazelnut Espresso Cream Martini isn’t just another cocktail; it’s a sensory journey. The addition of **hazelnut liqueur** introduces a nutty dimension that transforms the standard espresso martini into something extraordinary. By rimming the glass with a blend of granulated sugar and **ground cinnamon**, we add a warm, aromatic boost that elevates the entire experience. Each sip is a dance of flavors, making this cocktail not only better than the classic version but a true signature drink.

    Flavor Profile

    As you take your first sip of the Hazelnut Espresso Cream Martini, you’re greeted with a rich, nutty essence that melds seamlessly with the deep, robust coffee flavor from the freshly brewed **espresso shot**. The subtle warmth of cinnamon from the sugar rim wraps around your senses, creating a comforting, autumnal vibe. It’s a cocktail that balances boldness with delicacy, each ingredient playing its part in a harmonious symphony of flavors.

    Ingredients

    • 2 tablespoons granulated sugar
    • 1 teaspoon ground coffee
    • 1 ounce vodka
    • 1 ounce Baileys Irish Cream
    • 1 ounce Kahlua
    • 1 tablespoon chocolate syrup
    • Ice cubes
    • 1 ounce **hazelnut liqueur**
    • 1/2 teaspoon **ground cinnamon**
    • 1 freshly brewed **espresso shot**

    Instructions

    1. In a small bowl, combine the granulated sugar and ground cinnamon. Mix well to create a fragrant blend.
    2. Spoon a layer of the cinnamon-sugar mixture onto a plate. Moisten the rim of a martini glass with water, then invert it and dip into the sugar-cinnamon mixture, ensuring a nice, even coating. Set aside.
    3. Fill a martini shaker three-quarters full with ice cubes.
    4. Add the vodka, Baileys Irish Cream, Kahlua, and **hazelnut liqueur** to the shaker. Pour in the freshly brewed **espresso shot** for a robust coffee flavor. Shake vigorously until condensation forms on the outside of the shaker, about 20-30 seconds.
    5. Drizzle chocolate syrup on the inside of the prepared martini glass, creating a decorative swirl.
    6. Strain the martini mixture into the glass, allowing the velvety cocktail to fill the chocolate-laced interior.
    7. Serve immediately, savoring the aroma and flavor of your artisanal creation.

    Pro Tips from Meaghan’s Kitchen

    • Chill your martini glasses in the freezer beforehand for an extra frosty experience.
    • Use freshly brewed espresso for the best flavor — instant coffee just won’t cut it here.
    • Shake your cocktail until it’s thoroughly chilled; the shaker should feel icy cold in your hands.
    • If you love a sweet kick, drizzle a little extra chocolate syrup directly into the cocktail shaker before shaking.
    • Experiment with different coffee types for the espresso shot to vary the flavor profile slightly.

    Variations & Dietary Swaps

    • Vegetarian/Vegan Swap: Replace Baileys Irish Cream with a vegan cream liqueur like Baileys Almande or a homemade almond milk version.
    • Spice-It-Up Version: Add a dash of cayenne pepper to the cinnamon-sugar rim for a spicy kick that pairs surprisingly well with the nutty and coffee flavors.
    • Kids-Friendly Version: Create a non-alcoholic version by using decaf espresso, hazelnut syrup, and a splash of chocolate milk for a mocktail that the whole family can enjoy.

    What to Serve With It

    This Hazelnut Espresso Cream Martini pairs beautifully with a small plate of dark chocolate truffles. The deep cocoa notes complement the nutty and spiced flavors of the martini. For a more substantial pairing, consider serving with a selection of cheeses, nuts, and dried fruits to create a sophisticated dessert board that invites leisurely sipping and snacking.

    Storage & Meal Prep

    If you’re prepping for a party, you can mix the vodka, Baileys, Kahlua, and hazelnut liqueur up to a day in advance and store it in the refrigerator. Just shake with ice and espresso when ready to serve. Leftover martini mix can be stored in an airtight container in the fridge for up to 24 hours, but the flavor is best fresh. Refrain from freezing, as the consistency and flavor may change.

    FAQ

    Can I use instant coffee instead of espresso?

    While you can use instant coffee in a pinch, the depth of flavor from a freshly brewed espresso shot is unmatched. It’s worth the extra effort!

    What if I don’t have a martini shaker?

    No shaker? No problem! A mason jar with a tight-fitting lid works equally well for mixing and chilling.

    Is there a non-alcoholic version of this cocktail?

    Yes! Substitute the alcohol with coffee-flavored syrup and a splash of hazelnut syrup. Use decaf espresso for a caffeine-free treat.

    Can I make this ahead of time for a party?

    You can prepare the alcohol mix in advance, but wait to add the espresso and ice until just before serving for optimal flavor and presentation.

    What type of chocolate syrup should I use?

    Opt for a high-quality chocolate syrup for the best results. Dark chocolate syrup adds a rich, indulgent touch to the cocktail.

    Final Thoughts

    Crafting a Hazelnut Espresso Cream Martini with a Cinnamon-Sugar Rim is more than just making a drink — it’s creating an experience. Whether you’re sharing it with friends or enjoying a cozy night in, this cocktail is sure to elevate the moment. I’d love to hear how it turns out for you and any fun twists you decide to try. Don’t hesitate to leave a comment, and if you loved this recipe, feel free to share it with fellow cocktail enthusiasts. Cheers to delicious discoveries!

    Related update: Hazelnut Espresso Cream Martinis with Cinnamon-Sugar Rim

    Related update: Tropical Berry Bliss Smoothie with Coconut and Lime

  • Decadent Oreo-Banana Cheesecake with Salted Caramel Swirl | Made by Meaghan Moineau

    Decadent Oreo-Banana Cheesecake with Salted Caramel Swirl | Made by Meaghan Moineau

    Decadent Oreo-Banana Cheesecake with Salted Caramel Swirl

    Imagine biting into a slice of cheesecake so creamy, it feels like velvet on your tongue. Now add the rich, bittersweet dance of dark chocolate, the luscious embrace of a homemade salted caramel swirl, and the comforting, nostalgic crunch of Oreos. This, my friends, is no ordinary dessert — it’s a decadent Oreo-Banana Cheesecake that will redefine your expectations of indulgence.

    Personal Story

    Growing up, cheesecake was a special-occasion dessert, reserved for birthdays and holidays when the whole family gathered around the dining table. I remember the first time I attempted to make one; it was a classic New York-style cheesecake, and let’s just say the results were less than perfect. The crust was soggy, the filling was dense, and I forgot to let it cool before devouring it. But that experience sparked a curiosity in me that led to years of experimenting with flavors and techniques.

    Flash forward to a summer evening last year, when the sweet aroma of bananas filled my kitchen. I had an excess of ripe bananas and a pantry begging for creativity. That’s when inspiration struck. What if I combined the familiar comfort of banana bread with the elegance of a cheesecake? And, why not throw in some Oreos and a salted caramel swirl for good measure?

    This Oreo-Banana Cheesecake with a Salted Caramel Swirl was born out of a love for pushing culinary boundaries and a desire to create a dessert that felt both familiar and exciting. As I took that first bite, the creamy texture, the rich Oreo crust, and the sophisticated caramel notes danced together perfectly. It’s been a family favorite ever since.

    What Makes This Version Special

    This isn’t just any cheesecake; it’s an elevated version that marries comfort with sophistication. The luscious salted caramel swirl weaves through the creamy filling, offering a delightful contrast to the rich Oreo and banana flavors. A hint of dark chocolate adds depth, turning this dessert into a complex symphony of flavors. Unlike the standard cheesecake, this version delivers a perfect balance of sweet and salty tones, making it a standout centerpiece for any dessert table.

    Flavor Profile

    Prepare your taste buds for an unforgettable experience. The Oreo-Banana Cheesecake with Salted Caramel Swirl is rich and creamy, with a delightful balance of sweet and savory notes. The Oreo crust adds a satisfying crunch, while the banana-infused filling is smooth and velvety. The salted caramel swirl introduces a sophisticated edge, and the hint of dark chocolate provides a lingering, slightly bitter finish. Each bite is a harmonious blend of flavors and textures that will leave you craving more.

    Ingredients

    • **Oreo cookies** – 200g, crushed
    • **Butter** – 75g, melted
    • **Cream cheese** – 500g
    • **Fresh whipping cream** – 300ml
    • **Gelatin powder** – 10g
    • **Water** – 50ml
    • **Nutella** or hazelnut spread – 100g
    • Skinless bananas – 3, mashed
    • **Lemon juice** – 1/2 tbsp
    • **Milk** – 3 tbsp
    • **Dark chocolate shavings** – optional, for garnish
    • **Sea salt flakes** – pinch
    • **Homemade salted caramel sauce** – 200ml

    Instructions

    1. Start by infusing the melted butter with a pinch of sea salt to give your Oreo crust a slightly savory edge. Mix the crushed Oreo cookies with the butter until well combined.
    2. Firmly press the Oreo mixture into a 9-inch cake pan. Place this in the refrigerator to chill until firm, about 30 minutes.
    3. In a large bowl, whisk the fresh whipping cream until soft peaks form. Set aside.
    4. Combine the gelatin powder and water in a small bowl and let it soak for a few minutes. Place the bowl over a double boiler and heat gently until the gelatin dissolves completely. Set aside to cool slightly.
    5. In a separate bowl, beat the cream cheese at medium speed with 3 tablespoons of milk until it’s smooth and creamy. Add the Nutella, and continue to beat for about 1 minute.
    6. Mash the bananas and mix them with the lemon juice to prevent browning, then fold them into the cream cheese mixture until well combined. Transfer to a large bowl.
    7. Gently fold the whipped cream into the cream cheese mixture using a hand whisk, then add the dissolved gelatin and mix until fully incorporated.
    8. Fold in 20g of crushed Oreo cookies with a rubber spatula for an added crunch.
    9. Pour half of the cream cheese mixture into the prepared cake pan. Drizzle half of the homemade salted caramel sauce over the top, using a knife to swirl it through. Repeat with the remaining mixture and caramel.
    10. Refrigerate the cheesecake for at least 4 hours or overnight to set. Once chilled, remove the cheesecake from the cake pan and sprinkle with extra crushed Oreo biscuits and dark chocolate shavings, if desired.

    Pro Tips from Meaghan’s Kitchen

    • Make sure your cream cheese is at room temperature before you start. It blends much more smoothly, preventing lumps in your cheesecake.
    • For a perfectly smooth caramel swirl, let the caramel cool slightly before adding it to the cheesecake mixture.
    • To avoid over-mixing, fold the whipped cream in gently. This keeps the mixture light and airy.
    • If your bananas are too ripe, consider adding a touch more lemon juice to balance the sweetness.
    • For a clean slice, dip your knife in hot water before cutting and wipe it clean between slices.

    Variations & Dietary Swaps

    • Vegetarian swap: Use agar-agar instead of gelatin for a plant-based gelling agent.
    • Spice it up: Add a pinch of cinnamon to the crust mixture for a warm, spicy twist.
    • Kids-friendly version: Skip the dark chocolate shavings and add colorful sprinkles on top for a fun, festive look.

    What to Serve With It

    This cheesecake pairs beautifully with a chilled glass of espresso martini, marrying the dessert’s rich flavors with the cocktail’s coffee notes. Alternatively, serve a side of fresh strawberries for a refreshing contrast that complements the cheesecake’s sweetness.

    Storage & Meal Prep

    Store any leftover cheesecake in an airtight container in the refrigerator for up to 3 days. For longer storage, wrap individual slices in plastic wrap and place them in a freezer-safe bag; they can be frozen for up to 2 months. To reheat, simply thaw a slice in the refrigerator for a few hours before serving. Avoid microwaving to maintain its creamy texture.

    FAQ

    Can I make this cheesecake without a mixer?

    Yes, you can! While a mixer makes the process quicker, you can achieve a smooth texture by thoroughly whisking by hand. Just be prepared to put in a little extra elbow grease.

    Is there a substitute for Nutella?

    If you’re not a fan of hazelnut spread, you can use melted dark chocolate or even peanut butter for a different flavor profile.

    How do I prevent my cheesecake from cracking?

    The key to preventing cracks is ensuring the cream cheese is at room temperature before you start. Also, avoid over-mixing once the gelatin is added, as this can cause air bubbles that lead to cracking.

    Can I use pre-made caramel sauce?

    While homemade salted caramel sauce enhances the cheesecake’s flavor, a high-quality store-bought version will work in a pinch. Just be sure to choose one that’s thick and rich.

    What if I don’t have a double boiler?

    If you don’t have a double boiler, you can create a makeshift one by placing a heatproof bowl over a pot of simmering water, ensuring the bowl doesn’t touch the water.

    Final Thoughts

    There you have it, my take on a Decadent Oreo-Banana Cheesecake with Salted Caramel Swirl — a dessert that’s as indulgent as it is delightful. I hope this recipe brings as much joy to your table as it has to mine. I’d love to hear how your cheesecake turns out, so feel free to share your creations in the comments below. Happy baking, and remember, the best recipes are shared with love!

    Related update: Decadent Oreo-Banana Cheesecake with Salted Caramel Swirl

    Related update: Decadent Mocha Raspberry Chiffon Cake with Hazelnut Praline Crunch

  • Spicy Maple Andouille Sausage and Sweet Potato Hash | Made by Meaghan Moineau

    Spicy Maple Andouille Sausage and Sweet Potato Hash | Made by Meaghan Moineau

    Spicy Maple Andouille Sausage and Sweet Potato Hash

    Imagine the sizzle of sausage as it hits a hot pan, mingling with the sweet aroma of caramelized onions and the earthy scent of roasting sweet potatoes. Each bite is a delightful dance of sweet, smoky, and spicy flavors, a cozy culinary hug perfect for any meal of the day. Welcome to Spicy Maple Andouille Sausage and Sweet Potato Hash — a dish that turns any breakfast, brunch, or dinner into a flavor adventure.

    Personal Story

    There’s something about the humble hash that takes me straight back to lazy Sunday mornings in my grandmother’s kitchen. As a child, I remember waking up to the smells of sizzling sausage and sweet onions, drifting into the dining room like an aromatic alarm clock. My grandmother, with her flour-dusted apron and ever-present wooden spoon, would hum to herself as she worked, adding a dash of this or a sprinkle of that, creating magic from simple ingredients.

    One particularly rainy Sunday, the cupboard was bare of regular potatoes, and we were left with only sweet potatoes. My grandmother, never one to be deterred by minor setbacks, decided to improvise. A little spicy, a little sweet, and suddenly our beloved breakfast took on a new life. The sweet potatoes added a depth and warmth to the dish that paired beautifully with the smoky sausage.

    Years later, inspired by her creativity, I decided to take her idea and run with it. I added a spicy maple glaze to the mix, giving the dish a sweet heat that complements the smoky andouille sausage and sweet potatoes. This unique twist has made this hash a go-to favorite in my home — a testament to my grandmother’s legacy of culinary ingenuity and resourcefulness.

    What Makes This Version Special

    This version of the classic hash stands out with its bold use of sweet potatoes instead of the traditional yukon golds, adding natural sweetness and a beautiful color contrast. But the real secret weapon here is the spicy maple glaze. By reducing maple syrup with smoked paprika and cayenne, you get a glaze that envelops the roasted ingredients in a sweet, smoky heat, perfectly balancing the savory andouille sausage.

    The combination of sweet and spicy, with the rich, smoky undertones of the sausage, elevates this dish beyond a simple hash. It’s an unforgettable ensemble of flavors that brings comfort and excitement to the table, making it perfect for both special occasions and everyday meals.

    Flavor Profile

    Biting into this hash is an experience of contrasts and harmony. The sweet potatoes bring a soft, earthy sweetness that is beautifully contrasted by the smoky, robust flavor of the andouille sausage. Meanwhile, the spicy maple glaze adds a layer of complexity, delivering a gentle heat that lingers pleasantly on the palate. The caramelized onions and roasted peppers add a sweetness and aroma that rounds out the dish, while fresh thyme and scallions provide a burst of herbal freshness in every bite.

    Ingredients

    • 1 large Yukon Gold potato, diced
    • 1 large sweet potato, diced
    • 1 red bell pepper, diced
    • 1 yellow bell pepper, diced
    • 1 large red onion, sliced
    • 8 oz smoked pork andouille sausage, sliced
    • 2 teaspoons canola oil
    • 1 teaspoon garlic salt
    • 1/4 teaspoon cayenne pepper
    • 2 tablespoons maple syrup
    • 1 teaspoon smoked paprika
    • 1 tablespoon fresh thyme, chopped
    • 2 scallions, finely chopped, for garnish

    Instructions

    1. Preheat your oven to 425°F (220°C). This high heat is crucial for ensuring the potatoes and peppers develop a lovely golden-brown crispness.
    2. In a large mixing bowl, toss the diced Yukon Gold potato, sweet potato, red bell pepper, yellow bell pepper, and sliced red onion with 1 teaspoon of canola oil. Spread this mixture evenly onto a baking sheet. Sprinkle with garlic salt and a dash of black pepper for seasoning.
    3. Roast in the preheated oven for 10 minutes. This initial roasting helps the vegetables start to caramelize, enhancing their natural sweetness.
    4. While the vegetables are roasting, create the spicy maple glaze. In a small saucepan over medium heat, combine the maple syrup, smoked paprika, and cayenne pepper. Stir frequently, allowing the mixture to reduce slightly, about 5 minutes, until it thickens.
    5. Remove the baking sheet from the oven and add the sliced andouille sausage. Toss everything together, ensuring the sausage is evenly distributed amongst the vegetables. Return to the oven and roast for an additional 10 minutes, or until the sausage is cooked through and the potatoes are fork-tender.
    6. Remove the pan from the oven and drizzle the spicy maple glaze over the roasted hash, tossing to coat all the pieces evenly. This will add a beautiful glossy finish and infuse every bite with flavor.
    7. Sprinkle with fresh thyme and garnish with finely chopped scallions for a pop of green and a touch of freshness. Serve immediately and enjoy the symphony of flavors!

    Pro Tips from Meaghan’s Kitchen

    • Caramelization is Key: Don’t rush the initial roasting. Allowing the vegetables to develop a deep golden-brown color brings out their natural sweetness and adds depth to the hash.
    • Balance the Heat: If you’re sensitive to spice, reduce the cayenne pepper in the glaze. You can always add more to taste after serving.
    • Prep Ahead: Chop all your veggies the night before and store them in airtight containers. This makes the morning prep a breeze!
    • Get Creative with Sausage: If you can’t find andouille, try using chorizo for a similar smoky flavor, or go for a milder sausage if you’re serving a crowd with varied tastes.
    • Use a Heavy Baking Sheet: A sturdy sheet pan ensures even roasting and prevents burning, especially at high temperatures.

    Variations & Dietary Swaps

    • Vegetarian Version: Swap the sausage for a plant-based alternative or roasted chickpeas. The hash remains just as satisfying and flavorful.
    • Spice-It-Up: Add a few dashes of hot sauce right before serving for those who crave extra heat.
    • Kids-Friendly Option: Tone down the spice by omitting the cayenne pepper and smoked paprika, and add a little more maple syrup for sweetness.

    What to Serve With It

    This spicy maple andouille sausage and sweet potato hash pairs beautifully with a crisp apple cider or a cold wheat beer, enhancing the dish’s sweet and smoky notes. For a lighter option, serve with a simple green salad dressed in lemon vinaigrette, or with a side of fluffy scrambled eggs for a complete breakfast spread.

    Storage & Meal Prep

    Store any leftovers in an airtight container in the fridge for up to three days. To reheat, spread the hash on a baking sheet and warm in a preheated oven at 350°F (175°C) until heated through, about 10-15 minutes. To freeze, portion the hash into freezer-safe bags, removing as much air as possible, and freeze for up to two months. Thaw in the refrigerator overnight before reheating.

    FAQ

    Can I make this dish ahead of time?

    Absolutely! You can prepare the vegetables and sausage a day in advance and store them separately in the fridge. Then, assemble and roast on the day you’re serving it. The glaze can also be made ahead and stored in the refrigerator.

    Is there a vegetarian substitute for andouille sausage?

    Yes, there are many plant-based sausages available that mimic the smoky flavor of andouille. Alternatively, roasted chickpeas can add a nice texture and protein to the dish.

    What’s the best way to get the potatoes crispy?

    Ensure your oven is fully preheated before roasting, and don’t overcrowd the baking sheet. This allows the potatoes to roast rather than steam, leading to a crisper texture.

    Can I use different types of peppers?

    Definitely! Feel free to use any combination of bell peppers you have on hand. Green bell peppers will add a slightly more bitter note, while orange or yellow ones will keep the dish sweet.

    How do I adjust the spice level?

    To make it less spicy, reduce or omit the cayenne pepper in the glaze. If you want to increase the heat, add more cayenne or even a pinch of red pepper flakes.

    Final Thoughts

    This Spicy Maple Andouille Sausage and Sweet Potato Hash is more than just a meal — it’s a celebration of flavors that come together in perfect harmony. Whether you’re making it for a weekend brunch or a cozy dinner, this dish is sure to impress and satisfy. I’d love to hear how it turned out for you! Feel free to leave a comment below or share your version on social media. Remember, the best meals are the ones shared with those we love. Happy cooking!

    Related update: Spicy Maple Andouille Sausage and Sweet Potato Hash

    Related update: Truffle-Infused Macaroni and Cheese with Crispy Pancetta Crumble

    Related update: Spiced Apple Cider Brioche with Maple-Cinnamon Glaze

  • Fluffy Buttermilk Pancakes with Vanilla-Cinnamon Swirl | Made by Meaghan Moineau

    Fluffy Buttermilk Pancakes with Vanilla-Cinnamon Swirl | Made by Meaghan Moineau

    Fluffy Buttermilk Pancakes with Vanilla-Cinnamon Swirl

    Picture this: a lazy Sunday morning, sunlight streaming through the kitchen window, and the irresistible aroma of pancakes sizzling on the griddle. These aren’t just any pancakes — these are Fluffy Buttermilk Pancakes with a Vanilla-Cinnamon Swirl. A breakfast classic elevated to pure comfort food bliss.

    Personal Story

    Growing up, pancakes were a Sunday morning staple in our household. I fondly remember the ritual: my mom in her apron, expertly flipping golden-brown pancakes while I eagerly watched, fork and knife in hand. Those moments were filled with laughter, warmth, and the delicious anticipation of that first bite.

    Fast forward a few years to when I first moved into my own apartment. Eager to recreate those cherished memories, I decided to whip up a batch of my childhood favorite. But as a novice cook, I underestimated the complexity of a seemingly simple pancake. My first attempt was a disaster; the pancakes were flat and tough, a far cry from the fluffy clouds I remembered. I was determined to master the perfect pancake.

    After much trial and error — and a few kitchen mishaps involving batter explosions — I discovered the magic ingredient: buttermilk. It was a game-changer, transforming my pancakes into the pillowy delights I craved. But I didn’t stop there. Inspired by a love for both vanilla and cinnamon, I experimented with adding them to the batter, creating a swirl of sweet and spicy goodness that took my pancakes to a whole new level.

    Now, these Fluffy Buttermilk Pancakes with Vanilla-Cinnamon Swirl are a staple in my kitchen, a beloved recipe that brings both nostalgia and newfound joy to my breakfast table.

    What Makes This Version Special

    The secret to these pancakes lies in the blissful blend of flavors and textures. By incorporating buttermilk into the batter, these pancakes achieve an unparalleled fluffiness and subtle tang that plain milk just can’t deliver. The addition of a vanilla-cinnamon swirl weaves an aromatic sweetness through each bite, elevating these pancakes from ordinary to extraordinary.

    While traditional pancakes are delightful, this version offers a deeply satisfying complexity that makes every mouthful a celebration. The warm, cozy notes of cinnamon paired with the rich, creamy vanilla create a symphony of flavors that dance on the palate. It’s like wrapping yourself in a comforting culinary hug.

    Flavor Profile

    The taste experience of these pancakes is nothing short of divine. Imagine biting into a stack of light and airy pancakes, each forkful melting in your mouth, with a lingering hint of buttermilk’s gentle tanginess. As you savor the bite, the swirl of vanilla and cinnamon reveals itself, offering a sweet, aromatic surprise that feels like a warm embrace. These pancakes are a perfect balance of soft, fluffy texture and rich, fragrant flavor — a delightful indulgence for any breakfast or brunch.

    Ingredients

    • 1 cup all-purpose flour
    • 2 tablespoons sugar
    • 1 teaspoon baking powder
    • 1/2 teaspoon salt
    • 1 egg, beaten until fluffy
    • 1 cup buttermilk
    • 2 tablespoons melted margarine
    • 1 teaspoon vanilla extract
    • 1 teaspoon ground cinnamon
    • 1 tablespoon honey

    Instructions

    1. In a large mixing bowl, combine the flour, sugar, baking powder, and salt. Stir to blend the dry ingredients evenly.
    2. In a separate bowl, beat the egg until fluffy. Add the buttermilk and melted margarine, whisking them together until well combined.
    3. Gently pour the wet ingredients into the dry ingredients, stirring just until the batter comes together. Be careful not to overmix; a few lumps are okay.
    4. In a small bowl, mix the vanilla extract, ground cinnamon, and honey to create the swirl mixture.
    5. Fold the cinnamon-vanilla mixture into the batter using a spatula, making sure to create a swirl rather than fully incorporating it into the batter.
    6. Heat a heavy griddle or fry pan over medium heat. Lightly grease with butter on a paper towel.
    7. Test the pan’s readiness by sprinkling a few drops of water on it. If the drops dance and sizzle, it’s hot enough for cooking.
    8. Pour approximately 1/4 cup of batter onto the griddle for each pancake. Use the back of a spoon to spread out the batter if needed.
    9. Cook until bubbles appear on the surface and begin to break, about 2-3 minutes. The edges should look set and slightly dry.
    10. Flip the pancake carefully and cook the other side until golden-brown, about 1-2 minutes more.
    11. Repeat with the remaining batter, adjusting heat as necessary to maintain consistent cooking.

    Pro Tips from Meaghan’s Kitchen

    • If you don’t have buttermilk on hand, make your own by adding a tablespoon of lemon juice or vinegar to one cup of milk. Let it sit for 5 minutes before using.
    • Avoid overmixing the batter to keep the pancakes tender and fluffy. Lumps are your friends in this case!
    • Use a non-stick griddle or well-seasoned cast iron skillet for even cooking and easy flipping.
    • For an extra cinnamon burst, dust the pancakes with a little cinnamon sugar before serving.
    • To keep pancakes warm while cooking the rest, place them on a baking sheet in a low oven (around 200°F).

    Variations & Dietary Swaps

    • Gluten-Free Option: Substitute the all-purpose flour with a gluten-free flour blend. Ensure the blend contains xanthan gum for structure.
    • Spice-It-Up Version: Add a pinch of cayenne pepper to the cinnamon swirl for a subtle kick.
    • Kids-Friendly Version: Top pancakes with a smiley face made from banana slices and chocolate chips for added fun.

    What to Serve With It

    These Fluffy Buttermilk Pancakes with Vanilla-Cinnamon Swirl pair beautifully with a tall glass of freshly squeezed orange juice or a hot chai latte. The citrusy freshness of the orange juice complements the warm notes of cinnamon, while a chai latte adds an extra layer of spice to your breakfast spread. For a hearty meal, consider serving with crispy bacon or a side of seasonal fruit.

    Storage & Meal Prep

    If you have leftovers (though it’s rare!), store the pancakes in an airtight container in the refrigerator for up to 3 days. For longer storage, stack pancakes with parchment paper between each layer and freeze in a zip-top bag for up to 3 months. Reheat in the oven at 350°F until warmed through or pop them in the toaster for a quick refresh.

    FAQ

    Can I make the batter the night before?

    Yes, you can prepare the batter in advance. Store it in the refrigerator and give it a gentle stir before cooking. The buttermilk may thicken the batter slightly overnight, so you might need to add a splash of milk to loosen it.

    Can I use whole wheat flour instead of all-purpose flour?

    Absolutely! Whole wheat flour will give the pancakes a nuttier flavor and denser texture. You might need to add a bit more buttermilk to achieve the desired batter consistency.

    What toppings go well with these pancakes?

    The possibilities are endless! Fresh berries, whipped cream, nuts, and maple syrup are classic choices. For a decadent treat, try a dollop of mascarpone cheese and a drizzle of warm caramel sauce.

    Why are my pancakes not fluffy?

    If your pancakes aren’t as fluffy as expected, check your baking powder’s expiration date — it might have lost its leavening power. Also, avoid overmixing the batter, as this can lead to dense pancakes.

    Final Thoughts

    These Fluffy Buttermilk Pancakes with Vanilla-Cinnamon Swirl are more than just breakfast; they’re a delightful way to start any day with a smile. I hope this recipe brings as much joy to your kitchen as it does to mine. If you give it a try, I’d love to hear how it turned out — feel free to leave a comment below or share your pancake creations on social media. Happy cooking, and may your mornings be full of warmth and deliciousness!

    Related update: Fluffy Buttermilk Pancakes with Vanilla-Cinnamon Swirl

    Related update: Spicy Maple Andouille Sausage and Sweet Potato Hash

  • Banana Blueberry Pancakes with Lemon Ricotta and Almond Crunch | Made by Meaghan Moineau

    Banana Blueberry Pancakes with Lemon Ricotta and Almond Crunch | Made by Meaghan Moineau

    Banana Blueberry Pancakes with Lemon Ricotta and Almond Crunch

    Picture this: a lazy Sunday morning, rays of sunlight streaming through your kitchen window, the air filled with the irresistible aroma of pancakes sizzling on the griddle. These aren’t just any pancakes; these are Banana Blueberry Pancakes with Lemon Ricotta and Almond Crunch — a delightful symphony of flavors and textures that will make your taste buds dance.

    Personal Story

    I still remember the first time I tried to make pancakes from scratch. I was a teenager, determined to surprise my family with a breakfast that would rival the best brunch spots in town. Armed with a basic recipe I found online, I embarked on what I thought would be a simple task. But as it turns out, my youthful confidence didn’t quite match my kitchen skills. The batter was too runny, the pancakes were either overcooked or raw in the middle, and my family graciously ate them with forced smiles. That day taught me a valuable lesson: great pancakes require a little finesse.

    Fast forward a few years, and I’ve become somewhat of a pancake aficionado, constantly tweaking and experimenting until I landed on a recipe that not only works but shines. The inspiration for these Banana Blueberry Pancakes with Lemon Ricotta and Almond Crunch came on a whim. I was at the farmer’s market, surrounded by the bounty of fresh produce, when I spotted some ripe bananas and plump blueberries. Suddenly, I was transported back to the kitchen mishap of my teenage years, but this time, I was armed with experience and a spark of creativity.

    By adding lemon zest and ricotta cheese to the mix, I discovered a way to bring brightness and creaminess to the pancakes. The sliced almonds, toasted with honey and a touch of salt, add a delightful crunch to contrast the pillowy softness of the pancakes. It’s a recipe that feels like a hug on a plate, and it’s become a beloved staple in my home.

    These pancakes aren’t just about satisfying hunger; they’re about creating a moment — a pause in the hustle and bustle of life to savor something truly special. And today, I’m thrilled to share this journey and recipe with you.

    What Makes This Version Special

    This isn’t just your average stack of pancakes. What sets these Banana Blueberry Pancakes apart is the infusion of **zesty lemon ricotta** and a **crunchy almond topping**. The lemon zest and ricotta bring a tangy creaminess that elevates the humble pancake into something utterly irresistible. Meanwhile, the almond crunch, with its honey-kissed golden edges, adds texture and a touch of sophistication. These aren’t just breakfast pancakes; they’re an experience, a delicious departure from the norm.

    Flavor Profile

    Every bite of these pancakes is a delightful journey through layers of flavor and texture. The soft, fluffy pancakes are punctuated with bursts of sweet, juicy blueberries and creamy banana. The lemon ricotta adds a subtle citrusy zing, complementing the natural sweetness of the fruits. And then, there’s the almond crunch — nutty, slightly salty, with a hint of honey that ties everything together. It’s a symphony of taste and texture that dances on your palate, leaving you craving another bite.

    Ingredients

    • 3 whole eggs
    • 1/2 cup water
    • 2 tablespoons liquid coconut oil
    • 1/3 cup coconut flour
    • 1 teaspoon cream of tartar
    • 1/2 teaspoon ground cinnamon
    • 2 ripe bananas, mashed
    • 1 cup frozen blueberries
    • 1 tablespoon **lemon zest**
    • 1/2 cup **ricotta cheese**
    • 1/4 cup **sliced almonds**
    • 1 tablespoon **honey**
    • 1 teaspoon vanilla extract

    Instructions

    1. In a large mixing bowl, beat the eggs for 1 minute until they are fluffy and pale. This helps create a lighter pancake.
    2. Add the water, liquid coconut oil, and coconut flour to the eggs. Whisk together until the mixture is smooth and lump-free. Allow the batter to sit for 5 minutes so the coconut flour can absorb the liquid and expand. This step is crucial for achieving a tender texture.
    3. Mix in the cream of tartar, ground cinnamon, and mashed bananas. Whisk until combined, ensuring the bananas are evenly distributed.
    4. Gently fold in the frozen blueberries with a spatula. Be careful not to over-mix, as this can lead to tough pancakes.
    5. Fold the lemon zest and ricotta cheese into the batter just before cooking. This ensures the fresh lemon flavor stands out.
    6. In a skillet over medium heat, toast the sliced almonds with honey and a pinch of salt, stirring frequently until they’re golden and fragrant. Remove from the skillet and set aside.
    7. Heat a little oil or butter in the same skillet over medium to low heat. Ladle 1/2 cup of batter for each pancake onto the hot skillet. Cook for about 5 minutes on one side, or until bubbles form and the edges look set.
    8. Flip the pancakes and cook the other side until they are golden-brown and cooked through, about 3 more minutes.
    9. Repeat the process until all the batter is used, keeping the cooked pancakes warm in an oven on low heat if desired.
    10. Serve the pancakes topped with the toasted almond crunch and a drizzle of maple syrup if desired.

    Pro Tips from Meaghan’s Kitchen

    • For extra fluffy pancakes, make sure your eggs are at room temperature before you start.
    • Don’t rush the resting phase of the batter; it’s key for the coconut flour to do its magic.
    • If you find your batter too thick after resting, add a splash more water to reach your desired consistency.
    • Use a non-stick skillet and a light hand with the oil to ensure perfectly golden pancakes every time.
    • Experiment with different nut toppings like pecans or walnuts for a twist on the almond crunch.

    Variations & Dietary Swaps

    If you’re looking to make these Banana Blueberry Pancakes with Lemon Ricotta and Almond Crunch your own, here are a few ideas:

    • Vegetarian Swap: Substitute the honey in the almond crunch with maple syrup or agave nectar.
    • Spice-It-Up Version: Add a pinch of nutmeg or cardamom to the batter for a warming spice note.
    • Kids-Friendly Version: Top the pancakes with a dollop of whipped cream and rainbow sprinkles for a fun twist that kids will love.

    What to Serve With It

    These pancakes are a meal in themselves, but why not make breakfast even more special? Serve them with a frothy cappuccino for a classic pairing, or try an iced matcha latte for a refreshing contrast. Fresh fruit or a side of crispy bacon would also complement the pancakes beautifully.

    Storage & Meal Prep

    If you find yourself with leftovers (a rare occurrence, I assure you), these pancakes store beautifully. Stack them with parchment paper in between each pancake and store in an airtight container in the fridge for up to 3 days. For longer storage, freeze them in a single layer before transferring to a freezer bag. To reheat, simply pop them in the toaster or a warm oven until heated through.

    FAQ

    Can I use fresh blueberries instead of frozen?

    Absolutely! Fresh blueberries work just as well. Just be gentle when folding them into the batter to avoid bursting them.

    Can I make the batter ahead of time?

    It’s best to prepare the batter fresh, but you can mix the dry ingredients a day ahead. Add wet ingredients just before cooking for optimal texture.

    What if I don’t have coconut flour?

    You can substitute with all-purpose flour or almond flour, but you’ll need to adjust the liquid amounts as coconut flour is more absorbent.

    How do I prevent pancakes from sticking?

    Ensure your skillet is hot before adding the batter and use a non-stick pan or a well-greased surface to prevent sticking.

    Can I skip the almond crunch?

    While the almond crunch adds a delightful texture, you can skip it or substitute with another nut or seed topping for a different crunch.

    Final Thoughts

    Cooking is about more than just following a recipe; it’s about creating memories and savoring moments. These Banana Blueberry Pancakes with Lemon Ricotta and Almond Crunch are not just a delicious breakfast treat — they’re an invitation to pause, enjoy, and share with those you love. I hope you’ll give this recipe a try, and I’d love to hear your thoughts. Did you add your own twist? Let me know in the comments below or share your pancake creations on social media. Happy cooking!

    Related update: Banana Blueberry Pancakes with Lemon Ricotta and Almond Crunch

    Related update: Fluffy Buttermilk Pancakes with Vanilla-Cinnamon Swirl

  • Maple Pecan Honey Cornbread with Orange Zest | Made by Meaghan Moineau

    Maple Pecan Honey Cornbread with Orange Zest | Made by Meaghan Moineau

    Maple Pecan Honey Cornbread with Orange Zest

    Imagine this: the golden crust of a freshly baked cornbread, still warm from the oven, with a sweet aroma that dances through your kitchen. A slice reveals a moist, sun-kissed interior dotted with crunchy pecans and hints of bright orange zest. This is not your grandmother’s cornbread — it’s something a little more magical.

    My Love Affair with Cornbread

    Growing up in the South, cornbread was more than just a side dish; it was a family staple, gracing our table during Sunday dinners, holiday feasts, and even simple weekday suppers. My earliest memory of this comforting dish is watching my grandmother expertly mix cornmeal and buttermilk in her old ceramic bowl, a routine she had perfected over decades. I vividly remember the scent of it baking, mingling with the savory tang of collard greens or the rich aroma of a beef stew.

    However, my journey to crafting the perfect cornbread was not without its hiccups. I recall a particularly chaotic Thanksgiving where, in my excitement to impress the family with my own take on the classic, I inadvertently forgot the baking powder. The result was a flat, sad disk that my family graciously ate with polite smiles. That little mishap taught me a valuable lesson about the science of baking and the importance of precision.

    Determined to redeem myself, I spent months experimenting with different ingredients and techniques, seeking to elevate the traditional recipe without losing its comforting soul. It was during a trip to a local farmer’s market that I stumbled upon fresh pecans and a basket of fragrant oranges, sparking an idea. What if I could infuse my cornbread with these vibrant flavors? Hence, the Maple Pecan Honey Cornbread with Orange Zest was born, a creation that has since become a beloved staple in my home.

    What Makes This Version Special

    This isn’t just any cornbread recipe, and here’s why: by infusing the batter with aromatic **orange zest** and crunchy **pecans**, I’ve added layers of texture and flavor that transform this humble side into a standout dish. The warm, earthy notes of **maple syrup** replace the usual vanilla, giving it a subtle sweetness that’s both comforting and sophisticated. Each element plays its part in creating a cornbread that is vibrant, complex, and utterly satisfying.

    Flavor Profile

    The Maple Pecan Honey Cornbread with Orange Zest bursts with a sweet and nutty profile, where each bite reveals a bright citrus aroma and a warm maple undertone. The cornmeal provides a heartiness, while the pecans add a delightful crunch. The orange zest weaves a thread of freshness throughout, ensuring a balanced bite that is both familiar and refreshingly new.

    Ingredients

    • 1 cup corn meal
    • 1 cup flour
    • 1 tablespoon baking powder
    • 1/2 cup white sugar
    • 1/2 teaspoon salt
    • 1/4 cup **honey**
    • 1/4 cup **maple syrup**
    • 1 large egg
    • 1 cup milk
    • 1/2 cup melted butter
    • 1 tablespoon grated **orange zest**
    • 1/2 cup chopped **pecans**

    Instructions

    1. Preheat your oven to 350°F (175°C) and grease a 9×9 inch baking pan.
    2. In a large bowl, combine the corn meal, flour, baking powder, sugar, and salt. Whisk these dry ingredients together until well mixed.
    3. In a separate bowl, whisk together the honey, maple syrup, egg, and milk. Ensure the mixture is smooth and the honey is fully integrated.
    4. Pour the wet ingredients into the dry ingredients and stir until just combined. Avoid over-mixing as this can lead to a dense cornbread.
    5. Gently fold in the melted butter, followed by the grated orange zest. Be careful to preserve the citrus aroma by folding lightly.
    6. Heat a dry skillet over medium heat and toast the pecans until they are fragrant and slightly golden, about 3-4 minutes. This step enhances their flavor and crunch.
    7. Fold the toasted pecans into the batter, distributing evenly.
    8. Pour the batter into the prepared pan and smooth the top with a spatula. Bake in the preheated oven for 25-30 minutes, or until the top is golden-brown and a toothpick inserted into the center comes out clean.
    9. Allow the cornbread to cool in the pan for at least 10 minutes before slicing. Serve warm.

    Pro Tips from Meaghan’s Kitchen

    • Use fresh orange zest for maximum flavor. Store-bought zest can sometimes be dry and lack vibrancy.
    • To ensure even mixing, bring your egg and milk to room temperature before combining with other ingredients.
    • If you prefer a slightly sweeter cornbread, try drizzling a bit of maple syrup over the top before serving.
    • For a more robust flavor, use dark maple syrup instead of the regular one.
    • Letting the cornbread cool slightly before cutting will make it easier to get clean slices.

    Variations & Dietary Swaps

    • Vegetarian Swap: Substitute the butter with a plant-based alternative like coconut oil or vegan butter for a vegetarian-friendly version.
    • Spice-It-Up Version: Add a teaspoon of cinnamon or nutmeg to the dry ingredients for a warm, spiced version.
    • Kids-Friendly Version: Reduce the orange zest to a teaspoon and add in a handful of mini chocolate chips for a sweeter, kid-approved treat.

    What to Serve With It

    Pair this Maple Pecan Honey Cornbread with a refreshing glass of iced green tea or a light citrus salad to complement its flavors. It’s also a fantastic side for hearty soups or chili, where its sweet nuttiness can shine against savory, spicy notes.

    Storage & Meal Prep

    Store any leftover cornbread in an airtight container at room temperature for up to 3 days. For longer storage, wrap individual slices in plastic wrap and place them in a zip-top freezer bag. Freeze for up to 3 months. To reheat, simply thaw at room temperature and warm in a 350°F oven for about 10 minutes.

    FAQ

    Can I use whole wheat flour instead of all-purpose flour?

    Yes, you can substitute whole wheat flour, but it may result in a denser texture. Consider using half whole wheat and half all-purpose to maintain a lighter crumb.

    How can I make this cornbread gluten-free?

    To make it gluten-free, you can use a 1:1 gluten-free baking flour blend in place of the all-purpose flour. Ensure your cornmeal is also certified gluten-free.

    What if I don’t have fresh oranges?

    If fresh oranges aren’t available, you can use store-bought orange juice and a teaspoon of orange extract as a substitute. However, fresh zest is recommended for the best flavor.

    Can I add other nuts or seeds?

    Absolutely! Feel free to swap the pecans for walnuts or even add sunflower seeds for extra crunch.

    How do I know when the cornbread is done?

    The cornbread is done when the top is golden-brown and a toothpick inserted into the center comes out clean. If the top browns too quickly, cover it with foil and continue baking.

    Final Thoughts

    There you have it, my dear kitchen adventurers, a Maple Pecan Honey Cornbread with Orange Zest that is sure to become a favorite in your baking repertoire. I hope this recipe brings warmth and joy to your table, just as it has to mine. Please feel free to leave comments about how your cornbread turned out or any tweaks you made. Sharing is caring, after all — let’s spread the cornbread love!

    Related update: Maple Pecan Honey Cornbread with Orange Zest

    Related update: Spicy Maple-Roasted Autumn Vegetables with Herbed Goat Cheese Drizzle

  • Decadent Caramel Bourbon Apple Brown Betty | Made by Meaghan Moineau

    Decadent Caramel Bourbon Apple Brown Betty | Made by Meaghan Moineau

    Decadent Caramel Bourbon Apple Brown Betty

    Picture this: a cozy kitchen filled with the warm, inviting aroma of sweet spiced apples mingling with the rich, buttery scent of freshly toasted bread. As the apples soften and release their juices, the air becomes heavy with notes of caramel and a whisper of bourbon. It’s an olfactory delight that promises comfort and indulgence in every bite.

    My Journey with Apple Brown Betty

    My love affair with Apple Brown Betty began in my grandmother’s sun-dappled kitchen. Every fall, she would orchestrate a symphony of flavors with the simplest of ingredients: apples picked from the backyard, day-old bread, and a dusting of brown sugar and cinnamon. It was a humble dessert, but to me, it was magic. I remember the way the top layer would turn irresistibly crispy, giving way to the tender, spiced apples beneath. Each spoonful was a taste of nostalgia, a reminder of her warm embrace and endless love.

    But let me share a little secret: not all my adventures with Apple Brown Betty were seamless. There was the time I ambitiously tried to make it for a Thanksgiving potluck, only to discover I’d forgotten to buy apples. I had to improvise with pears and, though delicious, it just wasn’t the same. It taught me an important lesson about the integrity of ingredients and the stories they carry. The apples were more than a flavor — they were a bridge to my past.

    Years later, as I grew more confident in my culinary skills, I decided to give this classic dessert an adult twist. Inspired by a bottle of bourbon gifted by a dear friend and a craving for something a little more decadent, I embarked on a mission to elevate my beloved Apple Brown Betty. The result? A rich caramel bourbon sauce that transforms each layer of apples into something truly luxurious. And for a touch of crunch, a sprinkle of candied pecans that adds a delightful contrast to the soft, spiced filling.

    What Makes This Version Special

    This version of Apple Brown Betty takes a beloved classic and infuses it with a touch of indulgence that feels both familiar and exciting. The addition of a **caramel bourbon sauce** brings an elevated richness, enhancing the natural sweetness of the apples while adding a smoky depth that’s utterly irresistible. But that’s not all. The **candied pecans** I use for this recipe add a delightful crunch, offering a nutty counterpoint that pairs perfectly with the soft, buttery bread cubes.

    By toasting the bread cubes before layering them with the apples, we enhance their texture and flavor, ensuring that the final dessert has a satisfying crispness that contrasts beautifully with the tender apple layers. This upgraded version is not just an Apple Brown Betty, but an experience — one that marries tradition with a modern twist, creating a dessert that’s perfect for cozy evenings and special occasions alike.

    Flavor Profile

    Prepare your senses for a journey through layers of warm, rich flavors with this Decadent Caramel Bourbon Apple Brown Betty. The first bite greets you with the buttery crunch of toasted bread, mingled with the toasty sweetness of caramel. As you delve deeper, the apples reveal themselves — tender and juicy, infused with the aromatic spice of cinnamon and the sophisticated warmth of bourbon. The candied pecans punctuate the experience, adding a nutty sweetness that lingers on your palate, making each spoonful a harmonious blend of textures and tastes.

    Ingredients

    • 5 cups of diced apples, peeled and cored
    • 3 cups of cubed bread (preferably day-old)
    • **1/2 cup of butter, melted**
    • 1/2 cup of white sugar
    • 1 teaspoon of cinnamon
    • 1 teaspoon of nutmeg
    • Juice of 1 lemon
    • **1/2 cup of caramel sauce**
    • **1/4 cup of bourbon**
    • **1/2 cup of candied pecans**

    Instructions

    1. Preheat your oven to 375°F (190°C). Butter a soufflé dish that holds 1-1/2 quarts to ensure the dessert doesn’t stick.
    2. In a large bowl, mix the diced apples with the white sugar, cinnamon, and nutmeg until well combined. Add the lemon juice and toss to coat, which helps to prevent the apples from browning and enhances their flavor.
    3. On a baking sheet, spread the cubed bread and toast in the oven for about 10 minutes, or until lightly golden-brown. This step not only intensifies the bread’s flavor but also helps it absorb the delicious apple juices without becoming soggy.
    4. In a small saucepan over medium heat, combine the **caramel sauce** with the **bourbon**, stirring until the mixture is smooth and aromatic. This will be our luscious drizzle that ties all the flavors together.
    5. Begin layering in the prepared soufflé dish: start with a base layer of toasted bread cubes. Add a layer of the apple mixture, followed by a drizzle of the caramel bourbon sauce. Dot with some of the melted butter.
    6. Repeat the layering process, ending with a top layer of bread cubes. Make sure the dish is well-heaped, as the ingredients will settle as they bake.
    7. Cover the dish with foil and bake in the preheated oven for 30 minutes.
    8. Remove the foil and continue baking for an additional 30 minutes, or until the apples are tender and the top is a beautiful golden-brown.
    9. Once out of the oven, sprinkle the **candied pecans** over the top for a finishing touch.

    Pro Tips from Meaghan’s Kitchen

    • Choose apples that hold up well during baking, like Granny Smith or Honeycrisp, for the best texture.
    • If your caramel sauce is too thick, gently warm it before mixing with the bourbon to ensure a smooth consistency.
    • For extra depth of flavor, consider adding a pinch of salt to the caramel bourbon mixture.
    • You can prepare the bread cubes and apple mixture a day ahead, saving you time on the day of baking.
    • If you prefer a less sweet dessert, reduce the sugar to 1/3 cup and let the natural sweetness of the apples shine.

    Variations & Dietary Swaps

    • Vegetarian Swap: Use a plant-based butter alternative and ensure your caramel sauce contains no dairy for a vegan-friendly dessert.
    • Spice-It-Up Version: Add a pinch of ground cloves or ginger to the apple mixture for a spicier kick.
    • Kids-Friendly Version: Omit the bourbon and use a splash of apple juice instead for a family-friendly treat.

    What to Serve With It

    This Decadent Caramel Bourbon Apple Brown Betty pairs beautifully with a scoop of vanilla bean ice cream, allowing the cold, creamy texture to balance the warm, spiced flavors of the dessert. For a cozy beverage pairing, consider a glass of spiced cider — the subtle warmth of the spices will complement the dessert wonderfully.

    Storage & Meal Prep

    Any leftovers can be stored in an airtight container in the fridge for up to three days. For longer storage, wrap portions individually and freeze for up to a month. When you’re ready to enjoy your Apple Brown Betty again, simply reheat in a 350°F (175°C) oven until warmed through, or microwave on medium power to maintain the dessert’s delightful texture.

    FAQ

    Can I use a different type of bread?

    Absolutely! While day-old white bread works well, you can experiment with brioche or challah for a richer flavor, or even whole wheat if you prefer a heartier texture.

    What can I use if I don’t have bourbon?

    If bourbon isn’t available, you can substitute it with a similar spirit like rum or omit it altogether for a non-alcoholic version.

    How can I make this gluten-free?

    Simply replace the bread cubes with a gluten-free bread variety. Make sure all other ingredients, like the caramel sauce, are also gluten-free.

    Does the alcohol cook out?

    Yes, most of the alcohol in the bourbon will cook off during baking, leaving behind just the rich, complex flavors.

    Can I prepare this dish in advance?

    Yes! You can assemble the dish a day in advance and store it in the fridge. Bake it fresh before serving for the best results.

    Final Thoughts

    There you have it — a sumptuous twist on the classic Apple Brown Betty, perfect for impressing guests or simply indulging yourself. I hope you find as much joy in making and eating this dessert as I do. If you try it, I’d love to hear your thoughts and see your creations! Share your experiences in the comments below, and don’t hesitate to pass this recipe along to fellow dessert lovers.

    Related update: Decadent Caramel Bourbon Apple Brown Betty

    Related update: Almond Amaretto Cloud Cake with Rosewater Marzipan Glaze

  • Bourbon-Infused Mini Cherry Pies with Pecan Streusel | Made by Meaghan Moineau

    Bourbon-Infused Mini Cherry Pies with Pecan Streusel | Made by Meaghan Moineau

    Bourbon-Infused Mini Cherry Pies with Pecan Streusel

    Imagine a warm summer evening, the air thick with the fragrance of ripe cherries mingling with a hint of vanilla and the subtle allure of bourbon. These mini cherry pies, crowned with a delightful pecan streusel, promise to be the star of any dessert table. Each bite offers a rich tapestry of flavors, leaving you longing for more.

    My Cherry Pie Love Affair

    There’s something about cherry pies that always takes me back to my childhood. Growing up, summer weekends meant visits to my grandmother’s house. Her kitchen was a sanctuary filled with the sweet and tangy aroma of freshly baked pies cooling by the window. I remember her laughing as I tried to sneak a cherry from the bowl while she wasn’t looking, always failing to escape her watchful eye. Those moments sparked my love for baking and the magic of turning simple ingredients into something extraordinary.

    Fast forward a few years, and I’m in my own kitchen, trying to recreate those memories. I soon discovered that while I could replicate the basics, I had a desire to make the recipe my own. I wanted to elevate the classic cherry pie with a twist that would resonate with my adult palate. After a few kitchen experiments, I found that a splash of bourbon in the filling, paired with a crunchy pecan streusel, brought out an intriguing depth and complexity to the pies.

    However, it wasn’t always smooth sailing. There was a time I miscalculated the amount of bourbon, and let’s just say the pies were more suited for a cocktail party than a family gathering! But with each attempt, I fine-tuned the recipe until it became a cherished favorite that I’m thrilled to share with you today.

    What Makes This Version Special

    Our Bourbon-Infused Mini Cherry Pies with Pecan Streusel are not your grandmother’s cherry pies — they’re a bold, grown-up take on the classic. The addition of bourbon adds a smoky undertone that beautifully complements the tart cherries. Meanwhile, the pecan streusel topping provides a delightful crunch that contrasts with the soft, juicy filling. This unique twist transforms a traditional dessert into an unforgettable treat that’s perfect for any occasion.

    Flavor Profile

    These mini pies offer a symphony of flavors and textures that dance on your taste buds. The filling is rich and fruity, with the cherries providing a natural sweetness that’s enhanced by the hint of smokiness from the bourbon. The pecan streusel topping adds a satisfying crunch and a nutty warmth, while the buttery crust holds it all together. Each bite is a complex, satisfying experience that leaves a lingering taste of nostalgia and innovation.

    Ingredients

    • 2 cups fresh or frozen sour cherries, pitted
    • **2 tablespoons bourbon**
    • 1/4 cup granulated sugar
    • 1 tablespoon cornstarch
    • 1 tablespoon fresh lemon juice
    • 1 teaspoon vanilla extract
    • 1 1/2 cups all-purpose flour
    • 1/4 cup **brown sugar**
    • 1/2 teaspoon ground cinnamon
    • 1/2 cup **chopped pecans**
    • 1/2 cup (1 stick) unsalted butter, cold and cut into cubes
    • 2/3 cup cold water
    • 1 tablespoon heavy whipping cream
    • 2 teaspoons turbinado sugar
    • 1/2 teaspoon salt

    Instructions

    1. Start by preparing the pie crust. In a food processor, combine flour and salt. Add butter to the mixture, pulsing until the mixture resembles coarse crumbs, approximately 30 seconds.
    2. With the processor running, gradually add 2/3 cup cold water in a slow, steady stream through the lid opening until the mixture forms a ball. Divide the dough into two disks, wrap in plastic wrap, and refrigerate for 1 hour.
    3. Preheat your oven to 350°F (175°C). On a lightly floured surface, roll one pastry disk to a 1/8-inch thickness. Fit the dough into 12 (2-1/2-inch) mini pie plates. Trim the dough around the edges and freeze until firm, about 10 minutes.
    4. Prick the bottoms and sides of the dough with a fork and bake until golden, about 6 to 8 minutes. Remove from the oven and let cool.
    5. In a small bowl, mix cornstarch with 2 tablespoons cold water until blended. In a large saucepan, combine cherries, bourbon, cornstarch mixture, sugar, and salt. Cook over medium heat until cherries are soft and the mixture is thickened. Stir in lemon juice and vanilla extract, then set aside to cool slightly.
    6. For the pecan streusel topping, mix chopped pecans, brown sugar, flour, and cinnamon in a bowl. Make sure it’s well-combined and set aside.
    7. Roll the remaining pastry disk to a 1/8-inch thickness. Cut into thin strips for lattice topping. Weave strips over each pie to create a lattice pattern. Carefully transfer lattice tops to prepared pie plates and seal the edges.
    8. Brush the tops and edges with cream and sprinkle each pie with turbinado sugar.
    9. Bake until the crusts are golden and the streusel is crisp, about 18 to 24 minutes. Serve warm, perhaps with a scoop of bourbon vanilla ice cream for the perfect finishing touch.

    Pro Tips from Meaghan’s Kitchen

    • For the best crust, keep your butter and water as cold as possible. This ensures a flaky, tender pastry.
    • When weaving your lattice, use a ruler to keep your strips even and straight for a professional-looking finish.
    • If using frozen cherries, thaw and drain them well to prevent a soggy filling.
    • Enhance the streusel by toasting the pecans before adding them for a deeper nutty flavor.
    • Let the pies cool slightly before serving to allow the filling to set, making slicing easier.

    Variations & Dietary Swaps

    • Vegetarian Swap: The original recipe is vegetarian, but ensure your bourbon is vegetarian-friendly by checking for any animal-derived clarifiers.
    • Gluten-Free Version: Use a gluten-free flour blend for the crust and streusel topping to make these pies celiac-friendly.
    • Kid-Friendly Version: Skip the bourbon and add an extra tablespoon of vanilla extract to keep the flavor rich without the alcohol.

    What to Serve With It

    These mini cherry pies are a delight on their own, but pairing them with a glass of chilled dessert wine elevates the experience. Alternatively, a scoop of bourbon vanilla ice cream perfectly complements the smoky undertones of the pie, creating a harmonious dessert duo that will undoubtedly impress your guests.

    Storage & Meal Prep

    To store leftovers, cover the pies with plastic wrap or place them in an airtight container in the refrigerator for up to 3 days. For longer storage, freeze the baked pies in a single layer on a baking sheet, then transfer them to a freezer-safe container for up to 1 month. To reheat, place frozen pies in a preheated 350°F (175°C) oven for about 10-15 minutes or until warmed through.

    FAQ

    Can I make the pie dough ahead of time?

    Absolutely! The dough can be made and refrigerated for up to two days in advance. Just be sure to let it sit at room temperature for about 10 minutes before rolling it out.

    What if I don’t have mini pie plates?

    No mini pie plates? No problem. You can use a muffin tin as an alternative. Simply adjust the dough circle size to fit each muffin cup.

    Can I use canned cherries instead of fresh or frozen?

    Yes, canned cherries can work. Just make sure to drain them well and adjust the sugar in the filling since canned cherries are often in syrup.

    Is there a non-alcoholic substitute for bourbon?

    If you’d prefer to avoid alcohol, replace the bourbon with an equal amount of apple juice or cherry juice for a similar depth of flavor without the booze.

    How do I prevent my pie filling from being too runny?

    Ensure your cornstarch mixture is well combined and cooked until thick before adding it to the pie. If your cherries are particularly juicy, you may need to increase the cornstarch slightly.

    Final Thoughts

    These Bourbon-Infused Mini Cherry Pies with Pecan Streusel are a testament to how a classic can be reimagined with a touch of creativity and a dash of bold flavors. I hope this recipe brings as much joy to your table as it has to mine. I’d love to hear about your baking adventures and any tweaks you make to the recipe. Please feel free to share your experiences or any questions in the comments below. Happy baking, my friends!

    Related update: Bourbon-Infused Mini Cherry Pies with Pecan Streusel

    Related update: Decadent Caramel Bourbon Apple Brown Betty