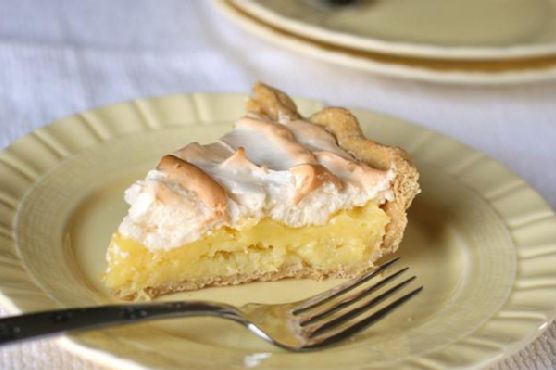
Grandma Inez’s Pineapple Pie
There’s something magical about recipes that have been passed down through generations. Grandma Inez’s Pineapple Pie is one such cherished recipe, evoking memories of summer afternoons spent in her cozy kitchen, with the sweet aroma of pineapple filling the air. This pie, with its rich, buttery crust and light, fluffy meringue, was a staple at every family gathering. Today, I’m thrilled to share this delightful recipe with you, so you can create your own memories with this timeless dessert.
Why You’ll Love It
This pie is a perfect blend of sweet and tart, with a creamy pineapple filling and a cloud-like meringue topping. It’s a wonderful dessert that offers a refreshing twist on the traditional fruit pie. Whether you’re serving it at a holiday dinner or as a special treat on a regular day, this pie is sure to impress your family and friends.
Ingredients
- 1/2 cup butter
- 1 can (20 oz) crushed pineapple, with juice
- 1/4 cup cornstarch
- 1/4 teaspoon cream of tartar
- 3 egg whites
- 3 egg yolks
- 1 pre-baked 9-inch pie crust
- 1/8 teaspoon salt
- 1 cup sugar (divided)
- 1 teaspoon vanilla (divided)
- 1/2 cup water
Instructions
- In a medium saucepan, cream together 1/2 cup of sugar, butter, and egg yolks using a hand-held electric mixer.
- Blend in the cornstarch and 1/2 teaspoon of vanilla.
- Add the water and crushed pineapple with its juice to the mixture and blend again thoroughly.
- Transfer the saucepan to the stove and cook over medium heat, stirring constantly until the mixture thickens.
- Pour the thickened pineapple filling into the pre-baked pie crust and let it cool completely.
- To prepare the meringue, whip the egg whites in a clean bowl until they start to become foamy.
- Add the remaining 1/2 cup sugar, cream of tartar, salt, and 1/2 teaspoon vanilla to the foamy egg whites and continue to whip until the meringue reaches soft peak stage and is smooth and glossy.
- Spread the meringue over the cooled pineapple pie, ensuring it covers the filling completely and touches the edges of the crust.
- Bake the pie in a preheated oven at 400°F (200°C) for just a few minutes, until the meringue is lightly browned.
- Let the pie cool before serving. Store any leftovers in the refrigerator.
Tips
Ensure all your ingredients are at room temperature before you start, as this will help them blend better. Also, when making the meringue, make sure your mixing bowl and beaters are completely clean and free of any grease, as even a small amount can prevent the meringue from forming peaks.
Variations & Substitutions
If you prefer, you can substitute fresh pineapple for canned, but make sure to adjust the sweetness by reducing the sugar slightly. For a different flavor profile, try adding a tablespoon of shredded coconut to the filling or topping the meringue with toasted coconut flakes.
Storage
This pie is best enjoyed fresh, but it can be stored in the refrigerator for up to three days. Cover it loosely with plastic wrap or an airtight container to prevent the meringue from weeping or becoming too soft.
FAQ
Can I freeze the pineapple pie?
It’s not recommended to freeze this pie, as the texture of the meringue might change upon thawing, becoming less stable and more watery.
Why is my meringue weeping?
Meringue can weep if it is not cooked long enough or if it is exposed to humidity. Ensure that the meringue is spread over the pie immediately after whipping and baked until it’s set and lightly browned.
Can I use a store-bought pie crust?
Absolutely! A store-bought pie crust will work just fine and can save you some time. Just make sure it’s pre-baked before adding the filling.
Nutrition
While this pie is a delightful treat, moderation is key. Each slice provides approximately 320 calories, with 14g of fat, 45g of carbohydrates, and 5g of protein. It’s a wonderful indulgence for those special occasions.
Final Thoughts
Grandma Inez’s Pineapple Pie is more than just a dessert—it’s a slice of nostalgia wrapped in a flaky crust and topped with heavenly meringue. Whether you’re a seasoned baker or a kitchen novice, this recipe is straightforward and rewarding. I hope you enjoy making and sharing this pie as much as our family has over the years. Happy baking!
Related update: Grandma Inez’s Pineapple Pie