Category: Snack

  • Authentic Kentucky Bourbon Balls | Made by Meaghan Moineau

    Authentic Kentucky Bourbon Balls | Made by Meaghan Moineau

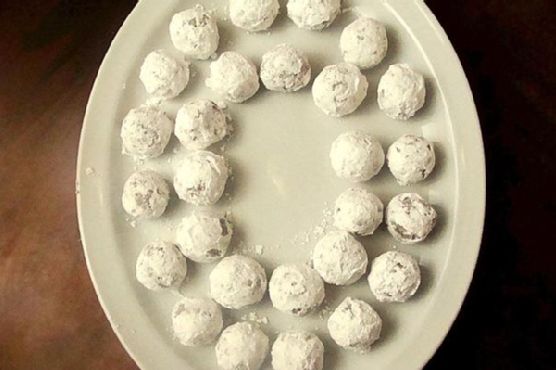
    Authentic Kentucky Bourbon Balls Recipe

    Welcome to my kitchen! Today, we’re diving into a classic Southern treat that holds a special place in my heart: Authentic Kentucky Bourbon Balls. These delightful confections are not only bursting with rich, nutty flavors but also carry a hint of nostalgia for me. I remember as a child, sneaking into my grandmother’s kitchen during the holidays. The air was thick with the aroma of bourbon and chocolate, and I was always eager to steal a taste from her stash of bourbon balls. Now, I’m excited to share this cherished recipe with you.

    Why You’ll Love It

    There are countless reasons to fall in love with these Authentic Kentucky Bourbon Balls:

    • Rich Flavor: The combination of bourbon and cocoa creates a depth of flavor that’s both indulgent and satisfying.
    • Simple to Make: With just a few ingredients, these treats are incredibly easy to prepare.
    • Perfect for Gifting: These make thoughtful, homemade gifts, perfect for the holiday season.
    • Make-Ahead Friendly: They actually taste better when made in advance, allowing the flavors to meld beautifully.

    Ingredients

    • 1 cup crushed vanilla wafer crumbs
    • 1 cup chopped pecans
    • 1 cup powdered sugar, plus more for rolling
    • 2 tablespoons unsweetened cocoa powder
    • 1/4 cup bourbon
    • 2 tablespoons light corn syrup

    Instructions

    1. In a deep bowl, combine crushed vanilla wafer crumbs, chopped pecans, powdered sugar, and the cocoa.
    2. In a separate bowl, blend the bourbon and corn syrup.
    3. Pour the bourbon mixture into the dry mixture; blend well.
    4. Cover and chill for 3 hours.
    5. Shape small bits of the dough into balls and roll them in the powdered sugar.
    6. Store in the refrigerator overnight in tightly covered containers. You can also make these a few days in advance for the best flavor.

    Tips

    • Use Quality Bourbon: The bourbon you choose will greatly affect the flavor, so opt for a quality brand you enjoy sipping.
    • Chilling is Key: Don’t skip the chilling step. It makes the mixture easier to handle and enhances the flavor.
    • Consistent Size: Use a small cookie scoop to ensure uniform ball sizes for even chilling and a professional look.

    Variations & Substitutions

    While the classic recipe is divine, there are a few tweaks you can make:

    • Nut Swap: Walnuts or almonds can be used instead of pecans for a different twist.
    • Flavored Liqueur: Replace bourbon with a flavored liqueur like amaretto or hazelnut for a unique taste.
    • Dark Chocolate: Substitute cocoa powder with dark chocolate cocoa for a richer chocolate flavor.

    Storage

    Store your bourbon balls in an airtight container in the refrigerator. They can last for up to two weeks, making them ideal for holiday prep. For longer storage, place them in the freezer for up to two months. Just let them thaw in the refrigerator before serving.

    FAQ

    Can I make bourbon balls without alcohol?

    Absolutely! You can substitute the bourbon with apple juice or a non-alcoholic vanilla extract. While the flavor will be different, they’ll still be delicious!

    Is it possible to use dark syrup instead of light corn syrup?

    Yes, but keep in mind that dark syrup will impart a stronger flavor, and it might slightly alter the color of the finished product. If you enjoy a deeper molasses flavor, feel free to experiment.

    Nutrition

    While I don’t have precise nutritional data, these treats are definitely a special indulgence. They are rich and dense, with a good amount of sugar and fat from the pecans and bourbon. Enjoy them in moderation as part of a balanced diet.

    Final Thoughts

    Authentic Kentucky Bourbon Balls are a delightful treat that combines the warmth of bourbon with the sweet richness of cocoa and pecans. Whether you’re making them for a holiday gathering, a special gift, or simply to indulge yourself, these bourbon balls are sure to impress. I hope this recipe brings as much joy to your kitchen as it has to mine. Remember to enjoy the process, savor each bite, and perhaps share a little nostalgia with your loved ones as you make them together. Happy baking!

    Related update: Authentic Kentucky Bourbon Balls

    Related update: Bacon Brownie Cupcakes

  • Almond Cookie Bar | Made by Meaghan Moineau

    Almond Cookie Bar | Made by Meaghan Moineau

    Almond Cookie Bar

    Welcome to the delightful world of homemade almond cookie bars! These delectable treats have been a family favorite for generations. I vividly remember my grandmother preparing these bars during the festive seasons, the kitchen filled with the warm, inviting aroma of baking dough and sweet apricot jam. Today, I’m excited to share this cherished recipe with you, hoping it brings as much joy to your home as it has to ours.

    Why You’ll Love It

    These almond cookie bars are a perfect blend of texture and flavor. The crunchy base is complemented by a luscious apricot layer, topped with a nutty, sweet almond and oatmeal mixture. They’re not only delicious but also incredibly satisfying, making them a hit at parties or as an afternoon snack. Plus, with ingredients like wholemeal flour and oatmeal cornflakes, you can feel a bit better about indulging in these treats.

    Ingredients

    • Almond flakes
    • Apricot gel/jam
    • Brown sugar
    • Butter
    • Cookie base
    • Fresh milk
    • Oatmeal cornflakes
    • Plain flour
    • Wholemeal flour

    Instructions

    1. Beat butter and sugar until light and fluffy.
    2. In a bowl, combine wholemeal flour and plain flour together, then mix in the butter mixture with a rubber spatula and knead gently to form a soft dough.
    3. Turn out the dough onto a floured surface or line with a plastic sheet below and with another plastic sheet on top. Then roll into a square. Chill for at least 1 hour.
    4. Transfer the dough onto non-grease paper and cover with a plastic sheet on top, then roll the dough to about 3mm thick.
    5. Prick the dough with a fork and bake for about 15-18 minutes until brown in a preheated oven at 180°C. Leave the biscuit to cool.
    6. Spread the apricot jam over the top of the biscuit and set aside.
    7. Mix topping ingredients and spread evenly on the biscuit with a palette knife.
    8. Bake for 15 minutes until golden.
    9. Remove the cooked biscuit from the oven and leave to cool completely, then cut into bars.

    Tips

    To ensure the dough is easy to work with, make sure the butter is at room temperature before you start. Chilling the dough is crucial as it helps in maintaining the shape while baking. When spreading the apricot jam, ensure the base has cooled completely to prevent the jam from melting and becoming runny.

    Variations & Substitutions

    These almond cookie bars are quite versatile. If you’re not a fan of apricot, try substituting with raspberry or strawberry jam for a different twist. For a healthier version, you can replace brown sugar with coconut sugar or a sugar substitute of your choice. If you prefer, add a sprinkle of cinnamon to the almond mixture for a warm, spicy note.

    Storage

    Store your almond cookie bars in an airtight container at room temperature for up to a week. For longer storage, you can freeze them for up to three months. Just ensure they are well wrapped to prevent freezer burn.

    FAQ

    Can I make these bars gluten-free?

    Yes, you can substitute the plain and wholemeal flours with a gluten-free baking blend. Make sure it contains xanthan gum to help bind the dough.

    What if I don’t have oatmeal cornflakes?

    If oatmeal cornflakes are not available, you can use regular rolled oats or crushed cornflakes as an alternative. They will provide a similar texture to the topping.

    Nutrition

    Each almond cookie bar contains approximately 150 calories, with a balance of carbohydrates, fats, and protein. The wholemeal flour and oatmeal add dietary fiber, making this a more wholesome treat.

    Final Thoughts

    These almond cookie bars are more than just a treat; they’re a piece of nostalgia and comfort. Whether you’re enjoying them with a cup of tea or sharing them with loved ones, they’re sure to bring a smile to your face. I hope this recipe becomes a beloved part of your baking repertoire, just as it has been in my family for years. Happy baking!

    Related update: Almond Cookie Bar

  • Rugelach | Made by Meaghan Moineau

    Rugelach | Made by Meaghan Moineau

    Delightful Rugelach: A Comforting Classic

    There’s something magical about the aroma of freshly baked rugelach wafting through the house. It takes me back to my grandmother’s cozy kitchen, where I first learned how to roll these delicate pastries. I remember the way she would hum softly, her hands expertly folding the dough around sweet preserves and crunchy walnuts. These moments, filled with warmth and love, are the essence of why I adore baking rugelach. Now, I’m excited to share this beloved recipe with you, hoping it brings the same joy and comfort to your home.

    Why You’ll Love It

    Rugelach is a delightful pastry that combines a tender, buttery dough with a sweet and nutty filling. It’s perfect for any occasion, whether you’re hosting a tea party, celebrating a holiday, or simply enjoying a quiet moment with a cup of coffee. Here’s why you’ll fall in love with this recipe:

    • Easy to make: With simple ingredients and clear instructions, this recipe is accessible for bakers of all levels.
    • Irresistible flavor: The combination of buttery dough, fruity preserves, and spiced cinnamon-sugar is simply divine.
    • Versatile: You can easily adapt the filling to suit your preferences or what you have on hand.

    Ingredients

    • Salted butter
    • Block of cream cheese
    • Salt
    • Plain flour
    • Egg yolks
    • Vanilla extract
    • Caster sugar
    • Fruit preserves
    • Walnuts
    • Butter (for brushing)
    • Ground cinnamon

    Instructions

    1. Leave butter and cream cheese in a warm place for a couple of hours to soften. They have to be soft and cannot be used straight out of the fridge.
    2. Pre-heat oven to 180°C.
    3. Place softened butter in a large mixing bowl. Add a block of cream cheese. Use block cream cheese, not cream cheese in a tub.
    4. Set the beater to medium speed and beat the butter and cream cheese until combined and light and fluffy.
    5. Add 2 large egg yolks, 1 teaspoon of vanilla extract, 1/2 cup of caster sugar, a pinch of salt, and 2.5 cups of plain flour. Mix all the ingredients together in the mixer on medium speed until the dough comes together.
    6. While the dough is being mixed, chop 1/2 cup of walnuts into fine pieces and set aside.
    7. When the dough is ready, scatter some flour on the table or countertop. Knead the dough and gently form it into a large block. Add more flour if the dough is too sticky. The dough should be a nice elastic block.
    8. Cut the dough into 4 equal pieces. Set 3 pieces of dough aside, covering them with a slightly damp cloth to prevent them from drying out.
    9. Roll the 4th piece of dough into a ball. Using a floured rolling pin, roll out the ball of dough into a flat circle about 2 to 3 mm thick.
    10. Cut the rolled dough into 8 triangles.
    11. Prepare some fruit preserves. If the preserves are thick and difficult to spread, whisk them with a fork for a minute.
    12. Place one teaspoon of preserves on the long end of each triangular piece of dough. Lightly spread it towards the other end, keeping most of the preserves on the long end.
    13. Scatter some chopped walnuts on the preserves at the long end.
    14. To roll the rugelach, tuck in the sides of the triangle slightly to hold the preserves and nuts in. Roll towards the third corner of the triangle.
    15. Repeat for all the blocks of dough until the rugelach are prepared.
    16. Place all the prepared rugelach on a sheet of baking paper on a baking tray.
    17. Mix 1/4 cup of caster sugar and 1 teaspoon of ground cinnamon in a small bowl.
    18. Melt 50g of butter. Gently brush each rugelach with melted butter and sprinkle with the cinnamon-sugar mixture. You can also roll the rugelach in the mixture.
    19. Place the rugelach in the pre-heated oven and bake at 180°C for about 35 minutes or until they are a dark golden brown.
    20. Leave the rugelach to cool before storing them.

    Tips

    • Softening: Make sure the butter and cream cheese are softened before you start. This ensures a smooth, cohesive dough.
    • Rolling: Keep your rolling pin and surface lightly floured to prevent sticking.
    • Filling: Be generous with the preserves and walnuts for a more flavorful pastry.

    Variations & Substitutions

    Rugelach is wonderfully adaptable, so feel free to experiment with different flavors:

    • Preserves: Try raspberry, apricot, or fig preserves for a different twist.
    • Nuts: Substitute pecans or almonds for walnuts if you prefer.
    • Spices: Add a pinch of nutmeg or cardamom to the cinnamon-sugar mix for an extra layer of flavor.

    Storage

    Store your rugelach in an airtight container at room temperature for up to a week. For longer storage, place them in a freezer-safe bag and freeze for up to three months. Just thaw them at room temperature before serving.

    FAQ

    Can I prepare the dough in advance?

    Absolutely! You can prepare the dough up to two days in advance. Just wrap it tightly in plastic wrap and store it in the refrigerator. Let it come to room temperature before rolling it out.

    Is it possible to use low-fat cream cheese?

    While you can use low-fat cream cheese, the texture and flavor may not be as rich. For the best results, I recommend using full-fat block cream cheese.

    Nutrition

    Each rugelach contains approximately 150 calories, 10g of fat, 15g of carbohydrates, and 2g of protein. Keep in mind that these values can vary based on the specific ingredients and portion sizes you use.

    Final Thoughts

    Baking rugelach is a beautiful way to connect with tradition while creating new memories with loved ones. Whether you’re savoring them fresh from the oven or sharing them with friends over tea, these delightful pastries are sure to bring happiness and warmth to your table. I hope this recipe becomes a cherished part of your baking repertoire, just as it has been for me.

    Related update: Rugelach

    Related update: Almond Cookie Bar

  • Green Monster Ice Pops | Made by Meaghan Moineau

    Green Monster Ice Pops | Made by Meaghan Moineau

    Green Monster Ice Pops

    There’s something magical about the refreshing taste of a homemade ice pop on a warm summer day. Growing up, I fondly remember the excitement of racing to the freezer, eagerly anticipating the moment when the ice pops would be ready. Those childhood memories inspired this recipe for Green Monster Ice Pops—a healthy twist on a classic treat that the whole family can enjoy. Packed with wholesome ingredients, these ice pops are not only delicious but also nutrient-rich, perfect for a guilt-free indulgence.

    Why You’ll Love It

    These Green Monster Ice Pops are the perfect blend of creamy and refreshing. You’ll love them because:

    • They’re incredibly easy to make, requiring just a few simple steps.
    • The combination of avocado and banana provides a natural creaminess without the need for dairy.
    • They’re packed with nutrients from spinach and mango, making them a healthy snack option.
    • They’re naturally sweetened with banana and honey, with the option to add more sweetness if desired.
    • Kids love the fun green color and delicious taste!

    Ingredients

    • 1 cup unsweetened almond milk
    • 1 ripe avocado
    • 1 cup baby spinach
    • 1 ripe banana
    • 2 tablespoons honey
    • 1 cup fresh mango, chopped

    Instructions

    1. Place all ingredients into a blender and mix well until smooth.
    2. Taste the smoothie. If it’s not sweet enough, add 1 to 2 tablespoons of maple syrup or additional honey and blend again.
    3. Pour the smoothie mixture into ice pop molds.
    4. Insert a wooden popsicle stick into each mold, leaving about a quarter of the stick above the mold.
    5. Place the molds into the freezer for 2-3 hours until fully frozen.
    6. Once frozen, remove the ice pops from the molds and enjoy!

    Tips

    • Ensure the avocado is ripe to achieve the best creamy texture.
    • For easier removal, run the molds under warm water for a few seconds to loosen the ice pops.
    • Use silicone molds for easy removal and less mess.

    Variations & Substitutions

    One of the best things about this recipe is its versatility. Here are some ideas to mix it up:

    • Substitute the almond milk: Use coconut milk for a tropical twist or regular milk if you prefer dairy.
    • Add-ins: Try adding chia seeds or flaxseeds for an extra nutritional boost.
    • Fruit swaps: Swap mango for pineapple or berries for a different flavor profile.

    Storage

    Once the ice pops are fully frozen, you can store them in the molds or remove them and place them in a freezer-safe bag or container. They will keep well for up to 1 month in the freezer. Just be sure to keep them well-sealed to prevent freezer burn.

    FAQ

    Can I make these ice pops without a blender?

    While a blender is recommended for achieving a smooth consistency, you could use a food processor or mash the ingredients by hand. However, the texture might not be as creamy.

    Are these ice pops suitable for children?

    Absolutely! These ice pops are packed with fruits and spinach, making them a fun and healthy treat for kids. The sweet taste of banana and mango masks the spinach, so it’s a clever way to sneak in some greens.

    Can I use frozen fruits instead of fresh ones?

    Yes, frozen fruits can be used in place of fresh ones. Just ensure they’re fully thawed before blending to achieve a smooth mixture.

    Nutrition

    These Green Monster Ice Pops are not only delicious but also provide a good source of vitamins and minerals:

    • Avocado: Rich in healthy fats and fiber.
    • Spinach: A powerful source of iron, calcium, and vitamins A and C.
    • Mango: High in vitamin C and antioxidants.
    • Banana: Provides potassium and natural sweetness.

    Final Thoughts

    Green Monster Ice Pops are a delightful way to enjoy a healthy treat that’s both satisfying and nourishing. Whether you’re looking to cool down on a hot day or simply want a nutritious snack, these ice pops are a fantastic choice. Try them out, and don’t be afraid to experiment with different variations to find your perfect flavor combination. Enjoy the vibrant taste and the joy of a homemade treat that brings back those cherished childhood memories.

    Related update: Green Monster Ice Pops

    Related update: Ginger Snap and Pumpkin Ice Cream Sandwiches

  • Monte Cristo Egg Rolls | Made by Meaghan Moineau

    Monte Cristo Egg Rolls | Made by Meaghan Moineau

    Monte Cristo Egg Rolls

    Welcome to the delightful world of Monte Cristo Egg Rolls! This unique twist on the classic Monte Cristo sandwich brings together the savory goodness of deli meats and cheese, all wrapped up in a crispy, golden egg roll. Whether you’re a fan of fusion cuisine or just love a good finger food, this recipe is sure to become a favorite in your household.

    Why You’ll Love It

    Imagine biting into a warm, crispy egg roll only to be met with the delightful flavors of ham, turkey, and Swiss cheese melded together with a hint of strawberry sweetness. These Monte Cristo Egg Rolls are perfect for those who enjoy both savory and sweet flavors in one bite. They make for an excellent appetizer at parties, a fun twist for brunch, or a delicious snack to enjoy while watching your favorite movie.

    In addition, these egg rolls are easy to make and require minimal ingredients. You can prepare them ahead of time and fry them just before serving to impress your guests with your culinary creativity. Plus, each bite is a nostalgic reminder of the classic Monte Cristo sandwich, reinvented for modern taste buds.

    Ingredients

    • 1/2 lb black deli forest ham
    • 1/2 lb deli honey ham
    • 1/2 lb smoked deli turkey
    • 12 egg roll wraps
    • 1/2 cup strawberry jam
    • 1/2 lb deli baby Swiss cheese

    Instructions

    1. Chop the black deli forest ham, honey ham, smoked turkey, and baby Swiss cheese into small pieces and place them into a mixing bowl.
    2. Add the strawberry jam to the bowl and stir until the ingredients are well combined.
    3. Lay out one egg roll wrap with one corner facing you.
    4. Place about 2 tablespoons of the filling just above the bottom corner of the wrap.
    5. Fold the bottom corner up over the filling, then fold in each side of the egg roll wrap.
    6. Roll the wrap up toward the other corner, using a little water on your finger to seal the roll and corner together.
    7. Preheat a deep fryer to 320 degrees Fahrenheit.
    8. Deep fry the egg rolls for about 3 minutes or until they are crispy and golden brown.
    9. Serve warm as is or sprinkle with powdered sugar for an extra touch of sweetness.

    Tips

    To ensure your egg rolls come out perfectly every time, here are a few tips:

    • Don’t overfill the egg rolls, as this can cause them to burst while frying.
    • Seal the egg rolls tightly to prevent the filling from leaking out.
    • If you don’t have a deep fryer, you can use a pot with enough oil to submerge the egg rolls.
    • Try using a thermometer to ensure the oil is at the right temperature for frying.

    Variations & Substitutions

    Feel free to get creative with this recipe! Here are some variations and substitutions you can try:

    • Swap out the meats for your favorites, such as roasted chicken or roast beef.
    • Use apricot or raspberry jam instead of strawberry for a different flavor profile.
    • Add a teaspoon of Dijon mustard to the filling for a tangy kick.
    • For a vegetarian version, use roasted vegetables and a variety of cheeses.

    Storage

    If you have any leftover egg rolls, store them in an airtight container in the refrigerator for up to 3 days. To reheat, place them in an oven at 350 degrees Fahrenheit for about 10 minutes or until warm and crispy.

    FAQ

    Can I make these egg rolls ahead of time?

    Yes, you can prepare the egg rolls in advance and freeze them before frying. When you’re ready to serve, fry them directly from frozen, adding an extra minute or two to the frying time.

    What can I serve with Monte Cristo Egg Rolls?

    Monte Cristo Egg Rolls pair well with a side of fresh fruit or a simple green salad. You can also serve them with a variety of dipping sauces, such as honey mustard, raspberry sauce, or even maple syrup.

    Nutrition

    Each Monte Cristo Egg Roll contains approximately:

    • Calories: 200
    • Protein: 12g
    • Fat: 10g
    • Carbohydrates: 18g
    • Sugar: 5g
    • Sodium: 500mg

    Please note that these values are approximate and can vary based on the specific ingredients used.

    Final Thoughts

    Monte Cristo Egg Rolls offer a fun and delicious way to enjoy the classic flavors of a Monte Cristo sandwich in a convenient and crispy package. Whether you’re making them for a special occasion or just as a treat for yourself, these egg rolls are sure to delight your taste buds and bring a smile to your face. Give them a try and enjoy the perfect blend of savory and sweet in every bite!

    Related update: Monte Cristo Egg Rolls

    Related update: Roasted Endive Salad With Prosciutto, Figs and Pistachios

    Related update: Green Monster Ice Pops