Delightful Rugelach: A Comforting Classic
There’s something magical about the aroma of freshly baked rugelach wafting through the house. It takes me back to my grandmother’s cozy kitchen, where I first learned how to roll these delicate pastries. I remember the way she would hum softly, her hands expertly folding the dough around sweet preserves and crunchy walnuts. These moments, filled with warmth and love, are the essence of why I adore baking rugelach. Now, I’m excited to share this beloved recipe with you, hoping it brings the same joy and comfort to your home.
Why You’ll Love It
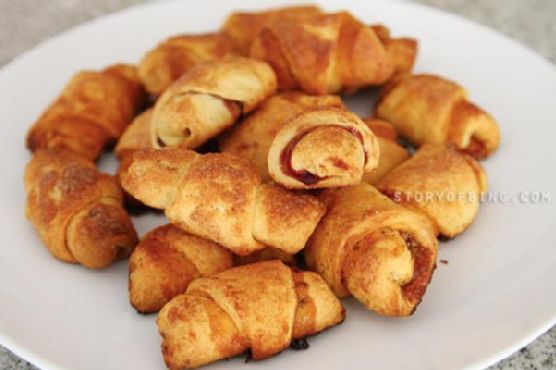
Rugelach is a delightful pastry that combines a tender, buttery dough with a sweet and nutty filling. It’s perfect for any occasion, whether you’re hosting a tea party, celebrating a holiday, or simply enjoying a quiet moment with a cup of coffee. Here’s why you’ll fall in love with this recipe:
- Easy to make: With simple ingredients and clear instructions, this recipe is accessible for bakers of all levels.
- Irresistible flavor: The combination of buttery dough, fruity preserves, and spiced cinnamon-sugar is simply divine.
- Versatile: You can easily adapt the filling to suit your preferences or what you have on hand.
Ingredients
- Salted butter
- Block of cream cheese
- Salt
- Plain flour
- Egg yolks
- Vanilla extract
- Caster sugar
- Fruit preserves
- Walnuts
- Butter (for brushing)
- Ground cinnamon
Instructions
- Leave butter and cream cheese in a warm place for a couple of hours to soften. They have to be soft and cannot be used straight out of the fridge.
- Pre-heat oven to 180°C.
- Place softened butter in a large mixing bowl. Add a block of cream cheese. Use block cream cheese, not cream cheese in a tub.
- Set the beater to medium speed and beat the butter and cream cheese until combined and light and fluffy.
- Add 2 large egg yolks, 1 teaspoon of vanilla extract, 1/2 cup of caster sugar, a pinch of salt, and 2.5 cups of plain flour. Mix all the ingredients together in the mixer on medium speed until the dough comes together.
- While the dough is being mixed, chop 1/2 cup of walnuts into fine pieces and set aside.
- When the dough is ready, scatter some flour on the table or countertop. Knead the dough and gently form it into a large block. Add more flour if the dough is too sticky. The dough should be a nice elastic block.
- Cut the dough into 4 equal pieces. Set 3 pieces of dough aside, covering them with a slightly damp cloth to prevent them from drying out.
- Roll the 4th piece of dough into a ball. Using a floured rolling pin, roll out the ball of dough into a flat circle about 2 to 3 mm thick.
- Cut the rolled dough into 8 triangles.
- Prepare some fruit preserves. If the preserves are thick and difficult to spread, whisk them with a fork for a minute.
- Place one teaspoon of preserves on the long end of each triangular piece of dough. Lightly spread it towards the other end, keeping most of the preserves on the long end.
- Scatter some chopped walnuts on the preserves at the long end.
- To roll the rugelach, tuck in the sides of the triangle slightly to hold the preserves and nuts in. Roll towards the third corner of the triangle.
- Repeat for all the blocks of dough until the rugelach are prepared.
- Place all the prepared rugelach on a sheet of baking paper on a baking tray.
- Mix 1/4 cup of caster sugar and 1 teaspoon of ground cinnamon in a small bowl.
- Melt 50g of butter. Gently brush each rugelach with melted butter and sprinkle with the cinnamon-sugar mixture. You can also roll the rugelach in the mixture.
- Place the rugelach in the pre-heated oven and bake at 180°C for about 35 minutes or until they are a dark golden brown.
- Leave the rugelach to cool before storing them.
Tips
- Softening: Make sure the butter and cream cheese are softened before you start. This ensures a smooth, cohesive dough.
- Rolling: Keep your rolling pin and surface lightly floured to prevent sticking.
- Filling: Be generous with the preserves and walnuts for a more flavorful pastry.
Variations & Substitutions
Rugelach is wonderfully adaptable, so feel free to experiment with different flavors:
- Preserves: Try raspberry, apricot, or fig preserves for a different twist.
- Nuts: Substitute pecans or almonds for walnuts if you prefer.
- Spices: Add a pinch of nutmeg or cardamom to the cinnamon-sugar mix for an extra layer of flavor.
Storage
Store your rugelach in an airtight container at room temperature for up to a week. For longer storage, place them in a freezer-safe bag and freeze for up to three months. Just thaw them at room temperature before serving.
FAQ
Can I prepare the dough in advance?
Absolutely! You can prepare the dough up to two days in advance. Just wrap it tightly in plastic wrap and store it in the refrigerator. Let it come to room temperature before rolling it out.
Is it possible to use low-fat cream cheese?
While you can use low-fat cream cheese, the texture and flavor may not be as rich. For the best results, I recommend using full-fat block cream cheese.
Nutrition
Each rugelach contains approximately 150 calories, 10g of fat, 15g of carbohydrates, and 2g of protein. Keep in mind that these values can vary based on the specific ingredients and portion sizes you use.
Final Thoughts
Baking rugelach is a beautiful way to connect with tradition while creating new memories with loved ones. Whether you’re savoring them fresh from the oven or sharing them with friends over tea, these delightful pastries are sure to bring happiness and warmth to your table. I hope this recipe becomes a cherished part of your baking repertoire, just as it has been for me.
Related update: Rugelach
Related update: Almond Cookie Bar