Category: Dinner

  • Strawberry Pretzel Salad | Made by Meaghan Moineau

    Strawberry Pretzel Salad | Made by Meaghan Moineau

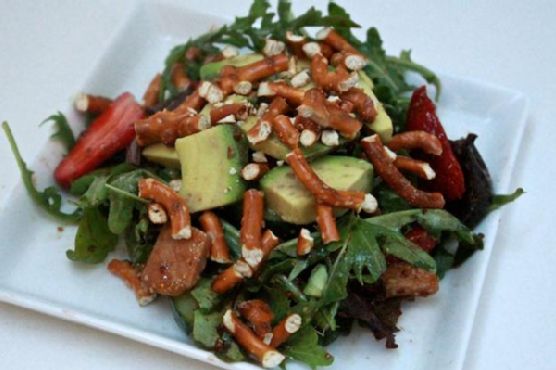
    Strawberry Pretzel Salad

    Welcome to a delightful world of flavors with our Strawberry Pretzel Salad—a refreshing and vibrant dish that combines sweet, salty, and savory in a way that is sure to become your new favorite. This salad is not only delicious but also brings a touch of nostalgia with every bite. Let me take you on a journey back to my childhood summers at my grandmother’s house, where I first tasted the magic of strawberries and pretzels together. I remember sitting on her porch, the sun warming my face, as I enjoyed this unique combination that seemed to capture the essence of summer. Now, I am thrilled to share this cherished recipe with you.

    Why You’ll Love It

    This Strawberry Pretzel Salad is a symphony of flavors and textures. Here are a few reasons why you’ll fall in love with it:

    • Sweet and Savory Balance: The sweetness of strawberries paired with the salty crunch of pretzels creates a perfect harmony.
    • Texture Delight: Crisp cucumbers, creamy avocado, and crunchy pretzels make every bite exciting.
    • Healthy and Nutritious: Packed with greens, healthy fats, and fresh ingredients, this salad is as wholesome as it is delicious.
    • Easy to Make: With simple steps and readily available ingredients, this salad comes together in no time.
    • Versatile: Perfect as a light lunch, a side dish, or a beautiful addition to your dinner table.

    Ingredients

    • 2 cups arugula
    • 1 avocado, sliced
    • 6 slices bacon
    • 2 tablespoons balsamic vinegar
    • 1 cucumber, sliced
    • 2 tablespoons flax seed oil
    • 4 cups mixed spring greens
    • 1 red bell pepper, sliced
    • 1 cup pretzels, crushed
    • Salt and pepper to taste
    • 1 cup strawberries, sliced
    • 1 tablespoon whole grain mustard

    Instructions

    1. Preheat your oven to 300°F (150°C).
    2. Arrange the bacon slices on a baking sheet lined with tin foil.
    3. Bake the bacon for 30 minutes, turning once halfway through. Set aside and let cool.
    4. In a small bowl, combine flax seed oil, balsamic vinegar, whole grain mustard, salt, and pepper. Mix well and set aside.
    5. In a large salad bowl, place strawberries, cucumber, mixed greens, arugula, and bacon. Toss lightly to combine.
    6. Add the prepared dressing to the salad and toss to coat evenly.
    7. Divide the salad among four plates and serve topped with sliced avocado and crushed pretzels.

    Tips

    • Choose Fresh Ingredients: For the best flavor, select ripe strawberries and fresh greens.
    • Prepare Ahead: You can pre-cook the bacon and mix the dressing ahead of time to save on prep work.
    • Serving Suggestion: Pair this salad with grilled chicken or fish for a more substantial meal.

    Variations & Substitutions

    Feel free to get creative with this recipe:

    • Nuts for Crunch: Substitute pretzels with toasted almonds or pecans for a different kind of crunch.
    • Vegan Option: Omit the bacon and add grilled tofu or chickpeas for protein.
    • Seasonal Fruits: Swap strawberries for other seasonal fruits like peaches or blueberries.

    Storage

    To store leftovers, keep the salad and dressing separate in airtight containers in the refrigerator. The salad can be stored for up to 2 days. Add the dressing and pretzels just before serving to maintain freshness and crunch.

    FAQ

    Can I make this salad ahead of time?

    Yes, you can prepare the components like the bacon and dressing in advance. However, for the freshest taste, it’s best to assemble the salad just before serving.

    What can I use instead of flax seed oil?

    If you don’t have flax seed oil, you can substitute it with extra virgin olive oil or avocado oil for a similar flavor profile.

    Nutrition

    This salad is a nutritious choice, offering a good balance of healthy fats, vitamins, and fiber. The combination of greens, avocado, and strawberries provides a wealth of nutrients, while the bacon and pretzels add protein and carbohydrates to keep you satisfied.

    Final Thoughts

    This Strawberry Pretzel Salad is more than just a dish; it’s a celebration of flavors and memories. Whether you’re serving it at a family gathering or enjoying it as a rewarding meal for yourself, it is sure to bring joy and satisfaction. I hope this recipe becomes a staple in your kitchen, as it has in mine. Enjoy the delightful crunch, the burst of fruity sweetness, and the comforting savory notes in every bite. Happy cooking!

    Related update: Strawberry Pretzel Salad

    Related update: Roasted Broccoli with Lemon and Garlic

    Related update: Chicken Liver Salad

  • Azteca Soup | Made by Meaghan Moineau

    Azteca Soup | Made by Meaghan Moineau

    Azteca Soup: A Warm Embrace of Flavor

    Why You’ll Love It

    Azteca Soup is not just a recipe; it’s a journey to the heart of Mesoamerican culinary tradition. This soup is a delightful fusion of fresh ingredients and bold flavors, perfect for warming up on a chilly day. I remember the first time I tasted this soup at a small family gathering. The aroma filled the room, and the vibrant colors of the ingredients were a feast for the eyes. My grandmother, with her apron slightly dusted with flour, ladled the soup into our bowls while sharing stories of her childhood in the bustling markets of Mexico City. The soup was a hit, and the warmth of that moment still lingers whenever I make it today.

    Ingredients

    • 2 tablespoons olive oil
    • 2 garlic cloves, minced
    • 1 onion, chopped
    • 1 jalapeño pepper, chopped
    • 2 celery stalks, chopped
    • 1 can (14 oz) canned tomatoes, with juice
    • 2 teaspoons chili powder
    • 1 teaspoon cumin
    • 1 cup fresh corn, cut from the cob
    • 1 handful fresh basil, cut into ribbons
    • 4 cups vegetable stock
    • 2 tablespoons lime juice
    • 1 avocado, diced
    • 1 cup nacho chips
    • 1/2 cup sour cream
    • Fresh basil shreds for garnish

    Instructions

    1. In a medium saucepan, heat the olive oil over medium heat. Add the garlic, onions, jalapeño pepper, and celery. Sauté for about 5 minutes until the onions become translucent.
    2. Add the canned tomatoes, chili powder, and cumin. Cook down over medium heat for about 10 minutes, stirring often to prevent sticking.
    3. Stir in the fresh corn, basil ribbons, reserved tomato juice, and vegetable stock. Bring the mixture to a boil, then reduce the heat and let it simmer for 15 minutes.
    4. When ready to serve, remove the soup from heat and stir in the lime juice and diced avocado.
    5. To serve, break several nacho chips into each bowl, ladle in the soup, then top each with a spoonful of sour cream. Garnish with a few fresh basil shreds and a whole nacho chip on top.

    Serve hot, and enjoy as a complete lunch or a substantial first course. This recipe serves 6 people.

    Tips

    For the best flavor, use fresh, ripe avocados and sweet corn. If you prefer a spicier soup, leave the seeds in the jalapeño pepper. Make sure to stir the soup frequently to prevent the ingredients from sticking to the bottom of the pot.

    Variations & Substitutions

    If you’re looking to add some protein, consider adding grilled chicken or shrimp. For a vegetarian version, you can substitute the sour cream with a vegan alternative. Feel free to experiment with different herbs like cilantro for a unique twist on the flavor profile.

    Storage

    Azteca Soup can be stored in an airtight container in the refrigerator for up to 3 days. To reheat, simply warm it on the stove over medium heat, stirring occasionally. The soup may thicken as it cools, so you might need to add a splash of vegetable stock when reheating.

    FAQ

    Can I use canned corn instead of fresh corn?

    Yes, canned corn can be used as a substitute for fresh corn. Just be sure to drain and rinse it before adding it to the soup.

    What can I use instead of jalapeño pepper?

    If you prefer a milder soup, you can substitute the jalapeño with a green bell pepper, or add a pinch of smoked paprika for a different kind of warmth without the heat.

    Nutrition

    This soup is a low-calorie, nutrient-rich option. It’s packed with vitamins from the fresh vegetables and offers heart-healthy fats from the avocado. Ideal for those seeking a wholesome meal without the extra calories.

    Final Thoughts

    Azteca Soup is more than just a dish; it’s an experience that brings people together. Whether you’re enjoying it with family around the dinner table or serving it at a gathering, this soup is sure to bring warmth and joy to your meal. With its vibrant flavors and comforting aroma, Azteca Soup is a testament to the rich culinary traditions that have been passed down through generations. I hope you enjoy making and sharing this recipe as much as I have. Bon appétit!

    Related update: Azteca Soup

    Related update: Mixed Paella

  • Beef Cottage Pie | Made by Meaghan Moineau

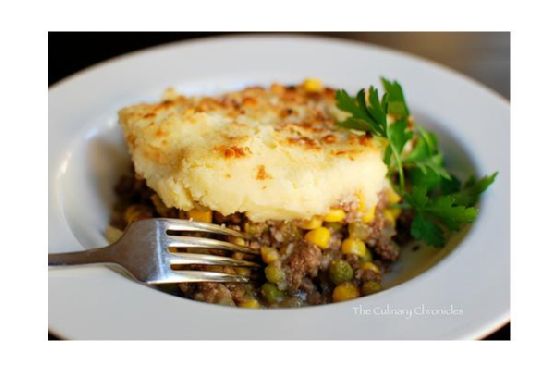
    Beef Cottage Pie | Made by Meaghan Moineau

    Beef Cottage Pie: A Comforting Classic

    Why You’ll Love It

    There’s something heartwarming about digging into a Beef Cottage Pie. It’s a dish that wraps you in warmth, much like a cozy blanket on a chilly evening. Growing up, the aroma of this pie baking in the oven meant family time was near. My grandmother, with her loving hands, would prepare it for our Sunday dinners. The rich flavors of beef, vegetables, and creamy mashed potatoes create a harmony that’s simply irresistible. Whether you’re making it for a family gathering or a comforting solo dinner, this dish promises to deliver satisfaction with every bite.

    Ingredients

    • 1 lb lean ground beef
    • 1 cup yellow diced onions
    • 1/2 cup diced celery
    • 3 cloves garlic, minced
    • 2 teaspoons fresh thyme, chopped
    • 2 tablespoons Worcestershire sauce
    • 2 tablespoons vegetable oil
    • 1 cup frozen vegetables (peas, carrots, corn mix)
    • 1 cup beef gravy
    • 4 cups mashed potatoes
    • 1/4 cup parmesan cheese, grated
    • Salt and pepper to taste

    Instructions

    1. Preheat your oven to 375 degrees Fahrenheit.
    2. In a large skillet, heat the vegetable oil over medium heat. Add the onions, celery, and garlic, and cook until they are translucent but not browned, approximately 5-6 minutes. Remove the mixture to a clean dish.
    3. In the same skillet, add the ground beef. Cook until browned, breaking up any large pieces. Using a large spoon, discard any excess fat/grease.
    4. Add the onions, celery, and garlic mixture back to the skillet and stir well. Add the Worcestershire sauce and thyme, and cook for an additional minute.
    5. Mix in the frozen vegetables and gravy. Cook for an additional 2-3 minutes. Season with salt and pepper to taste.
    6. Coat a large casserole dish with cooking spray. Pour the ground beef and vegetable mixture into the dish and spread evenly.
    7. Spoon the mashed potatoes on top of the beef mixture and carefully spread to create an even layer.
    8. Sprinkle parmesan cheese over the top and place the dish in the preheated oven. Bake for 25-30 minutes.
    9. Turn the oven broiler on and brown the top of the cottage pie until it turns an even golden brown color.
    10. Remove from the oven and let the pie set for 5-10 minutes before serving. Enjoy!

    Tips

    For the best results, use freshly mashed potatoes, which are easier to spread and maintain their creamy texture. If you’re short on time, high-quality store-bought mashed potatoes can work in a pinch. Also, for a deeper flavor, consider using a mix of ground beef and ground lamb.

    Variations & Substitutions

    Feel free to get creative with your Beef Cottage Pie. Swap out the ground beef for turkey or chicken if you prefer a lighter version. Vegetarians can use lentils or a plant-based meat substitute. You can also add different herbs like rosemary or basil for a unique twist. For a cheesy delight, mix some cheddar into the mashed potatoes before spreading them over the beef mixture.

    Storage

    Leftovers can be stored in an airtight container in the refrigerator for up to 3 days. For longer storage, freeze individual portions for up to 2 months. Reheat in the oven at 350 degrees Fahrenheit until warmed through.

    FAQ

    Can I make Beef Cottage Pie in advance?

    Absolutely! You can prepare the pie up to the point of baking, cover it tightly, and refrigerate for up to 24 hours. When you’re ready to serve, simply bake it as directed, adding a few extra minutes to the baking time if it’s still cold from the fridge.

    What side dishes go well with Beef Cottage Pie?

    While this dish is a meal on its own, it pairs beautifully with a fresh green salad or steamed vegetables like broccoli or green beans. For a heartier option, serve it alongside a crusty loaf of bread.

    Can I use sweet potatoes instead of regular potatoes?

    Yes, using sweet potatoes can add a delightful sweetness that complements the savory filling. Just prepare them as you would regular mashed potatoes and proceed with the recipe.

    Nutrition

    This Beef Cottage Pie is packed with protein and essential nutrients. Lean ground beef provides iron and B vitamins, while the vegetables add fiber and vitamins. Opting for low-sodium gravy and controlling cheese portions can make it a healthier option without sacrificing flavor.

    Final Thoughts

    Beef Cottage Pie is more than just a meal; it’s a celebration of comfort and tradition. Whether you’re indulging in it for a special occasion or a simple weeknight dinner, it brings a touch of warmth and nostalgia to the table. I hope this recipe becomes a beloved staple in your home, just as it has in mine. Happy cooking!

    Related update: Beef Cottage Pie

  • Vegetable Cheddar Quiche | Made by Meaghan Moineau

    Vegetable Cheddar Quiche | Made by Meaghan Moineau

    Vegetable Cheddar Quiche: A Comforting Classic

    There’s something magical about the aroma of a freshly baked quiche wafting through the house. Growing up, my grandmother’s kitchen was always filled with the comforting scent of baking, and her vegetable cheddar quiche was a family favorite. I remember sitting at her kitchen table, eagerly waiting for the quiche to cool just enough to savor that first warm, cheesy bite. Today, I’m sharing her recipe with you, hoping it brings the same warmth and joy to your home.

    Why You’ll Love It

    This vegetable cheddar quiche is perfect for any meal of the day. Whether you’re enjoying it as a savory breakfast, a light lunch, or a satisfying dinner, it’s a versatile dish that’s packed with flavor and nutrition. Here’s why you’ll fall in love with this recipe:

    • Simple Ingredients: Made with everyday ingredients you likely have on hand.
    • Customizable: Easily adapt the recipe to suit your taste preferences or dietary needs.
    • Deliciously Comforting: Rich, cheesy, and full of hearty vegetables.
    • Perfect for Leftovers: Enjoy warm or cold, making it ideal for meal prep.

    Ingredients

    • 1 refrigerated pie crust
    • 1 tablespoon olive oil
    • 1 cup broccoli florets, chopped
    • 1 cup fresh mushrooms, sliced
    • 1 cup fresh spinach, chopped
    • 1 medium onion, diced
    • 2 cloves garlic, minced
    • 1/2 teaspoon salt
    • 1/4 teaspoon pepper
    • 1/4 teaspoon cayenne pepper
    • 3 large eggs
    • 1/2 cup mayonnaise
    • 1/2 cup milk
    • 1 cup shredded sharp cheddar cheese
    • 3 tablespoons grated parmesan cheese
    • Fresh cilantro for garnish

    Instructions

    1. Preheat your oven to 375°F (190°C).
    2. Unroll the refrigerated pie crust and place it into a pie plate. Crimp the edges and set aside.
    3. In a frying pan, heat olive oil over medium heat. Add broccoli, mushrooms, spinach, onion, and garlic. Cook for about 5 minutes until the vegetables are tender, stirring occasionally. Season with salt, pepper, and cayenne pepper while cooking.
    4. Once vegetables are tender, remove the pan from the heat and set aside to cool.
    5. In a large bowl, beat the eggs, mayonnaise, and milk with a whisk until smooth and well-blended.
    6. Add the cooled vegetable mixture to the egg mixture, stirring until combined. Mix in the shredded cheddar cheese.
    7. Pour the mixture into the prepared pie crust. Sprinkle the top with the grated parmesan cheese.
    8. Bake in the preheated oven for 40-45 minutes, or until the center of the quiche is set and the top is golden brown.
    9. Let the quiche stand for 10 minutes before slicing. Garnish with fresh cilantro before serving.

    Tips

    • For a crispier crust, pre-bake the pie crust for 5-7 minutes before adding the filling.
    • Ensure your vegetables are well-drained to prevent the quiche from becoming soggy.
    • Use a sharp cheddar for a more pronounced cheesy flavor.

    Variations & Substitutions

    This quiche is wonderfully adaptable. Here are some ideas to make it your own:

    • Cheese: Try swapping cheddar for Swiss or Gruyère for a different flavor profile.
    • Vegetables: Substitute or add vegetables like bell peppers, zucchini, or asparagus.
    • Spices: Add herbs like thyme, basil, or chives for extra aromatic notes.
    • Crust: Make it crustless for a low-carb option by skipping the pie crust and pouring the egg mixture directly into a greased pie plate.

    Storage

    Once cooled, store any leftover quiche in an airtight container in the refrigerator for up to 3 days. Reheat slices in the oven at 350°F (175°C) for about 10 minutes or enjoy cold straight from the fridge.

    FAQ

    Can I freeze this quiche?

    Yes, you can freeze the baked quiche. Allow it to cool completely, then wrap it tightly in plastic wrap and aluminum foil before placing it in the freezer. It can be stored for up to 2 months. Thaw overnight in the refrigerator before reheating in the oven.

    Can I make this quiche without mayonnaise?

    Absolutely! If you prefer not to use mayonnaise, substitute with an equal amount of sour cream or Greek yogurt for a similar creamy texture.

    How can I make this quiche dairy-free?

    For a dairy-free version, use a dairy-free milk alternative such as almond milk and a plant-based cheese substitute. Ensure your pie crust is also dairy-free if you’re not making it from scratch.

    Nutrition

    This quiche is not only delicious but also a nutritious choice. Packed with vegetables, it provides a good source of vitamins and minerals. The eggs and cheese offer a boost of protein, making it a satisfying meal option.

    Final Thoughts

    This vegetable cheddar quiche is more than just a meal; it’s a slice of nostalgia and comfort. Whether you’re sharing it with family or savoring it solo, each bite is a reminder of simpler times and the joy of homemade cooking. I hope this recipe becomes a beloved part of your family’s culinary tradition, just as it is in mine. Enjoy your quiche-making journey!

    Related update: Vegetable Cheddar Quiche

    Related update: Rich Jelly Scones

    Related update: Beef Cottage Pie

  • How Sweet It Is Sweet Potato Lasagne | Made by Meaghan Moineau

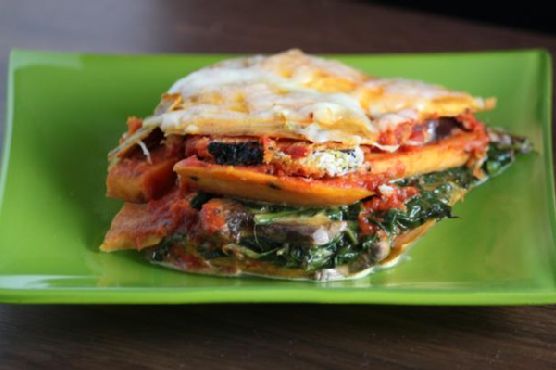
    How Sweet It Is Sweet Potato Lasagne | Made by Meaghan Moineau

    How Sweet It Is Sweet Potato Lasagne

    There’s something truly magical about the combination of sweet and savory, and this Sweet Potato Lasagne is a delightful testament to that. This dish takes me back to chilly autumn evenings spent in my grandmother’s kitchen, where the warmth of the oven and the rich aroma of spices filled the air. It’s a comforting, hearty meal that brings people together, just like those cherished family dinners of my childhood.

    Why You’ll Love It

    This Sweet Potato Lasagne is not just another lasagne; it’s a celebration of flavors and textures. The sweetness of the potatoes perfectly balances with the savory notes of the mushrooms and spinach. The hint of curry powder adds a unique twist, making this dish an exciting adventure for your taste buds. It’s a fantastic vegetarian option that’s both satisfying and nutritious, making it a perfect choice for family dinners or potlucks.

    Ingredients

    • Baby portabella mushrooms
    • Dry curry powder
    • Dried basil leaves
    • Eggplants
    • Frozen spinach
    • Heavy cream
    • Monterey Jack & cheddar cheese mix
    • Jalapenos
    • Marinara sauce
    • Salt & pepper
    • Sweet potatoes
    • Vegetable cooking oil

    Instructions

    1. Slice the sweet potatoes into 1/4 inch thick slices. Boil them until semi-cooked, which should take about 10 minutes.
    2. Mix dry curry powder with olive oil (1 cup) and rub this mixture over the sweet potato slices. Set aside and let marinate for at least 10 minutes.
    3. Slice eggplants into 1/4 inch thick slices and rub all over with an olive oil (1 cup), dried basil, salt, and pepper mix. Set aside and let marinate for at least 15 minutes.
    4. In a pan, pour canola or vegetable cooking oil and sauté spinach and mushrooms for about 3-5 minutes. Add jalapenos and salt & pepper to taste.
    5. Reduce the heat and add heavy cream and about half of the Monterey Jack & cheddar cheese mix until the mixture is creamy but not watery.
    6. Start layering the lasagne in the following order: sweet potatoes, spinach/mushroom mix, eggplants, marinara sauce, sweet potatoes, spinach/mushroom mix, eggplants.
    7. Finally, sprinkle the remaining Monterey Jack & cheddar cheese blend on top.
    8. Bake at 350-375°F for about 35-45 minutes, depending on your oven. You’ll know it’s ready when you can easily pass a fork through all the layers.
    9. Devour with passion!

    Tips

    To ensure the sweet potato slices cook evenly, cut them as uniformly as possible. If you prefer a spicier kick, feel free to add more jalapenos or even a sprinkle of red pepper flakes. Allow the lasagne to cool slightly before serving; this will make it easier to cut and serve intact slices.

    Variations & Substitutions

    If you’re a fan of heat, consider adding some crushed red pepper flakes to the marinara sauce. For a vegan version, substitute the heavy cream with coconut cream and use a dairy-free cheese alternative. If eggplants aren’t your favorite, zucchini makes a great substitute in this recipe.

    Storage

    This Sweet Potato Lasagne stores beautifully. Place any leftovers in an airtight container and refrigerate for up to 3 days. You can also freeze portions for up to 2 months. To reheat, simply thaw overnight in the fridge and bake at 350°F until heated through.

    FAQ

    Can I make this lasagne ahead of time?

    Absolutely! You can prepare the lasagne a day in advance. Just assemble it, cover it tightly, and refrigerate. When you’re ready to enjoy, bake it as instructed.

    What can I serve with Sweet Potato Lasagne?

    This dish pairs wonderfully with a fresh green salad or some crusty garlic bread. A glass of red wine would complement the flavors beautifully as well.

    Nutrition

    While the exact nutritional values will depend on the specific brands and quantities of ingredients used, this Sweet Potato Lasagne is a good source of vitamins A and C from the sweet potatoes, iron from the spinach, and calcium from the cheese.

    Final Thoughts

    Whether you’re looking to try something new or searching for a tasty vegetarian dish, this Sweet Potato Lasagne is a must-try. It’s a dish that embodies warmth, love, and nostalgia, much like the family gatherings it reminds me of. I hope it brings as much joy to your table as it does to mine. Happy cooking!

    Related update: How Sweet It Is Sweet Potato Lasagne

  • Classic Greek Moussaka | Made by Meaghan Moineau

    Classic Greek Moussaka

    There’s something inherently comforting about a dish that has been passed down through generations, and Classic Greek Moussaka is no exception. I still remember the first time I tasted my grandmother’s moussaka as a child during a family reunion in her sunlit kitchen overlooking the Aegean Sea. The aroma of cinnamon and nutmeg filled the room, and the flavors were like nothing I had experienced before. Now, every time I prepare this dish, it brings back those cherished memories, and I’m delighted to share this recipe with you.

    Why You’ll Love It

    This Classic Greek Moussaka is a hearty and satisfying meal that combines layers of savory eggplants, rich meat sauce, and creamy béchamel topping. It’s perfect for family gatherings or a special dinner. The combination of flavors and textures will transport you to a sun-drenched Greek island, even if just for a meal. Whether you’re a fan of Greek cuisine or trying it for the first time, this dish is sure to become a beloved favorite.

    Ingredients

    • Eggplants
    • Sea salt
    • Olive oil
    • Onions
    • Lean beef
    • Canned tomatoes
    • Garlic
    • Ground cinnamon
    • Ground allspice
    • White salt and ground pepper
    • Tomato paste
    • Butter
    • Flour
    • Warm milk
    • Ground nutmeg
    • Egg yolks
    • Feta cheese
    • Bread crumbs

    Instructions

    1. Sprinkle the eggplant slices with sea salt and let them stand for 45 minutes to draw out the bitterness. Then rinse thoroughly to remove excess salt.
    2. Thinly brush each slice with olive oil and bake in a preheated grill pan for several minutes on each side. Set aside. Repeat until all slices are grilled.
    3. For the meat sauce, lightly sauté the onions in olive oil until tender. Add the ground beef and sauté, stirring frequently to break up the clumps of meat, until the meat is no longer pink.
    4. Stir in canned tomatoes, garlic, cinnamon, allspice, salt, and pepper and simmer briefly on low heat. Add in tomato paste and a little water if the sauce is too thick. Remove from heat and set aside.
    5. For the béchamel sauce, add flour to the melted butter, stirring constantly. When the mixture is evenly thick, gradually whisk in warm milk. Gently bring to a boil, then remove from heat, season with pepper and nutmeg. Whisk in the egg yolks vigorously. Set aside.
    6. Thinly coat with olive oil a suitable ovenproof baking dish, sprinkle the bottom with homemade bread crumbs. Place a layer of eggplant, cover with some meat sauce and feta cheese, and repeat this until the pan is almost full. Finish with a layer of feta cheese.
    7. Top with béchamel sauce. Cover with tin foil and bake in a preheated oven at 180°C for 1 hour.
    8. Remove moussaka from the oven and let it set at room temperature for 45 minutes before serving.

    Tips

    To achieve the perfect moussaka, make sure to let the eggplant slices sit with salt for the full 45 minutes to remove any bitterness. When preparing the béchamel sauce, stir continuously to avoid lumps and ensure a smooth consistency. Lastly, giving the moussaka time to set before serving helps the layers hold together better when sliced.

    Variations & Substitutions

    If you prefer a vegetarian version, you can replace the ground beef with lentils or a plant-based meat substitute. For a slightly different flavor profile, try using ground lamb instead of beef. You can also experiment with different cheeses, such as Parmesan or Ricotta, to suit your taste preferences.

    Storage

    Leftover moussaka can be stored in an airtight container in the refrigerator for up to three days. For longer storage, freeze individual portions in airtight containers for up to three months. To reheat, thaw overnight in the refrigerator and bake in a preheated oven at 175°C until heated through.

    FAQ

    Can I prepare Moussaka ahead of time?

    Yes, you can assemble the moussaka a day in advance and store it in the refrigerator. When ready to bake, allow it to come to room temperature before placing it in the oven.

    What should I serve with Moussaka?

    Moussaka pairs beautifully with a fresh Greek salad and some crusty bread. A glass of red wine complements the flavors wonderfully.

    Nutrition

    Moussaka is a rich and hearty dish, so it is best enjoyed as an occasional treat. It provides a good source of protein from the beef and egg yolks, as well as essential vitamins and minerals from the eggplants and tomatoes. For a lighter option, consider serving with a side of steamed vegetables.

    Final Thoughts

    Classic Greek Moussaka is more than just a dish; it’s a culinary journey that tells a story with every bite. Whether you’re sharing it with family or savoring it on a quiet evening at home, its warmth and richness are sure to bring comfort and joy. I hope this recipe becomes as beloved in your home as it is in mine. Happy cooking!

    Related update: Classic Greek Moussaka

    Related update: How Sweet It Is Sweet Potato Lasagne

  • Sauteed Chicken With Mushrooms and Cream | Made by Meaghan Moineau

    Sauteed Chicken With Mushrooms and Cream | Made by Meaghan Moineau

    Sauteed Chicken With Mushrooms and Cream

    Welcome to a dish that brings warmth and comfort to your table, Sauteed Chicken With Mushrooms and Cream. This recipe has been a beloved staple in my family for generations, often gracing our tables during special gatherings and Sunday dinners. I fondly remember my grandmother preparing this dish with such love and care, her kitchen filled with the rich aroma of sautéed mushrooms and creamy sauce. Today, I share this cherished recipe with you, hoping it brings as much joy to your family as it has to mine.

    Why You’ll Love It

    This Sauteed Chicken With Mushrooms and Cream is a culinary delight that you’ll find yourself returning to again and again. Here’s why:

    • Rich and Flavorful: The combination of tender chicken, earthy mushrooms, and a creamy wine sauce creates a depth of flavor that’s simply irresistible.
    • Easy to Prepare: Despite its gourmet taste, this dish is straightforward to make, requiring just a few steps to bring it all together.
    • Perfect for Any Occasion: Whether it’s a weeknight dinner or a special occasion, this dish fits the bill, impressing family and friends alike.

    Ingredients

    • Frying chicken parts
    • Mushrooms
    • Butter
    • Olive oil
    • Salt
    • Black fresh ground pepper
    • Dry white wine
    • Heavy cream

    Instructions

    1. Rinse the chicken in cool water, then pat dry with clean paper towels.
    2. Set a heavy-bottomed frying pan over moderately-high heat. Add 2 tablespoons of butter and 1 tablespoon of olive oil to the pan.
    3. When very hot (but not smoking), place the chicken pieces skin-side down and season with salt and pepper.
    4. Saute for 5-6 minutes, basting with the juices and fat, until the underside is browned. Turn pieces over, season again with salt and pepper, and saute the same way for an additional 5-6 minutes, or until juices run clear.
    5. While the chicken is cooking, in a separate pan, saute the mushrooms in 1 tablespoon of butter. Remove to a plate when finished browning.
    6. When chicken is finished cooking, remove to a warm plate.
    7. Rapidly spoon all but a tablespoon of fat out of the pan. Add 1/2 cup of wine to deglaze the pan, scraping the sides and bottom to incorporate all the seasoning into the liquid. Deglaze until the alcohol has burned off.
    8. Add cream and mushrooms to the deglazing sauce and incorporate; boil down rapidly for a minute or two, or until the sauce starts to thicken.
    9. Add the chicken and baste with the sauce and mushrooms. Cover and simmer 2-3 minutes to bring the chicken back up to a hot temperature. Season again if necessary with salt and pepper.

    Tips

    • Use Fresh Ingredients: Fresh mushrooms and quality chicken make a significant difference in flavor.
    • Patience is Key: Allow the sauce to thicken naturally by simmering, enhancing its richness.
    • Season to Taste: Remember to taste the sauce before serving and adjust the seasoning as needed.

    Variations & Substitutions

    This recipe is versatile and can be adapted to suit your preferences:

    • Swap the Mushrooms: Try using a mix of mushrooms like cremini, shiitake, or portobello for added texture and flavor.
    • Wine Alternatives: If you prefer not to use wine, chicken broth makes a good substitute, though you might lose some of the depth that wine provides.
    • Herb Additions: Adding herbs like thyme or rosemary can enhance the dish’s aromatic profile.

    Storage

    Store any leftovers in an airtight container in the refrigerator for up to 3 days. To reheat, gently warm the chicken and sauce in a pan over low heat, adding a splash of cream if the sauce has thickened too much.

    FAQ

    Can I use chicken breasts instead of parts?

    Yes, boneless chicken breasts can be used. Adjust the cooking time accordingly to ensure they don’t dry out. Chicken thighs are also a great option for added juiciness.

    What is the best type of white wine to use?

    A dry white wine, such as Sauvignon Blanc or Chardonnay, works best for deglazing and complements the creamy sauce beautifully.

    Can I make this dish dairy-free?

    For a dairy-free version, substitute the butter with olive oil and use coconut cream in place of heavy cream. Note that the flavor will change slightly, but it will still be delicious.

    Nutrition

    This dish, rich in protein and healthy fats, can be part of a balanced meal. However, due to the cream and butter, it’s higher in calories and fat. Adjust portion sizes or pair with a light side salad to balance your meal.

    Final Thoughts

    Sauteed Chicken With Mushrooms and Cream is more than just a meal; it’s a comforting embrace on a plate, carrying with it the essence of family gatherings and cherished memories. Whether you’re recreating a nostalgic dish or trying it for the first time, I hope this recipe finds a special place in your heart and home. Enjoy every bite!

    Related update: Sauteed Chicken With Mushrooms and Cream

    Related update: Classic Greek Moussaka

  • Lentil Salad With Vegetables | Made by Meaghan Moineau

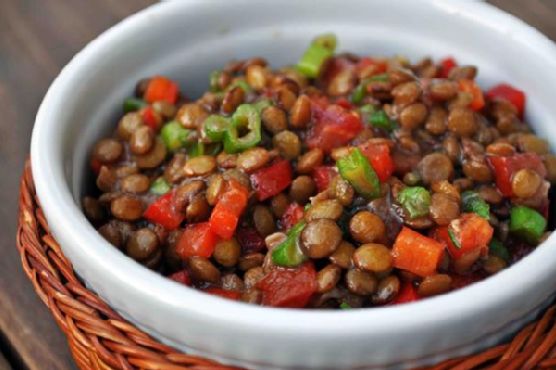
    Lentil Salad With Vegetables | Made by Meaghan Moineau

    Lentil Salad With Vegetables

    Welcome to our kitchen! Today, we’re diving into a dish that not only satisfies the taste buds but also brings a delightful burst of nutrition to your table. Lentil Salad with Vegetables is a recipe that has been passed down in our family for generations, and I’m thrilled to share it with you today. I still remember the warm summer evenings spent at my grandmother’s house, where this salad was a staple. The vibrant colors and fresh flavors were always a highlight of our meals, and now I hope it becomes a cherished part of your family dinners too.

    Why You’ll Love It

    This Lentil Salad with Vegetables is a delightful medley of flavors and textures that will elevate any meal. Whether you’re looking for a refreshing side dish, a nutritious lunch, or a light dinner, this salad fits the bill. Here’s why you’ll fall in love with this recipe:

    • Nutritious: Packed with protein-rich lentils and a variety of vegetables, this salad is a nutrient powerhouse.
    • Flavorful: The combination of balsamic and red wine vinegar gives a tangy kick, while rosemary adds a fragrant touch.
    • Versatile: Perfect for summer picnics, potlucks, or a cozy dinner at home.
    • Easy to Make: With simple ingredients and straightforward steps, this salad is quick to prepare.

    Ingredients

    • 2 tablespoons balsamic vinegar
    • 3 tablespoons extra virgin olive oil
    • 2 green onions, chopped
    • 1 cup lentils
    • 1 bell pepper, diced
    • 1 red bell pepper, diced
    • 1 tablespoon red wine vinegar
    • 1 teaspoon fresh rosemary, chopped
    • Salt, to taste
    • 2 tomatoes, diced
    • 1 white onion, diced

    Instructions

    1. Heat the extra virgin olive oil in a saucepan over medium-high heat and add the diced white onion.
    2. Cook the onion until just translucent, stirring occasionally to ensure even cooking.
    3. Add the lentils to the saucepan and pour in enough water to cover them. Cook according to the package directions until tender.
    4. Once cooked, drain the lentils and let them cool to room temperature.
    5. In a large mixing bowl, combine the cooled lentils with the diced tomatoes, bell peppers, and green onions.
    6. Add the chopped rosemary, balsamic vinegar, and red wine vinegar to the vegetable mixture.
    7. Season with salt to taste. You can also add more olive oil or vinegar according to your preference.
    8. Toss everything together until well combined.
    9. Serve the salad cold or at room temperature, and enjoy!

    Tips

    To make the most out of your Lentil Salad with Vegetables, here are some tips to keep in mind:

    • Choose Fresh Ingredients: Fresh vegetables make a big difference in flavor and texture.
    • Cook Lentils Properly: Ensure the lentils are cooked just right – they should be tender but not mushy.
    • Adjust Seasoning: Feel free to adjust the amount of vinegar and olive oil based on your taste preferences.

    Variations & Substitutions

    This salad is incredibly adaptable. Here are a few variations and substitutions you might consider:

    • Add Cheese: Crumble some feta or goat cheese on top for added creaminess.
    • Include Nuts: Toss in some toasted walnuts or almonds for extra crunch.
    • Use Different Vinegars: Try apple cider vinegar or white wine vinegar for a different flavor profile.
    • Herbs: Swap rosemary with thyme or parsley for a different herbal touch.

    Storage

    This salad can be stored in an airtight container in the refrigerator for up to 3 days. It’s a great make-ahead dish for busy weeks, and the flavors only deepen over time. Just give it a good toss before serving to redistribute the dressing.

    FAQ

    Can I use canned lentils for this recipe?

    Yes, you can use canned lentils to save time. Just make sure to rinse and drain them well before adding them to the salad.

    Is this salad vegan?

    Yes, this Lentil Salad with Vegetables is completely vegan, making it a great option for those following a plant-based diet.

    What can I serve with this salad?

    This salad pairs well with grilled chicken, fish, or tofu. It also makes a great accompaniment to hearty soups or stews.

    Nutrition

    This salad is not only delicious but also nutritious. Packed with protein, fiber, and vitamins, it’s a wholesome addition to any meal. Lentils are an excellent source of plant-based protein, while the assortment of vegetables provides a rainbow of nutrients.

    Final Thoughts

    I hope this Lentil Salad with Vegetables becomes as beloved in your home as it is in ours. It’s a simple yet flavorful dish that brings people together around the table. Whether you’re enjoying it as a light lunch or serving it as a side at a family gathering, it’s sure to bring smiles and satisfaction. Don’t forget to share your own twists and experiences with this recipe in the comments below. Happy cooking!

    Related update: Lentil Salad With Vegetables

    Related update: Pennsylvania Dutch Pickled Eggs

    Related update: Strawberry Pretzel Salad

  • Steak with lemon and capers | Made by Meaghan Moineau

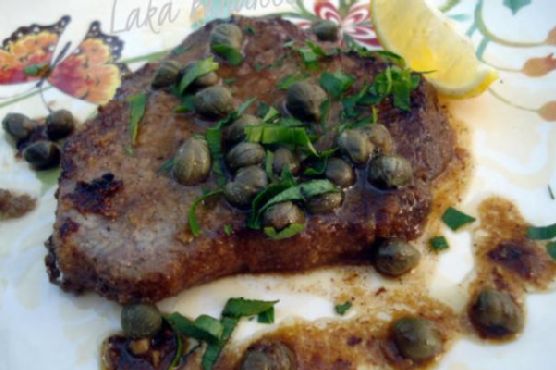
    Steak with lemon and capers | Made by Meaghan Moineau

    Steak with Lemon and Capers

    There’s something truly magical about the aroma of sizzling steak mingling with the zesty freshness of lemon and the briny pop of capers. This recipe for Steak with Lemon and Capers not only delivers a mouthwatering dining experience but also carries with it a memory of warm family gatherings, where laughter and delicious food went hand in hand.

    Why You’ll Love It

    Imagine a tender, juicy steak infused with the tang of lemon and the unique flavor of capers. This recipe is a delightful blend of simplicity and sophistication. You’ll love how quickly it comes together, making it perfect for both weekday dinners and special occasions. The ingredients are straightforward, yet they combine to create a dish that feels both luxurious and comforting. Plus, the sauce is absolutely divine when drizzled over the steak—or anything else on your plate!

    Ingredients

    • Beef steak
    • Butter
    • Capers
    • Dry white wine
    • Flour
    • Garlic
    • Black ground pepper
    • Lemon juice
    • Lemon wedges
    • Olive oil
    • Parsley
    • Salt

    Instructions

    1. Flatten the steaks lightly with a meat mallet.
    2. In a shallow dish, combine flour, salt, and pepper. Dip the steaks into the mixture, ensuring both sides are well-coated.
    3. Heat a mixture of butter and olive oil in a pan over medium heat. Sauté the steaks for about 4 minutes on each side until they are browned to your liking. Remove from the pan and set aside.
    4. In the same pan, sauté the garlic for about 1 minute, stirring continuously to avoid burning.
    5. Add the wine and lemon juice to the pan, stir, and let it simmer for 5 minutes to slightly reduce the liquid.
    6. Add the capers and give everything a good stir.
    7. Return the steaks to the pan, cover, and simmer over low heat for 4 minutes to allow the flavors to meld.
    8. Garnish with chopped parsley and serve with lemon wedges on the side.

    Tips

    For the best results, make sure your steaks are at room temperature before cooking. This ensures even cooking throughout. When flattening the steaks, be gentle to maintain their structure. Lastly, don’t skip the resting part after cooking; it allows the juices to redistribute, making each bite as juicy as possible.

    Variations & Substitutions

    If you’re looking to switch things up, consider using chicken or pork cutlets instead of beef. Both proteins work wonderfully with the lemon and capers. For a bit of heat, add a pinch of red pepper flakes to the sauce. You can also substitute white wine with chicken broth if you prefer an alcohol-free version.

    Storage

    Leftovers can be a delightful treat. Store any remaining steak and sauce in an airtight container in the refrigerator for up to three days. To reheat, gently warm the steak in a pan over low heat until it’s heated through. Avoid microwaving as it can toughen the meat.

    FAQ

    What can I serve with Steak with Lemon and Capers?

    This dish pairs beautifully with a variety of sides. Consider serving it with creamy mashed potatoes, steamed asparagus, or a fresh arugula salad. The sauce is also fantastic when soaked up with crusty bread.

    Can I use a different type of steak?

    Absolutely! This recipe is quite versatile. Ribeye, sirloin, or even filet mignon would be excellent choices. Just be mindful of cooking times as they may vary depending on the thickness of the steak.

    Nutrition (if applicable)

    This dish is rich in protein and offers a good balance of flavors from healthy fats like olive oil and butter. If you’re mindful of sodium intake, consider rinsing the capers to reduce their saltiness. Adjusting the amount of butter and oil can also help manage caloric content.

    Final Thoughts

    Steak with Lemon and Capers is more than just a meal; it’s an experience. The bright, bold flavors are sure to impress family and guests alike. Whether it’s a casual dinner or a special celebration, this dish delivers a taste of elegance with every bite. Give it a try, and let it become a new favorite in your culinary repertoire!

    Related update: Steak with lemon and capers

  • Steamed Clams In Wine and Chorizo | Made by Meaghan Moineau

    Steamed Clams In Wine and Chorizo | Made by Meaghan Moineau

    Steamed Clams in Wine and Chorizo

    Welcome to my kitchen! Today, I’m excited to share with you a recipe that carries a special place in my heart: Steamed Clams in Wine and Chorizo. This dish is a delightful fusion of flavors that brings back fond memories of summer evenings spent by the seaside. I remember the first time I enjoyed this dish was during a family vacation in Spain. We gathered around a big table, the sea breeze gently brushing against our faces, as we eagerly dipped crusty bread into the rich, savory broth. It was an experience that made me fall in love with the simplicity and charm of this meal. Now, I’m thrilled to recreate this dish with you, bringing a taste of the coast into your home.

    Why You’ll Love It

    This recipe is a magnificent blend of simplicity and flavor that captures the essence of coastal dining. The savory chorizo complements the briny clams perfectly, while the hint of cumin and the vibrant freshness of cilantro add depth and complexity. Plus, it’s a one-pot dish, making it both convenient and quick to prepare. Whether you’re hosting a dinner party or enjoying a cozy night in, this dish is sure to impress and delight your guests.

    Ingredients

    • 1 Spanish chorizo, cut into slices
    • 1 teaspoon cumin seeds
    • 1 cup dry white wine
    • 1/4 cup fresh cilantro, chopped
    • 1 garlic clove, minced
    • 2 pounds little neck clams, scrubbed
    • 2 tablespoons olive oil
    • 1 onion, diced
    • 1/2 teaspoon salt
    • 1 yellow bell pepper, diced

    Instructions

    1. Heat the olive oil in a deep pot over moderate heat. Add the onion, yellow bell pepper, garlic, cumin seeds, and salt. Cook, stirring occasionally, until the vegetables are softened, about 7 to 9 minutes.
    2. Stir in the dry white wine and bring the mixture to a boil.
    3. Add the clams and chorizo to the pot. Cover and boil until the clams open, approximately 7 to 8 minutes. Discard any clams that do not open.
    4. Season the dish with freshly cracked pepper and stir in the chopped cilantro.
    5. Serve the clams with some crusty bread to sop up the delicious sauce.

    Tips

    For the best results, ensure your clams are fresh. They should have a pleasant, briny smell and be tightly closed. If any are open, give them a tap; they should close. If not, discard them. Additionally, don’t skip the crusty bread! It’s perfect for soaking up the flavorful broth and makes the meal truly satisfying.

    Variations & Substitutions

    If you’re not a fan of cilantro, you can swap it for fresh parsley, which will also add a nice herbaceous note. Feel free to experiment with different types of chorizo or even replace it with another smoked sausage if you prefer a milder flavor. For a spicier kick, add a pinch of red pepper flakes to the pot along with the cumin seeds.

    Storage

    If you have leftovers, store them in an airtight container in the refrigerator for up to two days. To reheat, gently warm them in a saucepan over low heat, adding a splash of water or broth if needed to restore the sauce’s consistency. However, this dish is best enjoyed fresh, as reheating can sometimes affect the texture of the clams.

    FAQ

    Can I use frozen clams?

    While fresh clams are recommended for the best flavor and texture, you can use frozen clams in a pinch. Just make sure they’re fully thawed before cooking, and adjust the cooking time as needed.

    What type of white wine should I use?

    A dry white wine like Sauvignon Blanc or Pinot Grigio works wonderfully in this recipe, adding a crisp acidity that pairs beautifully with the briny clams and rich chorizo.

    Nutrition

    This dish is not only delicious but also a good source of protein and essential nutrients. Clams are high in iron and vitamin B12, while chorizo adds flavorful fats and proteins. Just be mindful of the sodium content, especially if you’re watching your salt intake.

    Final Thoughts

    Steamed Clams in Wine and Chorizo is more than just a dish; it’s an invitation to experience the flavors of the sea, the warmth of the chorizo, and the comfort of a home-cooked meal. I hope that as you prepare and share this recipe with your loved ones, it brings as much joy and fond memories to your table as it has to mine. Bon appétit!

    Related update: Steamed Clams In Wine and Chorizo

    Related update: Masala-Tofu Burger

    Related update: Steak with lemon and capers