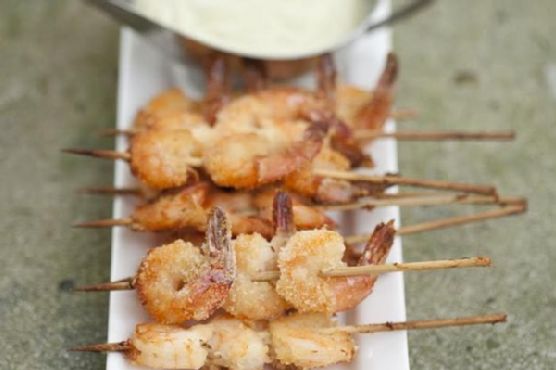
Category: Dinner

  • Spicy Italian Sausage & Roasted Pepper Ragu with Basil Pesto | Made by Meaghan Moineau

    Spicy Italian Sausage & Roasted Pepper Ragu with Basil Pesto | Made by Meaghan Moineau

    Spicy Italian Sausage & Roasted Pepper Ragu with Basil Pesto

    Picture this: a bubbling pot on the stove, aromatic with the scent of fire-roasted peppers and sizzling Italian sausage. The air is filled with the promise of something comforting yet daring, a dish that wraps you in a warm embrace with a gentle kick. Welcome to my kitchen, where the classic Italian Ragu gets a vibrant makeover with a smoky, spicy twist and a fresh, creamy finish.

    Personal Story

    There’s something undeniably magical about a humble ragu. Growing up, Sundays were synonymous with the rich, tangy aroma of my grandmother’s kitchen. She would simmer her ragu for hours, filling every corner of the house with the promise of a hearty meal. It was more than just food; it was the centerpiece of our family gatherings, a tradition that glued us together over plates of pasta and stories shared.

    Years later, when I embarked on my own culinary journey, I decided to honor this family tradition by adding my own flair to it. I remember the first time I attempted my spin on the classic ragu. It was a chilly fall evening, and I was craving that old familiar warmth but with a kick of excitement. As I charred the bell peppers over an open flame, the kitchen filled with a smoky aroma that was nothing short of enchanting. The addition of jalapeño and a swirl of homemade basil pesto was a revelation — it turned out to be the perfect symphony of flavors.

    Of course, there were some mishaps along the way. On one occasion, I got a bit too adventurous and added an entire jalapeño without seeding it first. The result was a ragu that could have doubled as a fire extinguisher! But with each attempt, I learned more about balancing heat and depth of flavor, eventually crafting what I believe to be the perfect Spicy Italian Sausage & Roasted Pepper Ragu with Basil Pesto.

    This dish has now become a staple in my household, a delightful surprise for guests and a comforting favorite for a cozy night in. It’s a testament to how food evolves and adapts, much like the families and memories it nurtures. Let’s dive into what makes this version uniquely special.

    What Makes This Version Special

    When you think of a traditional Italian ragu, you might picture a rich, tomato-based sauce simmered to perfection. But this version of Spicy Italian Sausage & Roasted Pepper Ragu takes things to a whole new level. The smoky depth comes from fire-roasted bell peppers, charred to perfection over an open flame. This technique adds a robust, earthy flavor that you just can’t achieve with raw or sautéed peppers.

    But that’s not all — the pièce de résistance is the fresh, creamy finish you’ll achieve with a generous drizzle of homemade basil pesto. This isn’t your ordinary pesto; it’s a blend of fresh basil leaves, parmesan cheese, olive oil, pine nuts, and a touch of lemon zest that brings a zesty, herbaceous brightness to the dish, rounding out the smoky and spicy elements beautifully.

    By marrying these elements, this ragu becomes a dynamic, multi-layered experience that dances on the palate. It’s a dish that embodies warmth, comfort, and a bit of adventure, making it a perfect centerpiece for any meal.

    Flavor Profile

    The first bite of this Spicy Italian Sausage & Roasted Pepper Ragu with Basil Pesto is a vivid journey through smoky, spicy, and fresh flavors. The charred bell peppers impart a deep, smoky foundation, while the Italian sausages bring a savory, spiced richness. The subtle heat from the jalapeño adds a tantalizing tingling sensation, perfectly balanced by the creamy, fragrant basil pesto that finishes each forkful with a fresh, herbal touch. It’s a symphony of flavors that will leave your taste buds singing.

    Ingredients

    • 4 **bell peppers** (red and yellow, for color and sweetness)
    • 3 cloves **garlic**, crushed
    • 1/2 teaspoon black fresh ground pepper
    • 3 **Italian sausages**, casings removed
    • 3 **Italian sweet sausages**, casings removed
    • 1 **jalapeño**, seeded and finely chopped
    • 3 tablespoons olive oil, divided
    • 1/4 cup chopped Italian fresh parsley
    • 1/2 cup salsa
    • 1 teaspoon sea salt
    • 1 **sweet onion**, chopped
    • 1 jar (12 oz) **fire-roasted red peppers**, drained and sliced
    • 1 cup fresh basil leaves
    • 1/2 cup grated parmesan cheese
    • 1/4 cup **pine nuts**
    • Zest of 1 lemon

    Instructions

    1. Preheat your oven to 375°F (190°C). Place the Italian sausages on a baking sheet and bake for 25-30 minutes, until they are cooked through and golden-brown. Set aside to cool slightly before slicing them lengthwise.
    2. While the sausages are baking, char the bell peppers over an open flame on your stovetop or grill. Rotate them frequently until the skins are blackened and blistered. Place the charred peppers in a bowl and cover with plastic wrap to steam for about 10 minutes. This makes peeling them easier. Once cooled, peel off the skins and slice the peppers into strips.
    3. In a large frying pan, heat 2 tablespoons of olive oil over medium heat. Add the sweet onion, garlic, and jalapeño. Sauté for about 5 minutes until the onion is translucent and fragrant.
    4. Add the sliced sausages to the pan along with the sliced fire-roasted red peppers and the charred bell peppers. Stir in the salsa, sea salt, and black pepper. Cook for another 10 minutes, allowing the flavors to meld together.
    5. Meanwhile, prepare the basil pesto. In a food processor, combine the fresh basil leaves, parmesan cheese, pine nuts, lemon zest, and the remaining tablespoon of olive oil. Blend until smooth and creamy.
    6. Once the ragu is ready, remove from heat and serve over your choice of pasta. Drizzle generously with the homemade basil pesto, and garnish with fresh Italian parsley.

    Pro Tips from Meaghan’s Kitchen

    • For an extra smoky flavor, consider adding a splash of smoked paprika to the ragu during the final simmer.
    • If you prefer a milder version, use half a jalapeño or substitute with a milder chili pepper.
    • Roasting your own peppers? Let them steam in a sealed container to make peeling easier and retain moisture.
    • For a creamier pesto, add a tablespoon of ricotta cheese to the food processor.
    • Don’t skip toasting the pine nuts before adding to the pesto — it brings out their nutty flavor beautifully.

    Variations & Dietary Swaps

    • Vegetarian Swap: Replace the sausages with a plant-based alternative or add hearty mushrooms like portobello for a meaty texture.
    • Spice-it-up Version: Add an extra jalapeño and a pinch of red pepper flakes for those who love it hot.
    • Kids-Friendly Version: Omit the jalapeño and reduce the garlic for a milder, kid-friendly dish that even the little ones will enjoy.

    What to Serve With It

    This ragu pairs beautifully with a glass of chilled Pinot Grigio, which complements the smoky and spicy notes perfectly. Serve it with a side of garlic bread to soak up the delicious sauce, or opt for a simple green salad with a lemon vinaigrette for a refreshing contrast.

    Storage & Meal Prep

    Store any leftover ragu in an airtight container in the refrigerator for up to 3 days. To freeze, allow the ragu to cool completely, then place it in a freezer-safe container for up to 2 months. Reheat on the stovetop over low heat until warmed through, adding a splash of water or broth if necessary to loosen the sauce.

    FAQ

    Can I use store-bought pesto instead of making my own?

    Absolutely! While homemade pesto adds a fresh touch, a good-quality store-bought pesto can be a convenient substitute.

    What’s the best pasta to serve with this ragu?

    I love pairing this ragu with a wide, flat pasta like pappardelle or fettuccine, as it holds the sauce beautifully.

    How can I make this dish less spicy?

    To reduce the heat, simply omit the jalapeño or replace it with a milder pepper, and adjust the amount of black pepper used.

    Can I make this dish ahead of time?

    Yes! This ragu actually tastes even better the next day as the flavors continue to meld. Prepare it a day in advance and store it in the fridge.

    What if I don’t have a gas stove to char the peppers?

    No worries! You can achieve a similar effect by broiling the peppers in the oven until their skins are blackened and blistered.

    Final Thoughts

    Thank you for joining me in my kitchen today! I hope this Spicy Italian Sausage & Roasted Pepper Ragu with Basil Pesto brings warmth and excitement to your dining table, just as it has to mine. I’d love to hear how your ragu turns out, so feel free to share your thoughts, tips, or any variations you try in the comments below. Happy cooking, and don’t forget to savor every bite!

    Related update: Spicy Italian Sausage & Roasted Pepper Ragu with Basil Pesto

    Related update: Pan Seared Lamb Loin with Spicy Chimichurri & Honey-Glazed Squash Salad

  • Exquisite Saffron-Infused Chicken Korma with Toasted Almonds | Made by Meaghan Moineau

    Exquisite Saffron-Infused Chicken Korma with Toasted Almonds | Made by Meaghan Moineau

    Exquisite Saffron-Infused Chicken Korma with Toasted Almonds

    Imagine this: a luxurious aroma wafting through your kitchen, golden saffron swirling into creamy coconut milk, and the sound of almond flakes gently crackling in a pan. This isn’t just any dinner — it’s an invitation to embark on a flavorful journey with my Exquisite Saffron-Infused Chicken Korma with Toasted Almonds.

    Personal Story

    My first encounter with chicken korma was at a tiny, bustling eatery in Delhi. Packed with locals and tourists alike, the aroma of spices enveloped us as we stepped in. I was hooked at the first bite — tender chicken, a symphony of spices, and a richness that lingered long after the meal was over. But the magic ingredient I didn’t know then was saffron, which would later elevate my own version of this beloved dish.

    Back in my own kitchen, I was determined to recreate that experience. My earliest attempts were, let’s say, educational. In one misadventure, I learned that not all saffron is created equal. I somehow managed to buy saffron threads that were as colorful as my evening plans, but sadly, lacked the depth of flavor I sought. Lesson learned — quality matters!

    One day, as I experimented with different variations, a lightbulb moment struck. I was sipping on a golden milk latte, and the warm embrace of saffron inspired me to blend it with coconut milk for the korma. That was the turning point. The addition of toasted almond flakes for texture was the cherry on top, winning over the hearts (and taste buds) of my family and friends.

    Now, every time I prepare this Saffron-Infused Chicken Korma, I’m transported back to that bustling Delhi eatery. It’s a dish steeped in tradition, yet with my own personal twist — an homage to my culinary journey and the flavors that have shaped it.

    What Makes This Version Special

    This isn’t your average chicken korma. The luxurious addition of saffron transforms the dish from classic to exquisite, infusing it with a depth of flavor and a golden hue that is nothing short of mesmerizing. But that’s not all — the toasted almond flakes bring an unexpected crunch that delights the senses. It’s this unique combination that elevates the dish, making it a standout on any dinner table.

    While traditional chicken korma is undeniably delicious, this version offers a delightful contrast of textures and a richness that only saffron can provide. If you’re a fan of classic Indian cuisine, this Saffron-Infused Chicken Korma with Toasted Almonds is a must-try recipe that promises to impress.

    Flavor Profile

    Prepare your taste buds for a rich and aromatic experience. As you take your first bite, the tender chicken melts in your mouth, enveloped in a velvety coconut milk sauce. The saffron adds a luxurious hint of floral warmth, perfectly balanced by the earthiness of cumin and coriander. Just when you think you’ve savored it all, the toasted almond flakes offer a delightful crunch, and a subtle hint of lemon zest ties it all together with a refreshing finish.

    Ingredients

    • 1 lb chicken breast, cut into small pieces
    • 2 cups coconut milk
    • 1 tablespoon coriander powder
    • 1 teaspoon cumin powder
    • 2 tablespoons ginger/garlic paste
    • 2 tablespoons ground almond
    • 2 tablespoons oil
    • 1 tablespoon poppy seeds
    • 2 tablespoons raisins
    • Salt, to taste
    • 1 teaspoon saffron threads
    • 1/4 cup toasted almond flakes
    • Fresh cilantro leaves, for garnish
    • Zest of 1 lemon

    Instructions

    1. Begin by blooming the saffron threads in warm coconut milk. Heat 1/4 cup of coconut milk until it’s just warm, then add the saffron and let it sit for about 10 minutes. This step will release the full flavor and color of the saffron.
    2. In a large pan, heat the oil over low heat. Add the ginger/garlic paste and fry for about 3 minutes until fragrant, ensuring you don’t burn the paste.
    3. Stir in the cumin powder, coriander powder, ground almond, and poppy seeds. Continue frying the masala for about 3-4 minutes over low heat, until the spices are well blended and aromatic.
    4. Add the chicken pieces to the masala, stirring carefully to ensure they’re evenly coated. Cook for another 5 minutes, folding the masala over the chicken pieces gently.
    5. Pour in the remaining coconut milk along with the saffron-infused milk. Stir well to cover all the chicken pieces. Add salt to taste and the raisins.
    6. Cover the pan and let the chicken simmer on low heat for about 20-25 minutes, stirring occasionally, until the chicken is cooked through and tender.
    7. Meanwhile, toast the almond flakes in a dry pan over medium heat. Keep a close eye on them, tossing frequently until they’re golden and aromatic.
    8. Once the chicken is cooked, stir in the lemon zest. Serve the korma hot, garnished with fresh cilantro leaves and the toasted almond flakes for added crunch.

    Pro Tips from Meaghan’s Kitchen

    • Use high-quality saffron threads for the best flavor. A little goes a long way, so invest in the good stuff.
    • When toasting almond flakes, be patient. Keep them moving in the pan to avoid burning, which can happen quickly.
    • For an even creamier texture, use full-fat coconut milk — it makes a noticeable difference.
    • Don’t rush the blooming of saffron. Properly blooming it in warm liquid enhances both color and flavor.
    • If you like a little heat, add a finely chopped green chili to the masala step for a gentle kick.

    Variations & Dietary Swaps

    • Vegetarian Swap: Replace chicken with paneer or tofu. The creamy sauce pairs beautifully with these proteins.
    • Spice-It-Up Version: Add a teaspoon of garam masala or more chilies for a spicier kick.
    • Kids-Friendly Version: Tone down the spices and omit the raisins if your little ones aren’t fans of sweet surprises in savory dishes.

    What to Serve With It

    This Saffron-Infused Chicken Korma is perfectly complemented by a side of fluffy basmati rice. For a more indulgent meal, pair it with garlic naan or paratha. A chilled glass of Gewürztraminer is an excellent choice for those who enjoy a bit of wine with their meal, as its floral notes harmonize beautifully with the saffron.

    Storage & Meal Prep

    If you have leftovers, store them in an airtight container in the fridge for up to 3 days. Reheat gently on the stove over low heat, adding a splash of coconut milk if needed to maintain the creamy consistency. This dish also freezes well for up to a month. Allow it to thaw overnight in the fridge before reheating.

    FAQ

    Can I use chicken thighs instead of breasts?

    Absolutely! Chicken thighs are juicier and can add even more flavor to the dish. Adjust the cooking time slightly as thighs may take a bit longer to cook through.

    Is there a substitute for saffron?

    While there’s no perfect substitute for saffron’s unique flavor, you can try a pinch of turmeric for color, but it won’t replicate the taste. For the best experience, use saffron.

    How do I prevent the almonds from burning?

    Toast the almonds over medium heat and keep stirring them frequently. Removing them from the pan as soon as they’re golden will prevent them from overcooking.

    Can I make this dish ahead of time?

    Yes, this dish actually benefits from being made ahead as the flavors meld beautifully over time. Just reheat gently before serving.

    What if I don’t have coconut milk?

    You can substitute with heavy cream for a richer texture or almond milk for a lighter version.

    Final Thoughts

    Whether you’re a seasoned home cook or trying your hand at Indian cuisine for the first time, this Exquisite Saffron-Infused Chicken Korma with Toasted Almonds is sure to impress. It’s a dish that brings warmth and comfort to any table, and I’m thrilled to share it with you. If you try this recipe, I’d love to hear your thoughts! Feel free to leave a comment or share your creations with me. Happy cooking!

    Related update: Exquisite Saffron-Infused Chicken Korma with Toasted Almonds

    Related update: Spicy Italian Sausage & Roasted Pepper Ragu with Basil Pesto

  • Spicy Stir-Fried Cabbage and Tomatoes with Ginger-Lime Zest | Made by Meaghan Moineau

    Spicy Stir-Fried Cabbage and Tomatoes with Ginger-Lime Zest | Made by Meaghan Moineau

    Spicy Stir-Fried Cabbage and Tomatoes with Ginger-Lime Zest

    Imagine a dish where each bite bursts with layers of flavor — the spice dances on your tongue while a tangy, citrusy brightness lingers in the background. This is not just any stir-fry; it’s a symphony of spice and zest that transforms humble cabbage and tomatoes into a culinary delight.

    Personal Story

    I recall my first encounter with this spicy stir-fried cabbage and tomatoes vividly. It was one of those cozy evenings where the world outside was a whirlwind, but inside, my kitchen was a haven of warmth and inviting aromas. I was experimenting with Asian flavors, trying to recreate the exotic dishes I’d savored at our neighborhood dim sum place. The cabbage, a staple in my fridge, and ripe tomatoes from the market were calling out to be transformed into something extraordinary.

    The first attempt was a bit of a kitchen mishap. I was over-enthusiastic with the red chili flakes, and the dish ended up so fiery that it could’ve powered a small city. But therein lay the beauty of cooking — every hiccup is a stepping stone to perfection. The next time, I found the balance, letting the cabbage and tomatoes marry harmoniously with the zing of fresh ginger and lime, creating a dish that felt both familiar and excitingly new.

    What started as a simple experiment has now turned into one of my favorite go-to meals. It’s perfect for those nights when you crave something comforting yet vibrant, with a hint of spice to warm your soul. Over time, I’ve tweaked and enhanced the recipe, bringing my own spin that elevates the traditional stir-fry to a whole new level.

    There’s a certain magic in watching my family and friends savor this dish, their initial skepticism over the cabbage quickly turning to delight as they experience the unexpected flavor profile. It’s become a dish that not only fills our bellies but also sparks conversations and brings smiles around the dinner table.

    What Makes This Version Special

    This version of spicy stir-fried cabbage and tomatoes is not your everyday stir-fry. Infused with fresh ginger and a zesty lime finish, it offers a unique contrast of spice and tangy brightness. Unlike traditional recipes, which might focus solely on heat, this dish balances the fiery kick of red chili flakes with the refreshing zing of **lime zest** and **lime juice**. The result is a refreshing melody of flavors that dance across your taste buds, leaving you craving more.

    Moreover, we bloom the garlic and ginger in sesame oil, a technique that enhances their aromatic qualities and provides a robust base for the other ingredients. This simple yet profound step transforms the ordinary into the extraordinary, ensuring every bite is an explosion of flavor.

    Flavor Profile

    If you’re wondering what this spicy stir-fried cabbage and tomatoes with ginger-lime zest tastes like, let me paint a picture for you. It’s spicy, tangy, and aromatic with a refreshing citrusy finish. The heat from the red chili flakes is immediate, but it doesn’t overwhelm — instead, it’s tempered by the sweetness of ripe tomatoes and a subtle, savory depth from soy sauce. The ginger adds a spicy warmth, while the lime zest and juice lift the dish with a vibrant, zesty finish that invigorates the palate.

    Ingredients

    • 1 medium Beijing cabbage, coarsely shredded
    • 2 cups diced tomatoes
    • 3 cloves garlic, minced
    • 2 tablespoons fresh ginger, grated
    • 1 teaspoon salt
    • 1 tablespoon sugar
    • 2 tablespoons ketchup
    • 2-3 tablespoons water
    • Zest of 1 lime
    • Juice of 1 lime
    • 1 teaspoon red chili flakes
    • 3 tablespoons soy sauce
    • 2 tablespoons sesame oil
    • Fresh cilantro, chopped (optional for garnish)

    Instructions

    1. Start by prepping your vegetables. Coarsely shred the Beijing cabbage and rinse it well to remove any dirt. Drain thoroughly and set aside. Rinse and dice the tomatoes and keep them ready.
    2. Heat a wok or large skillet over medium-high heat. Add the sesame oil and allow it to heat until shimmering. Add the minced garlic and grated ginger, stirring continuously for about 30 seconds until they’re fragrant but not browned. This blooming technique unlocks their full aromatic potential.
    3. Increase the heat to high and add the shredded cabbage to the wok. Stir-fry for about 3-4 minutes, or until the cabbage starts to soften. If needed, add a couple of tablespoons of water to help the cooking process along without burning.
    4. Add the diced tomatoes, salt, sugar, ketchup, and soy sauce to the wok. Mix everything together and stir-fry for another 3-4 minutes, until the tomatoes have softened and the flavors have melded beautifully. The sauce should be slightly thickened.
    5. Finish by adding the red chili flakes, lime zest, and lime juice. Stir well to combine, cooking for just another minute. This final step infuses the dish with a vibrant, tangy freshness.
    6. Remove from heat, taste, and adjust seasoning if necessary. Garnish with fresh cilantro if desired, and serve immediately.

    Pro Tips from Meaghan’s Kitchen

    • For the best flavor, always bloom your garlic and ginger in hot sesame oil. It elevates the aromatics and creates a delicious base for your stir-fry.
    • Keep the wok hot and moving! A high heat helps to quickly cook the vegetables, keeping them vibrant and crisp-tender.
    • If you like a little extra heat, try adding a touch more red chili flakes at the end, but do so sparingly and taste as you go.
    • Use fresh lime juice and zest. This isn’t the place for bottled lime juice — the fresh stuff is essential for that bright, zesty finish.
    • For a more robust flavor, let the stir-fry rest for a few minutes before serving. This allows the flavors to meld together beautifully.

    Variations & Dietary Swaps

    • Vegetarian Swap: This dish is already vegetarian but make it vegan by ensuring your ketchup and soy sauce are vegan-friendly.
    • Spice-it-up Version: Add thinly sliced fresh red chilies along with the red chili flakes for an extra fiery kick.
    • Kids-Friendly Version: Reduce the chili flakes to a pinch and add a tablespoon of honey for a touch of sweetness that kids will love.

    What to Serve With It

    For a complete meal, serve this spicy stir-fried cabbage and tomatoes with a side of steamed jasmine rice. The fluffy, aromatic rice is the perfect canvas for soaking up all those delicious stir-fry juices. And don’t forget a chilled glass of Riesling — its slight sweetness and acidity make it a brilliant match for the spicy, tangy flavors of the dish.

    Storage & Meal Prep

    If you have leftovers (though I doubt you will!), store them in an airtight container in the refrigerator for up to 3 days. To reheat, simply pop it in the microwave or toss it back into a skillet over medium heat, stirring until warmed through. This dish doesn’t freeze well due to the high water content of the cabbage and tomatoes, which can result in a mushy texture upon thawing.

    FAQ

    Can I use another type of cabbage?

    Absolutely! Napa cabbage or even green cabbage can work well in this recipe, though cooking times may vary slightly.

    How can I make it less spicy?

    If you prefer a milder dish, simply reduce the amount of red chili flakes or omit them altogether. You can also add more lime juice to counteract the heat.

    Can I prepare the ingredients in advance?

    Yes, prepping your vegetables ahead of time can make the cooking process even quicker. Store the shredded cabbage and diced tomatoes separately in the fridge until you’re ready to cook.

    What else can I add to the stir-fry?

    Feel free to get creative! Add sliced bell peppers, carrots, or even tofu for extra texture and nutrients. Just be sure to adjust cooking times accordingly.

    Is there a substitute for sesame oil?

    If you don’t have sesame oil on hand, you can use vegetable or peanut oil. However, sesame oil adds a distinct nutty aroma that’s hard to replace.

    Final Thoughts

    There you have it — a dish that’s as vibrant and lively as a summer’s day, yet comforting enough to warm you on a chilly evening. This spicy stir-fried cabbage and tomatoes with ginger-lime zest is a celebration of flavors, bringing a touch of Asian cuisine into your home kitchen. I hope you’ll give it a try and experience the wonderful harmony of spice and zest for yourself. If you do, don’t forget to share your thoughts and any personal twists you might have added in the comments below. Happy cooking, my friends!

    Related update: Spicy Stir-Fried Cabbage and Tomatoes with Ginger-Lime Zest

    Related update: Exquisite Saffron-Infused Chicken Korma with Toasted Almonds

  • Zesty Citrus-Herb Pork Carnitas Tacos with Pineapple Salsa | Made by Meaghan Moineau

    Zesty Citrus-Herb Pork Carnitas Tacos with Pineapple Salsa | Made by Meaghan Moineau

    Zesty Citrus-Herb Pork Carnitas Tacos with Pineapple Salsa

    Imagine this: the sound of pork gently sizzling in a cast-iron pan, the aroma of rosemary wafting through the kitchen, and a splash of lime that transforms the ordinary into something extraordinary. This isn’t just any taco night; it’s an experience, a celebration of flavors with my Zesty Citrus-Herb Pork Carnitas Tacos with Pineapple Salsa.

    My love affair with carnitas began on a balmy summer night at a bustling food market in Oaxaca. The air was thick with the scent of spices, and I found myself drawn to a tiny stall nestled between colorful piñatas and fresh produce. The vendor, with twinkling eyes and a knowing smile, handed me a taco that was unlike any I’d ever tasted. It was the perfect balance of savory, zesty, and sweet. That evening, I vowed to bring that magic back home.

    Back in my kitchen, I was determined to recreate that unforgettable taste. I bought every cut of pork imaginable, tried every combination of spices, and even enlisted my friends as taste testers. It was a labor of love, filled with mishaps like the time I accidentally added too much salt and had to start over (I learned the hard way to taste as I go!). But through trial and error, I discovered my secret weapon: a hint of rosemary that adds an aromatic depth, and a pineapple salsa that gives a bright, tropical flair.

    Every time I serve these Zesty Citrus-Herb Pork Carnitas Tacos with Pineapple Salsa, I’m transported back to that enchanting night in Oaxaca. The laughter, the music, the vibrant flavors — all alive in every bite. It’s not just a meal; it’s a memory, a piece of my heart shared with you.

    What Makes This Version Special

    What sets this recipe apart from traditional carnitas is the surprising twist of pineapple salsa and rosemary infusion. By warming olive oil with fresh rosemary before browning the pork, the meat takes on an aromatic quality that’s both unexpected and delightful. Meanwhile, the pineapple salsa introduces a refreshing sweetness that balances the savory richness of the pork. Plus, adding a splash of lime juice and zest during the final browning stage elevates the flavors with a zesty brightness. This isn’t just a dish; it’s a flavor journey that transforms classic carnitas into something exceptionally vibrant and fresh.

    Flavor Profile

    Prepare to be wowed by the taste experience these tacos offer. Picture the juicy, tender pork, slightly crispy on the edges, infused with the fragrant essence of rosemary. The natural sweetness of pineapple salsa dances on your tongue, countering the savory depth of the carnitas. Add to that the zesty kick from lime juice and zest, and you’ve got a dynamic, multi-layered flavor profile that’s both invigorating and comforting. It’s a harmonious blend of zesty, savory, and sweet, with a delicate herbal note that lingers beautifully.

    Ingredients

    • 2 lbs lean pork butt, cut into large chunks
    • 4 cloves garlic, crushed
    • 1 tablespoon sea salt
    • 1 teaspoon ground pepper
    • **3 tablespoons olive oil**
    • **1 tablespoon fresh rosemary, finely chopped**
    • 1/2 cup orange juice
    • 1/4 cup milk
    • **1 lime, juiced and zested**
    • 12 corn tortillas
    • 1 cup **fresh pineapple, diced**
    • 1 small jalapeño, minced
    • 1/2 cup salsa fresca
    • 1 avocado, sliced
    • 1/4 cup cilantro, chopped
    • 1 small onion, chopped
    • 2 additional limes, sliced for serving

    Instructions

    1. In a large Dutch oven, combine the pork, garlic, sea salt, ground pepper, and enough water to cover the pork. Bring to a boil over medium-high heat, then reduce the heat, cover, and simmer over medium-low for 45 minutes to one hour, until the pork is tender and easy to shred.
    2. Drain the pork well and allow it to cool slightly. Once cool enough to handle, shred the meat using your hands or the tines of a fork. Remove and discard any remaining fat.
    3. Return the shredded pork to the Dutch oven. In a small pan, gently warm the olive oil with the rosemary for 2-3 minutes to infuse the flavors. Add the infused olive oil to the pot with the pork.
    4. Add the orange juice and milk to the pork, cooking over medium heat until the liquid has evaporated and the pork begins to brown, about 15 minutes. Stir occasionally to achieve an even golden-brown crispiness.
    5. During the final browning stage, add the lime juice and zest to the pork for a bright, citrusy finish. Season with additional salt and pepper to taste.
    6. While the pork is browning, prepare the pineapple salsa by combining the diced pineapple, minced jalapeño, and salsa fresca in a bowl. Set aside.
    7. Chop the onions and cilantro, and slice the avocado and limes. Place each in small individual bowls for serving.
    8. Heat the corn tortillas in a dry frying pan over medium heat until warm and pliable. Keep them warm by wrapping in a clean kitchen towel.
    9. To assemble the tacos, stack two tortillas, layer with warm carnitas, a spoonful of pineapple salsa, chopped cilantro, onion, and avocado slices. Finish with a squeeze of lime juice for an extra burst of flavor.

    Pro Tips from Meaghan’s Kitchen

    • Infuse the Oil: Infusing the olive oil with rosemary is key. Do it gently over low heat to avoid burning and maximize flavor transfer.
    • Crispy Edges: For those irresistible crispy edges, ensure the pork is in a single layer in the pan, allowing maximum contact with the heat.
    • Balance the Heat: If the jalapeño is too spicy for your taste, remove the seeds and veins to tone down the heat.
    • Tortilla Warmth: Warming the tortillas in a dry pan keeps them pliable and enhances their flavor, making the taco experience more enjoyable.
    • Juicy Pineapple Salsa: Let the pineapple salsa sit for a few minutes before serving to allow the flavors to meld beautifully.

    Variations & Dietary Swaps

    • Vegetarian Swap: Substitute the pork with jackfruit for a vegetarian-friendly version that still delivers that pulled texture.
    • Spice-It-Up Version: Add chipotle powder to the pork for a smoky, spicier kick that complements the pineapple salsa.
    • Kids-Friendly Version: Use sweet bell peppers instead of jalapeños in the salsa for a milder, kid-approved flavor.

    What to Serve With It

    Pair these vibrant Zesty Citrus-Herb Pork Carnitas Tacos with a chilled glass of hibiscus iced tea, which perfectly complements the tacos’ tropical flair. Alternatively, a light Mexican lager offers a refreshing balance to the zesty and savory notes of the carnitas, making it an ideal companion for this festive dish.

    Storage & Meal Prep

    Leftover carnitas can be stored in an airtight container in the fridge for up to 3 days. For longer storage, freeze the shredded pork in portions, ensuring they’re tightly sealed to prevent freezer burn, for up to 3 months. To reheat, thaw overnight in the fridge, then warm in a skillet over medium heat until hot and crispy. Pineapple salsa is best fresh but can be refrigerated for up to a day.

    FAQ

    Can I make this recipe in advance?

    Absolutely! You can prepare the carnitas a day ahead, allowing the flavors to develop further. Simply reheat in a skillet before serving to regain crispiness.

    Is there a substitute for milk in this recipe?

    Yes, you can use a non-dairy alternative like almond or coconut milk. Just be mindful of the flavor it might add to the dish.

    How can I adjust the spice level?

    To adjust the heat, simply modify the amount of jalapeño in the salsa. Removing the seeds and veins will also reduce the spiciness.

    What if I don’t have fresh pineapple?

    Canned pineapple can be used as a substitute. Just make sure to drain it well to avoid adding excess moisture to the salsa.

    Final Thoughts

    I hope these Zesty Citrus-Herb Pork Carnitas Tacos with Pineapple Salsa bring a bit of my kitchen to yours. They’re more than just a meal; they’re a celebration of flavors and memories. I’d love to hear how they turn out in your own kitchen. Feel free to leave a comment or share your experience on social media. Let’s keep the conversation going — after all, cooking is always better together!

    Related update: Zesty Citrus-Herb Pork Carnitas Tacos with Pineapple Salsa

    Related update: Spicy Stir-Fried Cabbage and Tomatoes with Ginger-Lime Zest

  • Maple-Glazed Bacon Wrapped Pork Tenderloin with Smoked Paprika | Made by Meaghan Moineau

    Maple-Glazed Bacon Wrapped Pork Tenderloin with Smoked Paprika | Made by Meaghan Moineau

    Maple-Glazed Bacon Wrapped Pork Tenderloin with Smoked Paprika

    Imagine the sizzle of bacon meeting the gentle caramelization of maple syrup, enveloping a perfectly seasoned pork tenderloin. This culinary delight tantalizes the senses with its sweet, smoky, and savory symphony, making it an irresistible centerpiece for any meal.

    Personal Story

    Every family has that one dish that always steals the show during gatherings. For mine, it’s always been the classic pork tenderloin. I remember the first time I tried to cook it solo; I was determined to elevate the dish beyond my grandmother’s simple yet delicious recipe. I wanted something that would leave everyone talking, something unforgettable. That’s when I stumbled upon the idea of wrapping it in bacon. But, not just any bacon-wrapped tenderloin — it needed a twist.

    One autumn afternoon, while watching the leaves cascade from the trees in a flurry of reds and golds, inspiration struck. The answer was in the sweet, smoky allure of maple syrup; it was the missing puzzle piece that would elevate the dish from ordinary to extraordinary. Combining it with a hint of smoky paprika and the earthiness of fresh sage seemed like a symphonic blend of flavors destined to come together.

    However, my first attempt was a kitchen disaster. I forgot to preheat the oven and ended up with a chewy mess instead of a tender masterpiece. But with every misstep, I learned. I perfected the maple glaze, discovered the right bacon crispness, and honed my timing to a science. And every time I prepare this dish now, it’s a beautiful reminder of those early culinary adventures.

    Today, the Maple-Glazed Bacon Wrapped Pork Tenderloin with Smoked Paprika has become a signature favorite at our gatherings, always leaving family and friends asking for more. The journey from kitchen mishap to mouthwatering success is a testament to the power of creativity and persistence in the kitchen.

    What Makes This Version Special

    The beauty of this Maple-Glazed Bacon Wrapped Pork Tenderloin with Smoked Paprika lies in its complex layering of flavors. The sweet and smoky maple glaze adds depth to the dish, while the hint of smoked paprika enhances the savory punch from the bacon wrap. This version of the classic pork tenderloin transcends the mundane by infusing a rich tapestry of flavors that awaken the palate. Unlike the standard bacon-wrapped tenderloin, this recipe transforms it into a gourmet experience with its sophisticated glaze and aromatic accompaniments.

    Flavor Profile

    Imagine biting into a succulent piece of pork tenderloin, perfectly cooked and enveloped in crispy bacon. The first taste is a delightful mix of sweetness and smokiness, with the maple syrup providing a caramelized glaze that dances on the taste buds. The smoked paprika adds an earthy depth, while the fresh sage leaves impart a subtle herbaceous note. Together, these flavors create a harmonious balance that’s both comforting and exciting, a true testament to culinary craftsmanship.

    Ingredients

    • Pork tenderloin – 2 pieces
    • **Bacon** – enough slices to wrap tenderloins
    • Black pepper – to taste
    • Coarse salt – to taste
    • **Fresh sage** – about 9-10 leaves
    • Garlic powder – a pinch
    • **2 tablespoons maple syrup**
    • **1 teaspoon smoked paprika**
    • **1 teaspoon Dijon mustard**

    Instructions

    1. Preheat your oven to 425°F (220°C). This step is crucial for achieving that perfect golden-brown crust on your tenderloin.
    2. Remove about an inch off the tapered end of each tenderloin to make a perfect cylinder. This ensures even cooking throughout.
    3. Season the tenderloins generously with coarse salt, black pepper, and a pinch of garlic powder. This foundational seasoning sets the stage for the bold flavors to come.
    4. In a small bowl, mix the maple syrup and Dijon mustard until well combined. Brush this glaze over the surface of the tenderloins, ensuring every nook and cranny is covered.
    5. On a sheet of cling wrap, lay out the bacon strips in an overlapping line. This will form the crispy exterior of your dish.
    6. Sprinkle the smoked paprika over the bacon, embedding a deep smoky flavor into the wrap.
    7. Place the sage leaves all over the bacon, about 9-10 leaves in total, to add a fragrant earthy note.
    8. Position one piece of tenderloin across the short ends of the bacon and roll to cover it completely with the bacon. Repeat for the other tenderloin segment.
    9. Transfer the bacon-wrapped tenderloins to a non-stick pan and sear on all sides over medium-high heat. This step is key to achieving a crispy, golden-brown exterior.
    10. Once seared, transfer the pan to the preheated oven. Cook for 8-10 minutes, turning the pieces after 5 minutes to ensure even cooking. You’re aiming for an internal temperature of 145°F (63°C).
    11. Remove from the oven and let it rest for at least 5 minutes before slicing. This allows the juices to redistribute, ensuring every bite is juicy and flavorful.

    Pro Tips from Meaghan’s Kitchen

    • When brushing the glaze, let it sit for a few minutes to slightly absorb into the meat before wrapping it with bacon.
    • Use a meat thermometer to ensure the tenderloin reaches the perfect internal temperature without overcooking.
    • For a beautiful presentation, slice the tenderloin into 1-inch medallions and serve fanned out on a platter.
    • If you prefer a spicier kick, add a sprinkling of crushed red pepper flakes to the glaze mixture.
    • Wrapping the tenderloins tightly in bacon helps maintain their shape and ensures an even cook.

    Variations & Dietary Swaps

    • Vegetarian Swap: Replace the pork with a thick, firm tofu. Follow the same steps for seasoning and wrapping with vegetarian bacon.
    • Spice-It-Up Version: Add a tablespoon of sriracha or hot sauce to the maple-Dijon glaze for an extra spicy kick.
    • Kids-Friendly Version: Use a honey glaze instead of maple syrup for a sweeter, milder flavor that kids will love.

    What to Serve With It

    This Maple-Glazed Bacon Wrapped Pork Tenderloin pairs beautifully with a glass of medium-bodied Pinot Noir, its acidity balancing the dish’s richness. For sides, roasted Brussels sprouts with a touch of balsamic vinegar or a creamy garlic mashed potato will complement the savory-sweet profile perfectly.

    Storage & Meal Prep

    If you find yourself with leftovers (a rare occurrence with this dish), store them in an airtight container in the fridge for up to three days. To reheat, place in a preheated oven at 350°F (175°C) for about 15 minutes, or until warmed through. This dish also freezes well; wrap the cooked tenderloin in aluminum foil and store it in a freezer-safe bag for up to 2 months. Thaw overnight in the fridge before reheating.

    FAQ

    Can I use turkey bacon instead of regular bacon?

    Absolutely! Turkey bacon will work just as well, though it may not crisp up quite the same way. Keep an eye on it during the searing process.

    What if I don’t have smoked paprika?

    If smoked paprika is unavailable, you can use regular paprika and add a dash of liquid smoke to the glaze for a similar effect.

    How do I know when the pork tenderloin is done?

    The best way to ensure doneness is by using a meat thermometer. The internal temperature should reach 145°F (63°C) for perfectly cooked pork.

    Can I prepare this dish ahead of time?

    Yes, you can prepare the tenderloin up to the searing step and refrigerate it overnight. Allow it to come to room temperature before continuing with the oven cooking process.

    What other herbs can I use instead of sage?

    Rosemary or thyme can be excellent substitutes if sage is not to your liking. They will provide a different but equally aromatic flavor profile.

    Final Thoughts

    Cooking is an adventure, and this Maple-Glazed Bacon Wrapped Pork Tenderloin with Smoked Paprika is a testament to how a little creativity can transform a classic into a show-stopping masterpiece. I’d love to hear how your dish turned out, so feel free to leave a comment or share your own twists on the recipe. Until next time, happy cooking from my kitchen to yours!

    Related update: Maple-Glazed Bacon Wrapped Pork Tenderloin with Smoked Paprika

    Related update: Zesty Citrus-Herb Pork Carnitas Tacos with Pineapple Salsa

  • Peruvian Lomo Saltado with Crispy Quinoa Crust and Citrus Avocado Salsa | Made by Meaghan Moineau

    Peruvian Lomo Saltado with Crispy Quinoa Crust and Citrus Avocado Salsa | Made by Meaghan Moineau

    Peruvian Lomo Saltado with Crispy Quinoa Crust and Citrus Avocado Salsa

    Imagine stepping into a bustling kitchen where vibrant aromas of sizzling beef and sautéed vegetables mingle with a hint of citrus. The air practically crackles with excitement as this new twist on a classic Peruvian dish, Lomo Saltado, takes center stage. Are you ready to experience a culinary journey enhanced by a crispy quinoa crust and brightened by a refreshing citrus avocado salsa?

    Personal Story

    When I first encountered Lomo Saltado, it was love at first bite. I still remember the lively family gathering at my best friend’s house, where her grandmother served this Peruvian classic. The savory beef, the tender vegetables, and those irresistible golden fries all served over a bed of fluffy rice – it was comfort on a plate. But what truly captivated me was the way each bite felt like a celebration of flavors dancing together.

    Fast forward a few years, and I’m in my own kitchen, a place where I’ve had my share of triumphs and, let’s be honest, some mishaps too. One such mishap came when I attempted to recreate Lomo Saltado for a dinner party. In my haste, I mistimed the fries, leaving them soggy and disappointing. I realized then that this dish, though seemingly simple, demanded respect and a touch of innovation to truly shine.

    Determined to elevate this beloved dish, I experimented with different techniques and ingredients. Inspiration struck during a trip to the local farmer’s market, where I stumbled upon vibrant avocados and fresh mint. The idea of adding a citrus avocado salsa was born, providing a refreshing counterpoint to the savory beef. Then, as I was preparing quinoa for another meal, it hit me – what if I could add a crispy quinoa crust to the beef? That extra texture was the missing piece of the puzzle.

    After a few tweaks and taste tests, my enhanced Lomo Saltado was ready for prime time. It was a hit, and I knew I had found a way to honor the traditional dish while making it uniquely mine. Now, I’m thrilled to share this recipe with you, inviting you to savor every bite and perhaps make it a cherished part of your own culinary repertoire.

    What Makes This Version Special

    This version of Lomo Saltado stands out with its crispy quinoa crust on the beef, adding an unexpected crunch that takes the texture to a new level. Quinoa, a staple grain in Peruvian cuisine, brings not just texture but also a nutty flavor that complements the savory beef. Paired with the citrus avocado salsa, which adds a refreshing burst of flavor, this dish is a true sensory delight. The salsa’s tangy lime and orange juices, combined with creamy avocado and fresh mint, brighten the entire plate, making each bite a journey of layered tastes.

    Flavor Profile

    Picture this: savory, juicy beef coated in a crispy quinoa and panko breadcrumb crust, sautéed to golden-brown perfection. The cumin and complete seasoning impart a warm, earthy note, while the soy sauce and red wine vinegar add an umami depth. The sautéed onions, bell peppers, and garlic bring a sweet and aromatic base, with a hint of heat from jalapeño. The citrus avocado salsa, with its tangy and fresh profile, balances the richness of the beef, leaving a lingering lightness on your palate. It’s a symphony of flavors that elevates each component into something truly special.

    Ingredients

    • 1 lb beef tenderloin, cut into chunks
    • **1/2 cup cooked quinoa**
    • **1/2 cup panko breadcrumbs**
    • 1 teaspoon cumin
    • 1 teaspoon complete seasoning
    • 1 green bell pepper, sliced
    • 1 red bell pepper, sliced
    • 1 yellow onion, sliced
    • 2 garlic cloves, minced
    • 1 jalapeño pepper, minced
    • 2 tablespoons red wine vinegar
    • 3 tablespoons soy sauce
    • 2 plum tomatoes, cut into wedges
    • 1 lb frozen french fries, prepared according to package instructions
    • 1 avocado, diced
    • **Juice of 1 lime**
    • **Juice of 1 orange**
    • **2 tablespoons freshly chopped mint**
    • **1 tablespoon olive oil**
    • **Sea salt to taste**
    • Cilantro, for garnish

    Instructions

    1. Prepare the frozen french fries according to the package directions. Set aside and keep warm.
    2. In a large bowl, combine the cooked quinoa and panko breadcrumbs. Coat the beef chunks in this mixture, pressing gently to ensure the crumbs adhere.
    3. Heat a large wok or skillet over medium-high heat. Add a tablespoon of olive oil, then sauté the onions and bell peppers until translucent, about 10 minutes.
    4. Add the garlic and jalapeño to the skillet, cooking for an additional minute until aromatic.
    5. Push the vegetables to the side of the skillet and add the crusted beef chunks. Cook until the beef is no longer pink and the crust is golden-brown, about 5 to 7 minutes.
    6. Stir in the cumin, complete seasoning, soy sauce, and red wine vinegar. Mix everything well and let it simmer for a minute.
    7. Add the tomato wedges, cover the skillet, and cook for an additional 5 minutes, allowing the tomatoes to soften and meld with the other ingredients.
    8. In a separate bowl, prepare the citrus avocado salsa by combining the diced avocado, lime juice, orange juice, chopped mint, and a pinch of sea salt. Mix gently.
    9. When ready to serve, add the prepared french fries to the skillet, tossing everything gently to combine.
    10. Serve the Lomo Saltado over a bed of white rice, garnished with freshly chopped cilantro and a generous helping of citrus avocado salsa on top. Enjoy with a side of aji sauce for extra heat, if desired.

    Pro Tips from Meaghan’s Kitchen

    • Ensure your quinoa is well-cooked and dry before mixing with the panko breadcrumbs for the crispiest crust.
    • For even more flavor, marinate the beef in soy sauce and a splash of lime juice for 30 minutes before coating.
    • Use a cast iron skillet for even heat distribution and to achieve that perfect golden-brown crust on the beef.
    • If your salsa is too tangy, add a pinch of sugar to balance the acidity.
    • Reheat the fries in a hot oven for a quick crisp if they start to soften.

    Variations & Dietary Swaps

    • Vegetarian Swap: Replace the beef with thick slices of portobello mushrooms. They soak up flavor beautifully and have a meaty texture.
    • Spice-It-Up Version: Add a pinch of cayenne pepper to the quinoa coating for an extra kick of heat.
    • Kids-Friendly Version: Offer the salsa as a side to let kids try it at their own pace, or swap it for a milder tomato and cucumber salad.

    What to Serve With It

    This Peruvian Lomo Saltado pairs beautifully with a chilled Pisco Sour, a traditional Peruvian cocktail that enhances the dish’s flavors. If you’re keeping it alcohol-free, a lime-infused sparkling water provides a refreshing balance. For a full meal experience, serve with a simple side salad of mixed greens and a light vinaigrette.

    Storage & Meal Prep

    Store any leftovers in an airtight container in the fridge for up to 3 days. For longer storage, place the beef and vegetables in one container and the salsa in another to maintain freshness. To reheat, warm the beef and vegetables on the stove over medium heat until heated through. The salsa is best enjoyed fresh but can be stored separately for a day.

    FAQ

    Can I prepare the quinoa coating in advance?

    Absolutely! You can make the quinoa and breadcrumb mixture up to a day ahead. Store it in an airtight container at room temperature until you’re ready to use it.

    What if I don’t have red wine vinegar?

    If you’re out of red wine vinegar, apple cider vinegar or balsamic vinegar can be used as substitutes. They will alter the flavor slightly but are both delicious alternatives.

    How can I make this dish gluten-free?

    To make this Lomo Saltado gluten-free, simply replace the panko breadcrumbs with gluten-free breadcrumbs and ensure your soy sauce is labeled gluten-free.

    Can I use fresh fries instead of frozen?

    Yes, fresh fries are a fantastic option! Just be sure to slice them evenly and fry or bake them until crispy before adding them to the dish.

    Final Thoughts

    I hope this unique twist on Peruvian Lomo Saltado with a crispy quinoa crust and citrus avocado salsa brings as much joy to your kitchen as it does to mine. Cooking is about exploration and making each recipe your own, so feel free to adjust flavors and ingredients to suit your taste. I’d love to hear how your Lomo Saltado adventure turns out, so leave a comment below or share your creation on social media. Happy cooking!

    Related update: Peruvian Lomo Saltado with Crispy Quinoa Crust and Citrus Avocado Salsa

    Related update: Maple-Glazed Bacon Wrapped Pork Tenderloin with Smoked Paprika

  • Zesty Citrus-Herb Baked Chicken Wings with Honey-Lime Glaze | Made by Meaghan Moineau

    Zesty Citrus-Herb Baked Chicken Wings with Honey-Lime Glaze | Made by Meaghan Moineau

    Zesty Citrus-Herb Baked Chicken Wings with Honey-Lime Glaze

    Imagine this: the sound of sizzling chicken wings in the oven, the kitchen enveloped in an aromatic symphony of citrus and herbs, and the anticipation of that first juicy bite. These are no ordinary wings — they are a vibrant explosion of sweet, tangy, and herbaceous flavors, perfectly sticky from a honey-lime glaze that beckons you back for more.

    Personal Story

    Growing up, chicken wings were a family favorite in our household, a weekend staple that brought us all together around the kitchen table. My earliest memories involve me standing on a stool next to my grandfather, watching as he expertly marinated the wings, adding just a splash of this and a pinch of that. The magic of his cooking wasn’t just in the ingredients but in the love and patience he poured into each dish.

    But it wasn’t always smooth sailing in my culinary journey with chicken wings. I recall a kitchen mishap in my early cooking days when, in a moment of overzealous ambition, I decided to improvise with a marinade that was more vinegar than anything else. The result was a batch of wings so tangy they made our mouths pucker more than smile. It was a humbling lesson in balance and restraint.

    Over the years, I’ve experimented and refined my approach, aiming to replicate the warmth and joy of those family gatherings in every bite. This current version, the Zesty Citrus-Herb Baked Chicken Wings with Honey-Lime Glaze, feels like the culmination of those lessons. It’s a dish that not only tantalizes the taste buds but also pays homage to the culinary memories that shaped my love for cooking.

    One evening, while preparing these wings for friends, I stumbled upon the magic of pairing citrus with herbs like fresh cilantro and mint. The result was a revelation, a perfect marriage of flavors that elevated the humble chicken wing to new heights. And the honey-lime glaze? Well, that was the sticky, sweet cherry on top.

    What Makes This Version Special

    This version of baked chicken wings is special because it infuses the wings with a vibrant citrus-herb marinade, accented with a honey-lime glaze for an irresistible sticky finish. Unlike traditional recipes that might rely solely on hot sauce or a simple barbecue glaze, this recipe brings in a medley of fresh herbs and citrus elements. The inclusion of **orange zest** adds a fragrant layer of citrus aroma, which, when combined with the **fresh cilantro** and **mint**, provides an herbaceous depth that traditional wing recipes often lack.

    The sweet, tangy, and herbaceous profile is enhanced by the **dark brown sugar** and **smoked paprika**, which introduce a subtle smokiness and sweetness that complements the natural flavors of the chicken. And then, finishing the wings under the broiler caramelizes the honey-lime glaze, offering that delightful sticky texture that everyone loves.

    Flavor Profile

    Prepare yourself for a taste experience like no other: these citrus-herb baked chicken wings are a harmonious blend of sweet, tangy, and herbaceous with a touch of smokiness. As you take your first bite, the initial sweetness of the honey-lime glaze hits your palate, quickly followed by the zesty brightness of the citrus. The herbs — parsley, cilantro, and mint — dance in the background, providing a refreshing counterpoint to the richness of the chicken. Finally, the smoked paprika leaves a gentle smoky finish, making each bite a multi-layered journey of flavors.

    Ingredients

    • 2 pounds chicken wings
    • **2 tablespoons lemon juice**
    • **2 tablespoons lime juice**
    • **1 tablespoon orange zest**
    • 2 cloves garlic, minced
    • **1/4 cup honey**
    • 2 tablespoons dark brown sugar
    • 2 tablespoons red wine
    • 1/4 cup chicken broth
    • 2 tablespoons vegetable oil
    • **1/4 cup fresh Italian parsley, chopped**
    • **1/4 cup fresh cilantro, chopped**
    • **2 tablespoons fresh mint, chopped**
    • 1 teaspoon smoked paprika
    • 1 teaspoon salt
    • 1/2 teaspoon freshly ground black pepper

    Instructions

    1. In a large mixing bowl, combine the lemon juice, lime juice, orange zest, garlic, honey, dark brown sugar, red wine, chicken broth, and vegetable oil. Whisk until the sugar has dissolved.
    2. Add the fresh parsley, cilantro, mint, smoked paprika, salt, and black pepper to the marinade, stirring until well incorporated.
    3. Place the chicken wings in a large resealable plastic bag or a shallow dish. Pour the marinade over the wings, ensuring they are well coated. Seal the bag or cover the dish and marinate in the refrigerator for at least 1 hour, or up to a few hours for maximum flavor infusion.
    4. Preheat your oven to 400°F (200°C). Line a baking sheet with aluminum foil and place a wire rack on top. Arrange the wings in a single layer on the rack, reserving the marinade.
    5. Bake the wings for 35-40 minutes, basting with the reserved marinade every 10 minutes, until the wings are cooked through and golden-brown.
    6. For an irresistible sticky finish, turn on the broiler and broil the wings for an additional 2-3 minutes, watching closely to ensure they don’t burn, until the honey-lime glaze is caramelized and sticky.
    7. Remove the wings from the oven and let them rest for a few minutes before serving. Garnish with additional fresh herbs if desired.

    Pro Tips from Meaghan’s Kitchen

    • If you’re short on time, a quick 30-minute marinade will still yield flavorful results, but for the best taste, go for at least a few hours.
    • Use a microplane to zest the orange; it’s the best tool for getting fine, fragrant zest without the bitter pith.
    • For extra crispy skin, pat the wings dry with paper towels before marinating. The less moisture, the crispier the skin will become.
    • Don’t overcrowd the baking rack. Ensuring space between the wings allows for even cooking and optimal crispiness.
    • Store leftover marinade in a sealed container in the fridge and use it to marinate other proteins like shrimp or pork for an easy meal later in the week.

    Variations & Dietary Swaps

    • Vegetarian Swap: Try this marinade on cauliflower florets or tofu. Both absorb the flavors wonderfully and make a great vegetarian alternative.
    • Spice-It-Up Version: Add a teaspoon of chili flakes or a dash of hot sauce to the marinade for some extra heat.
    • Kids-Friendly Version: Reduce the smoked paprika and skip the broiling step to keep the wings milder and less sticky, perfect for little ones.

    What to Serve With It

    These zesty wings pair beautifully with a chilled glass of Sauvignon Blanc, whose crispness complements the citrus notes perfectly. For a more substantial meal, serve with a zesty coleslaw tossed in a lime vinaigrette or alongside some roasted sweet potatoes for a delightful contrast of flavors.

    Storage & Meal Prep

    Leftover wings can be stored in an airtight container in the refrigerator for up to 3 days. To reheat, place them in a preheated 350°F (175°C) oven for about 10-12 minutes until heated through. For longer storage, freeze the wings in a single layer on a baking sheet; once frozen, transfer them to a freezer-safe bag or container. They can be frozen for up to 3 months. Reheat directly from frozen in a 375°F (190°C) oven for about 20-25 minutes.

    FAQ

    What if I don’t have fresh herbs?

    If fresh herbs are unavailable, you can substitute with dried herbs. Use a third of the quantity as dried herbs are more concentrated in flavor.

    Can I use chicken drumsticks instead of wings?

    Absolutely! Chicken drumsticks will work just as well, though you may need to adjust the cooking time, baking them for an additional 10-15 minutes to ensure they’re cooked through.

    Is there a non-alcoholic substitute for red wine?

    You can substitute the red wine with either red grape juice or additional chicken broth. Both will provide the necessary liquid and flavor.

    How can I make the wings crispier?

    For extra crispiness, consider adding a tablespoon of baking powder to the marinade. It raises the pH level of the skin, helping it crisp up beautifully in the oven.

    What’s the best way to zest an orange?

    Use a microplane or fine grater for zesting. Avoid the white pith as it can be bitter; focus on just the colorful outer layer of the orange peel.

    Final Thoughts

    There’s something deeply satisfying about crafting a dish that not only delights the senses but also carries the warmth of shared memories and culinary adventures. These Zesty Citrus-Herb Baked Chicken Wings with Honey-Lime Glaze are a testament to flavor exploration and a celebration of the simple joys of cooking. I hope you savor every bite as much as I do. If you give this recipe a try, I’d love to hear how it turned out for you. Share your thoughts in the comments below or tag me on social media with your delicious creations. Happy cooking, dear friends!

    Related update: Zesty Citrus-Herb Baked Chicken Wings with Honey-Lime Glaze

    Related update: Peruvian Lomo Saltado with Crispy Quinoa Crust and Citrus Avocado Salsa

  • Gourmet Turkey Burgers with Roasted Red Pepper and Feta | Made by Meaghan Moineau

    Gourmet Turkey Burgers with Roasted Red Pepper and Feta | Made by Meaghan Moineau

    Gourmet Turkey Burgers with Roasted Red Pepper and Feta

    The warm sizzle of turkey burgers hitting a hot pan, a hint of tangy feta cheese mingling with the fresh aroma of mint, and the smoky allure of roasted red pepper relish – this is not your average cookout fare. Welcome to a Mediterranean-inspired flavor journey that will transform your typical burger night into a gourmet dining experience.

    Personal Story

    Growing up, turkey burgers were a weeknight staple in our home. My mom, ever the culinary magician, would whip them up with whatever we had on hand. It was always a delicious surprise to bite into the latest creation. One summer evening, after a particularly adventurous attempt involving pineapple and a questionable spice mix, I decided it was time to craft my own signature turkey burger recipe.

    Fast forward a few years to a bustling Saturday morning at the local farmer’s market. As I browsed the vibrant stalls, the aroma of freshly roasted red peppers drew me in. That’s when inspiration struck. Why not combine the savory goodness of turkey with the zesty kick of feta and the aromatic freshness of mint? The result was nothing short of extraordinary.

    My first attempt at these gourmet turkey burgers was during a backyard gathering with friends. As the burgers sizzled on the grill, guests began to gather, drawn by the intoxicating smell. The roasted red pepper relish added a layer of depth, complimenting the juicy, herb-infused turkey patties perfectly. It was a hit, and I knew this recipe was a keeper.

    Now, this recipe has become my go-to when I want to impress or simply indulge in something a bit more sophisticated than your average burger night. It’s a dish that carries memories of family dinners and farmer’s market discoveries – a true testament to the beauty of elevating the everyday.

    What Makes This Version Special

    What sets these gourmet turkey burgers apart is the incorporation of **tangy feta cheese** and a hint of **fresh mint**. These ingredients elevate the flavor profile of traditional turkey burgers, transforming them into a Mediterranean delight. Add a rich, smoky **roasted red pepper relish**, and you’ve got a dish that’s bursting with complexity and flavor.

    Most turkey burger recipes stick to the basics, but this version dares to be different. The feta cheese adds a creamy tang that perfectly complements the lean ground turkey, while the fresh mint introduces a delightful contrast of brightness and flavor. The roasted red pepper relish, with its deep, smoky notes, ties everything together, creating a burger that’s anything but ordinary.

    Flavor Profile

    Prepare yourself for a taste sensation with these gourmet turkey burgers. The savory turkey, combined with the **tanginess of feta** and the **freshness of mint**, creates a harmonious balance that delights the palate. As you bite into the juicy patty, the subtle **smokiness from the roasted red pepper relish** adds a layer of depth, making each mouthful a truly memorable experience. It’s a dish that dances between savory, zesty, and slightly sweet – a perfect melody of flavors.

    Ingredients

    • 1 lb lean extra ground turkey
    • 1/2 cup shredded carrots
    • 1 egg, beaten
    • 2 cloves garlic, minced
    • 3 green onions, finely chopped
    • 1/2 cup panko breadcrumbs
    • 1/2 cup crumbled **feta cheese**
    • 1/4 cup finely chopped **fresh mint leaves**
    • 1/2 cup grated zucchini
    • 1/4 cup spinach, chopped
    • 1 tbsp tomato paste
    • 1 tsp smoked paprika
    • Salt and pepper to taste
    • 2 large **red bell peppers**
    • Olive oil for spritzing
    • **Roasted red pepper relish**

    Instructions

    1. Begin by preparing the roasted red peppers. Char the skins of the red bell peppers directly over an open flame until blackened. This step adds a deeper smoky flavor that will penetrate the relish. Once charred, slice the peppers, remove the seeds, and spritz with olive oil. Roast in the oven at 425°F (220°C) for 20 minutes until they become tender and aromatic.
    2. In a large mixing bowl, combine the ground turkey, shredded carrots, egg, minced garlic, green onions, panko breadcrumbs, crumbled **feta cheese**, and chopped **fresh mint leaves**. Add grated zucchini, chopped spinach, tomato paste, and smoked paprika. Season with salt and pepper.
    3. Gently fold the mixture together, being careful not to overwork it. You want all ingredients to be well combined but not overly compacted to ensure juicy burgers.
    4. Divide the mixture into 4-6 equal portions and shape each into a round patty. Aim for uniform thickness to ensure even cooking.
    5. Preheat a grill or skillet to medium-high heat. Cook the patties for about 4-5 minutes per side, or until they reach an internal temperature of 165°F (74°C) and are golden-brown on the outside.
    6. As the burgers cook, prepare the roasted red pepper relish by chopping the roasted peppers and combining them with a drizzle of olive oil, salt, and pepper. The relish should be slightly chunky, adding texture to the burgers.
    7. Serve your gourmet turkey burgers topped with the smoky roasted red pepper relish, and enjoy the symphony of flavors.

    Pro Tips from Meaghan’s Kitchen

    • When forming the patties, create a small indentation in the center of each burger. This helps them cook more evenly and prevents them from puffing up in the middle.
    • If you’re short on time, prepare the roasted red pepper relish a day ahead. It allows the flavors to meld beautifully, enhancing the overall taste.
    • Consider using a combination of fresh herbs such as parsley or cilantro for an added layer of flavor complexity.
    • Make sure your grill or skillet is properly preheated before adding the patties. This ensures a good sear and locks in the juices.
    • For extra flavor, toast the burger buns on the grill for a quick minute before serving.

    Variations & Dietary Swaps

    • Vegetarian Version: Swap out the turkey for a hearty mix of chickpeas and quinoa. Add extra breadcrumbs to bind the mixture.
    • Spice-It-Up: Add a pinch of cayenne pepper or a dash of sriracha sauce to the burger mix for a spicy kick.
    • Kids-Friendly: Skip the mint and smoked paprika, and add a touch of mild cheddar cheese to make the burgers more appealing to younger taste buds.

    What to Serve With It

    Pair these gourmet turkey burgers with a chilled glass of Sauvignon Blanc to complement the tangy feta and fresh mint. For a classic side, serve with crispy sweet potato fries, which naturally balance the savory notes of the burger. A light side salad with a lemon vinaigrette also works beautifully to refresh the palate between bites.

    Storage & Meal Prep

    These turkey burgers are perfect for meal prep. Once cooked, allow the patties to cool completely before storing them in an airtight container in the refrigerator for up to 3 days. To freeze, arrange the patties on a baking sheet lined with parchment paper and place them in the freezer until solid. Transfer to a freezer-safe bag or container and store for up to 3 months. Reheat in the oven at 350°F (175°C) until heated through, being careful not to dry them out.

    FAQ

    Can I use a different cheese instead of feta?

    Absolutely! Goat cheese or a mild blue cheese can make great substitutes, adding their own unique flavors to the mix.

    How can I make the burgers juicier?

    Incorporating ingredients like grated zucchini and carrots not only adds moisture but also boosts the nutritional profile of the burgers.

    What if I don’t have a grill?

    No problem! You can cook these burgers in a skillet on your stovetop. Just ensure it’s heated to medium-high for a good sear.

    Can I make the burgers ahead of time?

    Yes, you can prepare the patties and store them uncooked in the fridge for up to 24 hours. This makes it easy to simply cook them when you’re ready to eat.

    What’s the best way to reheat the burgers?

    For the best results, reheat the burgers in the oven to maintain their juiciness. Avoid microwaving as it can make them rubbery.

    Final Thoughts

    Embrace the flavors of the Mediterranean with these gourmet turkey burgers, a delightful dish that proves healthy eating doesn’t have to be boring. I hope you’ll give this recipe a try and make it your own. Whether you’re grilling for friends or enjoying a quiet night in, these burgers are sure to impress. I’d love to hear how yours turned out or any twists you added, so feel free to drop a comment or share your photos. Happy cooking!

    Related update: Gourmet Turkey Burgers with Roasted Red Pepper and Feta

    Related update: Zesty Citrus-Herb Baked Chicken Wings with Honey-Lime Glaze

  • Sumptuous Mediterranean Moussaka with Pistachio-Crusted Eggplants | Made by Meaghan Moineau

    Sumptuous Mediterranean Moussaka with Pistachio-Crusted Eggplants

    Imagine the scent of roasted eggplant mingling with the warm, spicy aroma of cinnamon and nutmeg. The sizzle of sautéing onions and garlic fills the air, drawing you into the kitchen where a Mediterranean feast is unfolding. This isn’t just any moussaka — it’s a Sumptuous Mediterranean Moussaka with Pistachio-Crusted Eggplants, and it’s about to redefine your culinary expectations.

    Personal Story

    My love affair with moussaka began on a sun-soaked trip to Crete, where the vibrant flavors and hospitable locals made every meal an unforgettable experience. One evening, nestled in a cozy taverna overlooking the Aegean Sea, I was served a slice of moussaka that stopped time. The layers of eggplant, rich meat sauce, and creamy béchamel were perfectly balanced, each bite a harmonious dance of flavors.

    Back home, I was determined to recreate that magical dish. My first few attempts were less than stellar, resulting in soggy eggplant and bland béchamel. But with persistence and a few creative twists, I found a version that not only captured the essence of that Cretan evening but elevated it in unexpected ways.

    One day, while rummaging through my pantry, I stumbled upon a bag of pistachios. A light bulb moment occurred — why not add a nutty crust to the eggplant layers? The result was a delightful crunch that contrasted beautifully with the creamy béchamel. My family, who had been my patient taste-testers, were unanimous in their verdict: this was the best moussaka yet.

    And so, the Sumptuous Mediterranean Moussaka with Pistachio-Crusted Eggplants was born, a dish that now holds a special place in my kitchen and heart. It’s a testament to the power of experimentation and the joy of bringing a taste of the Mediterranean home.

    What Makes This Version Special

    This version of moussaka stands out with its unique pistachio-crusted eggplant layers. The crunch of the pistachios adds a delightful texture that transforms the dish from ordinary to extraordinary. Meanwhile, the béchamel sauce is infused with a hint of lemon zest, offering a refreshing lift that brightens the rich, hearty flavors. These tweaks not only elevate the classic moussaka but also provide a new dimension to every bite.

    Flavor Profile

    The Sumptuous Mediterranean Moussaka with Pistachio-Crusted Eggplants is a feast for the senses. Imagine the rich and hearty flavors of a traditional moussaka, now enhanced by a zesty, nutty undertone. The pistachio crust adds a satisfying crunch that complements the savory meat sauce, while the lemon-infused béchamel provides a light, aromatic finish. It’s a symphony of textures and tastes, with each layer bringing something special to the table.

    Ingredients

    • 4 medium-sized eggplants, cut into 1/4 inch slices
    • **1 cup pistachios, finely chopped**
    • 2 tablespoons olive oil
    • 1 teaspoon sea salt
    • 1 tablespoon butter
    • 1/4 cup flour
    • 2 cups warm milk
    • **Zest of 1 lemon**
    • 1/4 cup fresh mint leaves, chopped
    • 3 egg yolks
    • 1/2 teaspoon ground nutmeg
    • 1 pound lean beef
    • 1 onion, finely chopped
    • 2 cloves garlic, minced
    • 1/2 teaspoon ground cinnamon
    • 1/2 teaspoon ground allspice
    • 1/2 teaspoon white salt
    • 1/2 teaspoon ground pepper
    • 1 can (14 oz) tomatoes, crushed
    • 2 tablespoons tomato paste
    • 1 cup feta cheese, crumbled
    • 1 cup bread crumbs

    Instructions

    1. Sprinkle the eggplant slices with sea salt and let them stand for 45 minutes to draw out excess moisture. Rinse thoroughly and pat dry.
    2. Preheat your oven to 180°C (350°F). Coat each eggplant slice with olive oil and dip them into the **finely chopped pistachios**. Arrange on a baking sheet and bake until golden-brown, about 15 minutes per side. Set aside.
    3. In a large skillet, heat olive oil over medium heat. Sauté the onions until soft, about 5 minutes. Add garlic and cook for another minute.
    4. Add the ground beef, breaking it into small pieces as it cooks. Once browned, stir in the crushed tomatoes, cinnamon, allspice, white salt, and ground pepper. Simmer on low heat for about 10 minutes. Mix in the tomato paste and adjust consistency with a little water if needed. Set aside.
    5. For the béchamel, melt butter in a saucepan over medium heat. Add flour and stir constantly until it forms a smooth paste. Gradually whisk in warm milk, bringing it to a gentle boil. Remove from heat and season with ground nutmeg. Whisk in the egg yolks vigorously until smooth. Stir in the **lemon zest** and fresh mint.
    6. Lightly oil a suitable ovenproof baking dish and sprinkle the base with bread crumbs. Layer with pistachio-crusted eggplants, some meat sauce, and crumbled feta cheese. Repeat these layers until the dish is nearly full, finishing with a layer of feta.
    7. Top everything with the lemon-mint béchamel sauce. Cover with foil and bake in the preheated oven for 1 hour.
    8. Remove the foil and let the moussaka set at room temperature for about 45 minutes before serving. This helps the layers to firm up and blend their flavors beautifully.

    Pro Tips from Meaghan’s Kitchen

    • For an even crunchier pistachio crust, toast the pistachios lightly in a dry pan before chopping.
    • Letting the eggplant sit with salt not only removes bitterness but also makes them absorb less oil during baking.
    • Don’t skip the resting time after baking; it’s crucial for achieving neat, well-defined layers when you cut into the moussaka.
    • To save time, make the meat sauce a day ahead. It allows the flavors to meld and makes your kitchen work more manageable.
    • If you prefer a thicker béchamel, simply add a bit more flour to your roux and adjust the milk accordingly.

    Variations & Dietary Swaps

    • Vegetarian Swap: Replace the beef with a mixture of mushrooms and lentils for a hearty vegetarian option.
    • Spice-It-Up Version: Add a teaspoon of crushed red pepper flakes to the meat sauce for a bit of heat.
    • Kids-Friendly Version: Substitute the eggplant with zucchini to make it more appealing to younger palates.

    What to Serve With It

    This Sumptuous Mediterranean Moussaka pairs wonderfully with a glass of chilled Sauvignon Blanc, whose crisp acidity complements the richness of the dish. For a side, consider a classic Greek salad with olives, cucumbers, and a sprinkle of feta cheese to keep the Mediterranean theme going.

    Storage & Meal Prep

    For leftovers, store the moussaka in an airtight container in the fridge for up to four days. It also freezes exceptionally well; just wrap tightly in foil and place in a freezer-safe container for up to two months. Reheat in the oven at 180°C (350°F) until heated through. This dish is perfect for meal prep, as it often tastes even better the next day!

    FAQ

    Can I make this moussaka ahead of time?

    Yes, you can! Prepare the moussaka up to the baking step, cover it, and refrigerate for up to 24 hours. When you’re ready to bake, simply add an extra 10-15 minutes to the cooking time.

    What is the best way to chop pistachios?

    For a fine chop, use a food processor, pulsing a few times until you reach the desired consistency. Be careful not to over-process, as you want small pieces, not a paste.

    How can I prevent the béchamel sauce from curdling?

    Always add the egg yolks off the heat and whisk vigorously. Slowly tempering the yolks with a bit of the hot milk before adding to the sauce can also help prevent curdling.

    What’s a good substitute for feta cheese?

    If you’re not a fan of feta, ricotta cheese can be a milder alternative, or you can use goat cheese for a slightly tangier flavor.

    Can I use pre-cooked meat for the sauce?

    Absolutely. If you have leftover cooked beef, simply crumble it into the sauce after sautéing the onions and garlic.

    Final Thoughts

    Creating this Sumptuous Mediterranean Moussaka with Pistachio-Crusted Eggplants is more than just making dinner; it’s an exploration of texture and flavor that brings the spirit of the Mediterranean into your home. I hope you’ll find as much joy in making and sharing this dish as I do. If you give it a try, please leave a comment or share your version on social media. Happy cooking, my friends!

    Related update: Sumptuous Mediterranean Moussaka with Pistachio-Crusted Eggplants

    Related update: Gourmet Turkey Burgers with Roasted Red Pepper and Feta

  • Maple-Glazed Bacon Wrapped Gouda-Stuffed Chicken Breast | Made by Meaghan Moineau

    Maple-Glazed Bacon Wrapped Gouda-Stuffed Chicken Breast | Made by Meaghan Moineau

    Maple-Glazed Bacon Wrapped Gouda-Stuffed Chicken Breast

    Imagine the aroma wafting through your kitchen: sizzling bacon intertwined with the sweetness of maple syrup, wrapped around a succulent chicken breast slowly oozing rich, creamy Gouda. This is not just a meal; it’s a culinary experience that turns any ordinary evening into a gourmet delight.

    My love affair with this dish began on a chilly autumn day. I was hosting my first-ever Friendsgiving and wanted to impress without straying too far from classic comforts. The idea of wrapping chicken in bacon was inspired by a family barbecue, where my uncle would always toss bacon-wrapped hot dogs onto the grill. They were a simple hit, but I knew there was a way to elevate that concept into something truly memorable.

    In my tiny, bustling kitchen, I experimented with flavors, textures, and techniques. The kitchen was alive with chatter and laughter, while the smell of maple-glazed bacon filled the air. At that moment, I knew I had stumbled upon something special. The final dish was met with “oohs” and “aahs” as the savory, smoky, and sweet flavors melded together beautifully.

    There was a mishap or two—like the time I tried to cook the bacon-wrapped chicken entirely on the stovetop, only to end up with a smoky kitchen and undercooked chicken. But every mistake was a lesson, bringing me closer to the perfect Maple-Glazed Bacon Wrapped Gouda-Stuffed Chicken Breast recipe that I am proud to share with you today.

    What Makes This Version Special

    This isn’t your everyday bacon-wrapped chicken. What sets this version apart is the addition of creamy Gouda cheese inside the chicken breast, which melts beautifully as it cooks. The Gouda introduces a sophistication with its nutty, slightly sweet profile that perfectly complements the other flavors. The real star, however, is the maple glaze. By brushing the chicken with a mix of maple syrup and Dijon mustard before wrapping it in bacon, we create a sweet and tangy glaze that caramelizes the bacon to golden perfection. This recipe elevates the classic dish to gourmet heights, making it ideal for special occasions or when you simply want to impress.

    Flavor Profile

    Prepare your taste buds for a delightful journey of sweet, smoky, and savory flavors. The creamy, melted Gouda provides a luscious texture, while the bacon offers a crispy, smoky contrast. A hint of herbaceous thyme rounds out the flavors, adding a subtle freshness that ties everything together. Each bite is an explosion of taste, making this dish a standout on any table.

    Ingredients

    • 4 skinless, boneless chicken breasts
    • 8 slices smoked Wright Brand Hickory Bacon
    • 4 slices **Gouda cheese**
    • 2 tablespoons **maple syrup**
    • 1 tablespoon Dijon mustard
    • 1 teaspoon fresh thyme leaves
    • Salt and pepper to taste

    Instructions

    1. Preheat your oven to 375°F (190°C). Clean and thoroughly dry the chicken breasts. Drying the chicken makes slicing easier and helps the bacon crisp up.
    2. Slice each chicken breast lengthwise to create a pocket, being careful not to cut all the way through. Stuff each pocket with a slice of Gouda cheese and a sprinkle of fresh thyme.
    3. Season the outside of the chicken breasts with salt and pepper.
    4. In a small bowl, mix together the maple syrup and Dijon mustard. Brush this mixture generously over each chicken breast.
    5. Carefully wrap each stuffed chicken breast with two slices of bacon, overlapping the edges as you wrap to secure the filling inside.
    6. Heat a large oven-safe skillet over medium-high heat. Sear the wrapped chicken breasts on all sides until the bacon is caramelized and golden-brown, about 3-4 minutes per side.
    7. Transfer the skillet to the preheated oven and bake for 25-30 minutes, or until the chicken is cooked through and reaches an internal temperature of 165°F (74°C).
    8. Remove from the oven and let the chicken rest for 5 minutes before slicing. This ensures the juices redistribute evenly.
    9. Serve warm with your favorite sides.

    Pro Tips from Meaghan’s Kitchen

    • Use a Meat Thermometer: Ensure perfectly cooked chicken by using a meat thermometer to check for a safe internal temperature of 165°F.
    • Let Gouda Shine: Opt for high-quality Gouda for maximum flavor impact. Smoked Gouda can add an extra layer of smokiness if you’re feeling adventurous.
    • Bacon Choice Matters: Thick-cut bacon works best for wrapping as it holds up well during cooking and crisps nicely.
    • Secure with Toothpicks: If your bacon seems to be slipping, use toothpicks to secure it in place during cooking—just remember to remove them before serving!
    • Sauce It Up: For a finishing touch, drizzle a little extra maple-Dijon glaze over the cooked chicken before serving.

    Variations & Dietary Swaps

    • Vegetarian Swap: Replace the chicken with thick slices of portobello mushrooms. Use a plant-based bacon alternative and vegan cheese for a delicious vegetarian option.
    • Spice-It-Up Version: Add a teaspoon of cayenne pepper to the maple-Dijon glaze for a spicy kick that contrasts beautifully with the sweetness.
    • Kids-Friendly Version: Use cheddar cheese instead of Gouda and skip the thyme for a milder, more kid-friendly flavor profile.

    What to Serve With It

    This Maple-Glazed Bacon Wrapped Gouda-Stuffed Chicken Breast pairs beautifully with a chilled glass of Riesling, which balances the sweetness and richness of the dish. For sides, consider roasted sweet potatoes or a fresh, zesty arugula salad to add a refreshing contrast.

    Storage & Meal Prep

    Store any leftover chicken in an airtight container in the refrigerator for up to 3 days. To freeze, wrap each cooked chicken breast tightly in plastic wrap and place in a freezer-safe bag for up to 2 months. Reheat in a 350°F oven until warmed through, about 15-20 minutes, ensuring the bacon remains crispy.

    FAQ

    Can I prepare this dish ahead of time?

    Yes! You can assemble the chicken breasts a day in advance and store them in the fridge. Sear and bake them just before you’re ready to serve.

    What if I don’t have an oven-safe skillet?

    After searing, transfer the wrapped chicken breasts to a baking dish or sheet before placing them in the oven.

    How do I prevent the cheese from leaking out?

    Be sure to seal the edges of the chicken well and secure the bacon tightly. A toothpick can also help hold everything together during cooking.

    What other cheeses can I use?

    If Gouda isn’t your style, you can try cheeses like mozzarella, cheddar, or even a spicy pepper jack for a different flavor profile.

    Can I use turkey bacon instead?

    Absolutely! Turkey bacon is a leaner option and will work well, though it may not crisp up as much as pork bacon.

    Final Thoughts

    Bringing this Maple-Glazed Bacon Wrapped Gouda-Stuffed Chicken Breast to your table is like sharing a piece of my kitchen with you. Whether you’re making this for a special occasion or simply to treat yourself on a Tuesday night, I hope you find as much joy in cooking and serving this dish as I have. Don’t forget to share your experience with me in the comments — I’d love to hear how your culinary adventure turns out!

    Related update: Maple-Glazed Bacon Wrapped Gouda-Stuffed Chicken Breast

    Related update: Sumptuous Mediterranean Moussaka with Pistachio-Crusted Eggplants