Category: Appetizer

  • Pennsylvania Dutch Pickled Eggs | Made by Meaghan Moineau

    Pennsylvania Dutch Pickled Eggs | Made by Meaghan Moineau

    Pennsylvania Dutch Pickled Eggs

    Why You’ll Love It

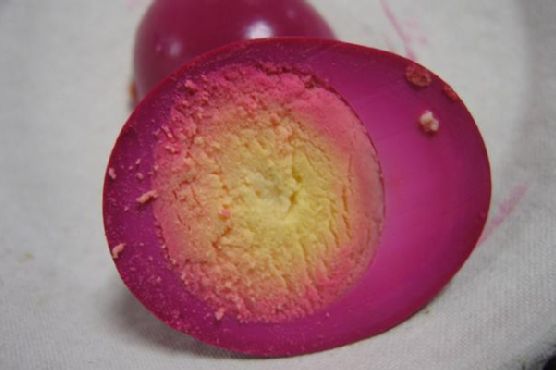
    Pickled eggs are a delightful and tangy treat that will transport you to the heart of Pennsylvania Dutch country. Not only are they visually striking with their vibrant pink hue, but they also pack a punch of flavor that is both sweet and tangy. These pickled eggs are a testament to the simplicity and resourcefulness of traditional cooking, using basic pantry staples to create something truly special. Whether you’re a fan of traditional pickling or looking to try something new, these eggs are sure to become a favorite in your household.

    I remember the first time I encountered pickled eggs at a small family gathering in rural Pennsylvania. My great-aunt Martha would bring a large jar of these beautifully colored eggs, and they were always the first to disappear from the table. To this day, the taste of these pickled eggs brings back cherished memories of family, laughter, and the warm kitchen where we gathered to share stories and food.

    Ingredients

    • 1 can of beets, drained (reserve the liquid)
    • 1 cup cider vinegar
    • 12 hard-boiled eggs, peeled
    • 1/2 cup granulated sugar
    • 1 onion, thinly sliced
    • 1 teaspoon table salt

    Instructions

    1. Drain the liquid from the beets into a medium saucepan. Set the beets aside for later use.
    2. In a large bowl or jar, layer the beets, sliced onions, and hard-boiled eggs.
    3. Add the granulated sugar and cider vinegar to the saucepan with the beet liquid and stir well.
    4. Bring the mixture to a boil over medium heat, stirring occasionally to ensure the sugar dissolves completely.
    5. Once boiling, reduce the heat to low and let the mixture simmer for 15 minutes.
    6. Carefully pour the hot beet juice mixture over the beets, eggs, and onions in the bowl or jar.
    7. Seal the bowl or jar tightly with a lid.
    8. Refrigerate the pickled eggs for at least one day before serving. The longer the eggs sit, the more flavorful they will become.

    Tips

    For the best results, ensure that the eggs are completely submerged in the pickling liquid. If necessary, you can weigh them down with a small plate or a clean object that fits inside the jar. Allowing the eggs to sit for at least three days will enhance the flavor and color even more. Always use freshly boiled eggs for easier peeling, and make sure they are completely cooled before pickling.

    Variations & Substitutions

    The beauty of this recipe lies in its versatility. Here are some variations and substitutions you can try to suit your taste preferences:

    • Spice it up: Add whole cloves, peppercorns, or a cinnamon stick to the pickling liquid for a spicier kick.
    • Sweeter touch: Increase the granulated sugar by a few tablespoons if you prefer a sweeter pickled egg.
    • Alternative vinegar: White vinegar or red wine vinegar can be used in place of cider vinegar for a slightly different flavor profile.
    • Vegetarian option: Omit the eggs and use only beets and onions for a vibrant pickled veggie side dish.

    Storage

    Store the pickled eggs in the refrigerator in a sealed jar or airtight container. They will keep for up to two weeks, but are best enjoyed within the first week for optimal flavor and texture. Always ensure the eggs are covered completely by the pickling liquid to prevent spoilage.

    FAQ

    Can I use fresh beets instead of canned?

    Yes, you can use fresh beets. Simply boil them until tender, peel, and slice. Use the cooking water as part of your beet liquid for the pickling process.

    Why did my eggs turn rubbery?

    If your eggs turned rubbery, they may have been overcooked during the boiling process. Ensure that you cook the eggs just until the yolks are set and immediately cool them in ice water to stop the cooking process.

    Can I reuse the pickling liquid?

    Reusing pickling liquid is not recommended as it loses potency and may harbor bacteria after the initial use. It’s best to make a fresh batch for each new set of pickled eggs.

    Nutrition

    Each pickled egg contains approximately:

    • Calories: 80
    • Protein: 6g
    • Fat: 5g
    • Carbohydrates: 5g
    • Sugar: 4g
    • Sodium: 200mg

    Final Thoughts

    Pennsylvania Dutch Pickled Eggs are a delightful way to bring a touch of tradition into your kitchen. Their vibrant color and unique flavor make them a standout addition to any meal, whether it’s a picnic, a holiday gathering, or simply a snack on a lazy afternoon. As you savor each bite, may it bring you comfort and nostalgia, just as it has for generations of families before. Enjoy the taste of history and the love that goes into every jar of these pickled treasures.

    Related update: Pennsylvania Dutch Pickled Eggs

    Related update: Oven-Baked Feta Cheese Dip

  • Sausage & Pepperoni Stromboli | Made by Meaghan Moineau

    Sausage & Pepperoni Stromboli | Made by Meaghan Moineau

    Sausage & Pepperoni Stromboli

    Welcome to our cozy kitchen, where today we’re going to dive into a classic, mouthwatering recipe: Sausage & Pepperoni Stromboli. This dish brings back fond memories of family gatherings at my grandmother’s house, where the rich aromas of freshly baked bread and sizzling sausage would fill the air. As a child, I remember eagerly waiting for the moment we could slice into the golden crust to reveal the cheesy, savory filling inside. Now, I’m excited to share this beloved recipe with you!

    Why You’ll Love It

    This Sausage & Pepperoni Stromboli is a delightful twist on traditional pizza, featuring a flaky, golden crust wrapped around a hearty, cheesy filling. It’s perfect for a cozy dinner, a game day snack, or even a potluck dish. Here are a few reasons why you’ll fall in love with this recipe:

    • Simple and Satisfying: With just a few ingredients, this stromboli is easy to assemble yet incredibly satisfying.
    • Versatile: Perfect as an appetizer, main dish, or even a lunchbox treat.
    • Family-Friendly: Kids and adults alike will enjoy customizing their slices with extra pizza sauce or toppings.
    • Make-Ahead: Prepare it in advance and pop it in the oven when you’re ready to enjoy!

    Ingredients

    • 1 egg
    • 1/2 pound Italian sausage
    • 1 cup shredded Parmesan cheese
    • 1/2 cup pepperoni slices
    • 1 roll of pizza dough
    • 1/2 cup pizza sauce, plus more for serving
    • 1 cup shredded mozzarella cheese

    Instructions

    1. Preheat your oven to 450 degrees F. Cook the Italian sausage in a medium skillet over medium heat until browned. Drain on paper towels and crumble into small pieces.
    2. Line a baking pan with parchment paper and lightly flour the surface. Roll out the pizza dough to form a large rectangle.
    3. Brush a thin layer of pizza sauce over the dough, leaving a small border around the edges.
    4. Evenly spread the crumbled sausage over the sauce, followed by the shredded mozzarella cheese.
    5. Layer the pepperoni slices on top of the cheese, then sprinkle 3/4 cup of the Parmesan cheese over the top.
    6. Gently fold in the short sides of the dough to form a seal around the filling.
    7. Starting from one long side, carefully roll the dough into about one third of the stromboli. Using the parchment paper to assist, continue rolling until you reach the opposite end. Pinch the seam to seal and place the stromboli seam-side down on the baking pan.
    8. In a small bowl, mix the egg with 1 tablespoon of water. Brush the egg mixture over the stromboli and sprinkle with the remaining 1/4 cup of Parmesan cheese.
    9. Place in the oven and immediately turn the temperature down to 350 degrees F. Bake for approximately 18 minutes.
    10. Remove from the oven and let the stromboli rest for 10 minutes. Check the center to ensure the dough is fully cooked. If needed, slice the stromboli in half and bake for an additional 5-8 minutes.
    11. Slice and serve with warm pizza sauce for dipping.

    Tips

    • Ensure your dough is at room temperature before rolling it out to prevent it from shrinking back.
    • For a crispier crust, use a pizza stone preheated in the oven.
    • Let the stromboli rest before slicing to allow the cheese to set slightly, making it easier to cut.

    Variations & Substitutions

    Feel free to get creative with your stromboli filling! Here are some ideas to customize your dish:

    • Vegetarian: Swap the sausage and pepperoni for mushrooms, bell peppers, and spinach.
    • Extra Spicy: Add sliced jalapeños or a sprinkle of red pepper flakes for a kick.
    • Different Cheeses: Experiment with provolone or cheddar cheese for a different flavor profile.

    Storage

    Store any leftover stromboli in an airtight container in the refrigerator for up to 3 days. To reheat, place slices in a preheated oven at 350 degrees F for about 10 minutes or until heated through. You can also freeze the baked stromboli for up to 3 months. Thaw overnight in the refrigerator before reheating.

    FAQ

    Can I use store-bought dough?

    Absolutely! Store-bought pizza dough works wonderfully for this recipe and saves time. Just ensure it’s at room temperature before rolling it out.

    How can I prevent the filling from leaking?

    Be sure to seal the edges of the dough well and avoid overfilling. Gently pinching the seams and tucking the ends will help contain the delicious filling.

    Nutrition

    This stromboli is a hearty dish that provides protein from the sausage and cheese, along with carbohydrates from the dough. While it’s a treat best enjoyed occasionally, you can balance it with a side salad or roasted vegetables for a well-rounded meal.

    Final Thoughts

    This Sausage & Pepperoni Stromboli is a delightful way to enjoy the flavors of pizza in a new, exciting form. Whether you’re serving it for a family dinner or a casual get-together, it’s sure to be a hit. I hope this recipe brings as much joy to your table as it has to mine. Happy cooking!

    Related update: Sausage & Pepperoni Stromboli

    Related update: North Carolina-Style BBQ Pulled Pork

  • Chicken and Mango Skewer | Made by Meaghan Moineau

    Chicken and Mango Skewer | Made by Meaghan Moineau

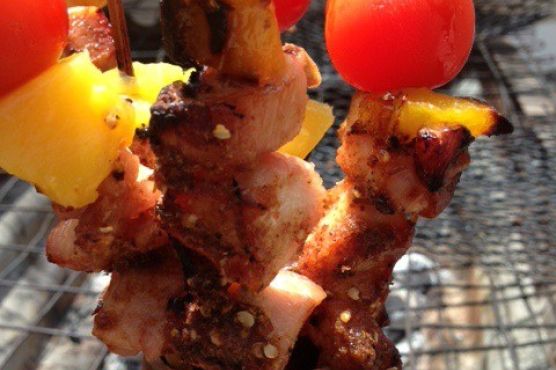
    Chicken and Mango Skewers

    There’s something magical about the sweet and savory combination of chicken and mangoes, especially when grilled to perfection. This recipe for Chicken and Mango Skewers is a delightful treat that’s perfect for barbecues or a cozy family dinner. As I prepare these skewers, I often find myself reminiscing about summer afternoons spent in my grandmother’s backyard, where the scent of grilled meats blended with the laughter of family and friends. These skewers capture those cherished memories and bring a taste of sunshine to your plate, no matter the season.

    Why You’ll Love It

    This Chicken and Mango Skewer recipe is a crowd-pleaser for several reasons:

    • Simplicity: With just a handful of ingredients, it’s incredibly easy to prepare, making it perfect for busy weeknights.
    • Flavor-packed: The suya seasoning mix adds a spicy kick that complements the sweetness of the mangoes beautifully.
    • Versatile: Serve it as an appetizer, a main dish with rice, or even as part of a vibrant salad.
    • Healthy: Using skinless chicken breast and a moderate amount of vegetable oil keeps this dish light and nutritious.

    Ingredients

    • 2 skinless chicken breasts
    • 1 chicken stock cube
    • 1 can of mangos (or 2 fresh mangos, peeled and cubed)
    • 1 teaspoon dry pepper
    • 2 tablespoons suya seasoning mix
    • 1 cooking spoon of vegetable oil

    Instructions

    1. Chop the chicken breasts into cubes and thread them onto skewers.
    2. Preheat your grill or oven to a medium-high heat.
    3. Place the chicken skewers on the grill to sear slightly.
    4. In a bowl, mix the chicken stock cube, dry pepper, suya seasoning, and vegetable oil to form a marinade.
    5. Using a brush, generously coat the chicken skewers with the marinade on both sides.
    6. Continue grilling, flipping occasionally, until the chicken is browned and cooked through.
    7. Once the chicken is cooked, thread the mango pieces onto the skewers. If using firm mangoes, grill them briefly for a caramelized touch.
    8. Serve the skewers on their own as an appetizer or alongside rice for a complete meal.

    Tips

    • If using wooden skewers, soak them in water for at least 30 minutes before grilling to prevent burning.
    • For an extra burst of flavor, let the chicken marinate in the seasoning mix for a few hours before grilling.
    • If you prefer spicier skewers, increase the amount of dry pepper in the marinade.

    Variations & Substitutions

    Feel free to customize this recipe to suit your taste or dietary needs:

    • Protein Swap: Substitute chicken with shrimp or tofu for a different twist.
    • Fruit Options: Pineapple or peaches can be used in place of mangoes for a different fruity flavor.
    • Vegetarian Option: Omit the chicken and use a selection of bell peppers, zucchini, and mushrooms for a hearty vegetarian skewer.

    Storage

    Leftover skewers can be stored in an airtight container in the refrigerator for up to 3 days. To reheat, place them in a preheated oven or on a grill until warmed through. Avoid microwaving, as it may make the chicken rubbery.

    FAQ

    Can I use fresh mangoes instead of canned?

    Absolutely! Fresh mangoes work perfectly in this recipe. Just make sure they are ripe but firm enough to hold their shape on the skewer.

    What is suya seasoning mix?

    Suya seasoning is a West African spice blend typically made from ground peanuts, ginger, garlic, paprika, and cayenne pepper. It gives the skewers a unique and savory flavor.

    Can I bake these skewers instead of grilling?

    Yes, you can bake the skewers in a preheated oven at 400°F (200°C) for about 20-25 minutes, flipping halfway through, until the chicken is cooked through.

    Nutrition

    This dish is a balanced combination of protein, healthy fats, and carbohydrates. Each serving provides approximately:

    • Calories: 300
    • Protein: 25g
    • Carbohydrates: 20g
    • Fat: 10g

    Final Thoughts

    These Chicken and Mango Skewers are a delightful way to bring a taste of the tropics to your table. Whether you’re enjoying them with family or sharing them at a barbecue, they’re sure to be a hit. The combination of tender chicken and sweet mango, all wrapped up in a spicy, flavorful seasoning, is irresistible. So, fire up your grill and enjoy a bite of sunshine!

    Related update: Chicken and Mango Skewer

    Related update: Sausage & Pepperoni Stromboli

  • Fava Crostini | Made by Meaghan Moineau

    Fava Crostini | Made by Meaghan Moineau

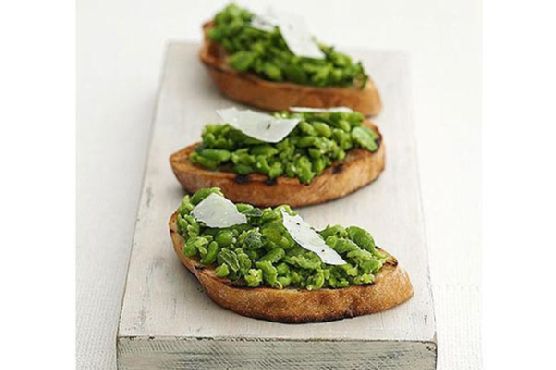
    Fava Crostini: A Delicious and Simple Appetizer

    There’s something truly magical about sitting around a rustic wooden table with friends, sharing stories and laughter over a spread of homemade delicacies. One such memorable moment for me was on a sun-drenched afternoon in Tuscany, where I first discovered the delightful simplicity of Fava Crostini. The creamy texture of the fava beans paired with the crunch of toasted bread left an indelible mark on my taste buds and my heart. This recipe, inspired by that unforgettable day, brings a piece of Tuscany to your home and is perfect for any gathering.

    Why You’ll Love It

    Fava Crostini is not just an appetizer; it’s an experience. Here’s why you and your guests will fall in love with this dish:

    • Simple Ingredients: With just a handful of basic ingredients, you can create a dish that bursts with flavor.
    • Quick and Easy: This recipe is straightforward and can be prepared in under 30 minutes.
    • Versatile: Whether you’re hosting a formal dinner or a casual get-together, Fava Crostini fits right in.
    • Nutritious: Packed with protein and fiber, fava beans are a healthy addition to any meal.

    Ingredients

    • Fresh broad beans (fava beans)
    • Glugs of olive oil
    • Whole garlic clove
    • Lemon, for squeezing
    • Water
    • Parmesan, for shaving
    • Salt & pepper to taste
    • Crusty bread (sliced)

    Instructions

    1. Throw the fava in a pan and cover with water and a little salt. Bring to a boil and then lower to a simmer.
    2. Cook for a couple of minutes until the fava beans are tender. Drain them thoroughly.
    3. Return the pan to the heat and pour in a couple of glugs of olive oil along with the whole garlic clove.
    4. Fry the garlic until it is browned and aromatic, then discard the garlic.
    5. Toss the fava beans into the pan and sauté for a minute or two.
    6. Begin mashing the fava beans with the back of a wooden spoon until you form a paste. Add a bit of water if necessary for consistency.
    7. Remove the fava paste from heat and season with salt, pepper, and a squeeze of lemon.
    8. Toast slices of good crusty bread.
    9. Rub the warm fava mixture onto the toasted bread and top with shaved parmesan.
    10. Optionally, drizzle a little extra virgin olive oil over the top for added richness.

    Tips

    • Quality Olive Oil: Use the best quality olive oil you can find, as it adds depth and richness to the dish.
    • Garlic Flavor: If you love garlic, feel free to mince it and incorporate it into the fava paste instead of discarding after frying.
    • Perfect Toast: Make sure your bread is toasted to golden perfection to provide the perfect crunch against the creamy fava spread.

    Variations & Substitutions

    Here are some creative ways to make this dish your own:

    • Add Herbs: Incorporate fresh herbs like mint or basil into the fava paste for a burst of flavor.
    • Cheese Options: Instead of parmesan, try using pecorino romano or even a creamy goat cheese for a different taste.
    • Gluten-Free: Use gluten-free bread or crackers to make this dish suitable for gluten-sensitive guests.

    Storage

    If you have leftovers, store the fava paste in an airtight container in the refrigerator for up to three days. Reheat gently on the stove before serving again. It’s best to toast fresh bread when ready to serve, as the texture can change if stored.

    FAQ

    Can I use frozen fava beans?

    Yes, you can use frozen fava beans if fresh ones are not available. Just make sure they are fully thawed before you start cooking, and adjust the cooking time as needed since they may already be partially cooked.

    What can I use instead of fava beans?

    If fava beans are hard to come by, you can substitute with edamame or even peas for a slightly different flavor profile but similar texture.

    Is this dish vegan?

    To make this dish vegan, simply omit the parmesan or replace it with a vegan cheese alternative that you enjoy.

    Nutrition

    Fava beans are rich in vitamins and minerals, particularly folate and magnesium. They are also a great source of plant-based protein and fiber, making this dish both delicious and nutritious. Just be mindful of the olive oil and cheese if you are watching your calorie intake.

    Final Thoughts

    Fava Crostini is a testament to the beauty of uncomplicated cooking. With each bite, you’ll be transported to a sunlit afternoon in the Italian countryside, sharing good food and good company. Whether you’re a seasoned chef or a kitchen novice, this recipe is sure to impress. Enjoy creating and savoring this delightful dish with those you love.

    Related update: Fava Crostini

    Related update: Chicken and Mango Skewer

  • Crab Cakes Rockefeller | Made by Meaghan Moineau

    Crab Cakes Rockefeller | Made by Meaghan Moineau

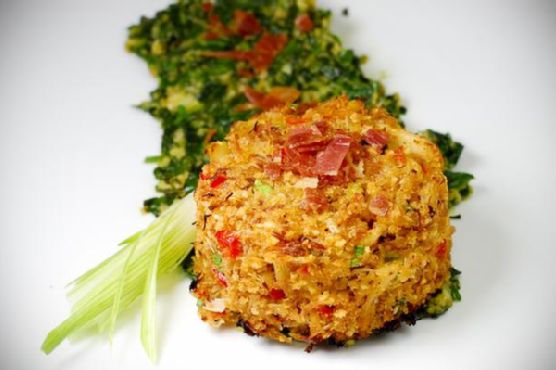
    Crab Cakes Rockefeller

    There’s something inherently special about the combination of flavors in a classic dish like Crab Cakes Rockefeller. I remember the very first time I tasted crab cakes during a summer vacation at the coast with my family. The crispy exterior and tender, savory interior were a revelation to my taste buds. Years later, I decided to recreate that magic at home, adding my own twist by merging it with the robust, green flavors of Rockefeller-style toppings. The result? A dish that brings back fond memories and creates new ones every time I serve it.

    Why You’ll Love It

    This Crab Cakes Rockefeller recipe is a delightful fusion of textures and flavors. The crab cakes themselves are tender with a hint of sweetness from honey and heat from chili powder, while the Rockefeller topping adds a savory, garlicky depth. Each bite is a harmonious blend of crispy, creamy, and green, reminiscent of a coastal getaway. Plus, it’s a versatile dish that works as an appetizer, main course, or even a fancy brunch option. You’ll love how easy it is to prepare and how impressive it looks on the plate!

    Ingredients

    • Canned lump crab claw meat
    • Red diced bell pepper
    • Diced green onions
    • Bread crumbs
    • Honey
    • Chili powder
    • Unsalted butter
    • Bacon
    • Baby spinach
    • Watercress stems
    • Garlic
    • Black salt & pepper

    Instructions

    1. Preheat your oven to 375°F and set the top rack to the middle position. This recipe is a great toaster oven candidate as well.
    2. Line a baking sheet with aluminum foil or a nonstick cooking mat.
    3. In a large bowl, combine the crab meat, diced red bell pepper, half of the diced green onion (reserving the other half), and half of the bread crumbs (reserving the other half).
    4. Mix in the honey and chili powder, then season to taste with salt and pepper.
    5. Form the crab cakes by pressing them into a 1/2 cup measure, squeezing tightly so they hold their shape. You can also mold them with your hands, but be sure to press them together tightly.
    6. Arrange the crab cakes on the lined baking sheet, leaving at least 1 inch between each crab cake.
    7. Using an olive oil sprayer (or by drizzling olive oil), lightly coat the outside of each crab cake. This will help with browning and forming an outer crust.
    8. Bake at 375°F for 25 minutes, or until golden brown.
    9. Meanwhile, fry the bacon in a large skillet until crispy. Set aside to drain, then crumble into small pieces using a sharp knife.
    10. Finely chop the spinach and watercress stems.
    11. In a large skillet, melt the butter over medium heat. Add the garlic and sauté for 1 minute.
    12. Add the remaining green onion, bread crumbs, and watercress stems. Sauté for 1 minute more.
    13. Finally, add the chopped spinach and cook until wilted, 1-2 minutes. Season to taste with salt and pepper.
    14. To serve, plate a crab cake atop a smear of the spinach mixture, then sprinkle the whole plate with crumbled bacon.

    Tips

    For best results, ensure your crab meat is well-drained to prevent the mixture from becoming too wet. When forming the crab cakes, pressing them tightly helps them hold together better during cooking. If you’re using fresh crab meat, give it a gentle squeeze to remove excess moisture. Additionally, resist the temptation to flip the crab cakes while baking; this ensures they develop a beautiful golden crust.

    Variations & Substitutions

    If you want to switch things up, consider using prosciutto instead of bacon for a slightly different flavor profile. You can also substitute arugula for watercress if you’re looking for a milder taste. For a gluten-free version, use gluten-free bread crumbs. Feel free to adjust the level of heat by adding more or less chili powder according to your preference.

    Storage

    Leftover crab cakes can be stored in an airtight container in the refrigerator for up to 3 days. To reheat, place them in a preheated oven at 350°F for about 10 minutes or until warmed through. Alternatively, you can freeze the crab cakes before baking. Just form the cakes, place them on a baking sheet, and freeze until solid. Then, transfer them to a freezer bag. Bake from frozen, adding an additional 5 minutes to the cooking time.

    FAQ

    Can I use fresh crab meat instead of canned?

    Absolutely! Fresh crab meat will work beautifully in this recipe. Just be sure to pick through it to remove any shell fragments and drain any excess liquid to avoid a soggy mixture.

    What can I serve with Crab Cakes Rockefeller?

    These crab cakes pair wonderfully with a simple green salad or roasted vegetables. For a heartier meal, consider serving them alongside a creamy risotto or buttery mashed potatoes. A crisp white wine or a light, refreshing cocktail makes for a perfect beverage companion.

    Nutrition (if applicable)

    Each serving of Crab Cakes Rockefeller (assuming 4 servings) contains approximately:

    • Calories: 450
    • Protein: 15g
    • Carbohydrates: 20g
    • Fat: 32g
    • Fiber: 3g
    • Sugar: 6g
    • Sodium: 560mg

    Final Thoughts

    Crab Cakes Rockefeller is a recipe that effortlessly combines elegance with comfort, making it a wonderful choice for both special occasions and everyday indulgence. Whether you’re reminiscing about past seaside adventures or creating new culinary traditions, this dish is sure to bring joy to your table. I hope you enjoy making and sharing it with those you love as much as I do. Bon appétit!

    Related update: Crab Cakes Rockefeller

    Related update: Steamed Clams In Wine and Chorizo

    Related update: Fava Crostini

  • Kohlrabi Salad With Apple, Bacon, and Snow Peas | Made by Meaghan Moineau

    Kohlrabi Salad With Apple, Bacon, and Snow Peas | Made by Meaghan Moineau

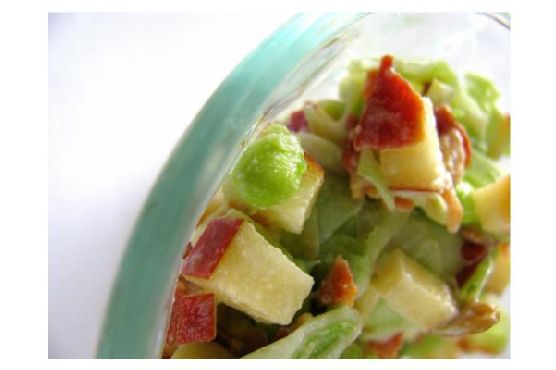
    Kohlrabi Salad With Apple, Bacon, and Snow Peas

    Welcome to a delightful journey of flavors and textures that will elevate your salad game to a whole new level. This Kohlrabi Salad with Apple, Bacon, and Snow Peas is not just a dish; it’s a symphony of crisp, sweet, and savory notes that come together harmoniously. Join me as we explore this refreshing recipe that’s perfect for any occasion.

    Why You’ll Love It

    There’s something magical about combining fresh, crunchy vegetables with the smoky, rich flavors of bacon. This salad offers a delightful contrast between the sweet and tart notes of Fuji apples and the creamy, tangy dressing. It’s a testament to how simplicity can yield extraordinary results.

    Growing up, I remember summers at my grandmother’s house where the garden was always brimming with fresh produce. The smell of freshly picked kohlrabi always brings back fond memories of helping her in the kitchen, where she taught me the art of creating dishes that celebrate each ingredient. This recipe is an ode to those warm summer days, sharing a meal with loved ones, and the joy of cooking from the heart.

    Ingredients

    • 1 kohlrabi bulb, peeled
    • 1 Fuji apple, chopped
    • 1 cup snow peas
    • 1/4 cup sunflower seeds
    • 4 slices of bacon, cooked and crumbled
    • 1/2 cup heavy cream
    • 2 tablespoons apple cider vinegar
    • 1 tablespoon honey

    Instructions

    1. Using a mandolin, slice the kohlrabi bulb paper thin.
    2. Mix the sliced kohlrabi with the chopped Fuji apple in a large bowl.
    3. Shell the snow peas (though I personally love eating the shell).
    4. Add the snow peas and sunflower seeds to the bowl.
    5. Crumble the cooked bacon finely and mix it into the salad.
    6. Refrigerate the salad while preparing the dressing.
    7. In a separate bowl, mix the apple cider vinegar into the heavy cream and let it sit at room temperature for 10 minutes until it thickens.
    8. Add the honey to the thickened cream and mix well.
    9. Gradually add the dressing to the salad, tossing gently to ensure everything is thinly coated.

    Tips

    For the best results, use fresh and high-quality ingredients. The sweetness of a Fuji apple complements the kohlrabi beautifully, but feel free to experiment with other apple varieties. A mandolin is essential for achieving paper-thin kohlrabi slices, but you can use a sharp knife if needed. Make sure to refrigerate the salad for at least 15 minutes before serving to allow the flavors to meld together.

    Variations & Substitutions

    If you’re looking for a vegetarian option, simply omit the bacon. To add more protein, consider topping the salad with grilled chicken or shrimp. You can also substitute the sunflower seeds with toasted almonds or walnuts for a different nutty flavor. If you prefer a lighter dressing, swap the heavy cream for Greek yogurt or buttermilk.

    Storage

    This salad is best enjoyed fresh, but you can store leftovers in an airtight container in the refrigerator for up to 2 days. The dressing may separate slightly, so give it a gentle stir before serving again.

    FAQ

    Can I prepare this salad in advance?

    Absolutely! You can prepare the salad components a day in advance, but I recommend adding the dressing just before serving to maintain the salad’s freshness and crunch.

    What if I don’t have a mandolin?

    No worries! While a mandolin helps achieve uniform slices, a sharp knife will work just fine. Just take your time to slice the kohlrabi as thinly as possible.

    Nutrition

    This salad is not only delicious but also nutritious. It’s packed with vitamins and minerals from the fresh vegetables and apples, healthy fats from the sunflower seeds and bacon, and a touch of sweetness from the honey. It’s a balanced dish that can fit into most dietary plans.

    Final Thoughts

    Whether you’re hosting a summer barbecue or looking for a refreshing lunch option, this Kohlrabi Salad with Apple, Bacon, and Snow Peas is sure to impress. It’s a dish that celebrates the beauty of fresh ingredients, simple preparation, and the joy of sharing a meal with those you love. I hope you enjoy it as much as I do. Happy cooking!

    Related update: Kohlrabi Salad With Apple, Bacon, and Snow Peas

    Related update: Noodle Kugel with Pineapple-Gluten free, Dairy Free

    Related update: Crab Cakes Rockefeller

  • Roasted Endive Salad With Prosciutto, Figs and Pistachios | Made by Meaghan Moineau

    Roasted Endive Salad With Prosciutto, Figs and Pistachios | Made by Meaghan Moineau

    Roasted Endive Salad With Prosciutto, Figs and Pistachios

    Why You’ll Love It

    As the leaves begin to fall and the air turns crisp, there’s nothing quite like a warm salad to bring comfort and elegance to your table. This Roasted Endive Salad with Prosciutto, Figs, and Pistachios is one of those dishes that combines simplicity with sophistication, making it perfect for both weeknight dinners and special occasions. The combination of roasted endive’s slightly bitter taste with the sweetness of figs, the salty crunch of prosciutto, and the nutty flavor of pistachios creates a symphony of flavors that will have you coming back for more.

    Growing up, my grandmother would often prepare a similar salad during the holiday season. The aroma of roasting endive would fill the kitchen, and I remember sneaking crispy bits of prosciutto off the counter when she wasn’t looking. It was a dish that brought the family together, a recipe filled with love and joy, and one that I am now excited to share with you.

    Ingredients

    • 4 heads of red or green endive
    • 2 tablespoons olive oil
    • 4 slices prosciutto
    • 1/2 cup dried figs, sliced
    • 1/4 cup pistachio nuts, shelled
    • 2 tablespoons honey

    Instructions

    1. Preheat your oven to 350°F (this is a great toaster oven candidate for smaller batches). Line a rimmed baking sheet with aluminum foil.
    2. Wash the endive thoroughly and remove any unsightly outer leaves. Slice each endive head in half lengthwise, from the stem to the tip.
    3. Arrange the endive cut side up on the foil-lined baking sheet. Generously coat each piece with olive oil.
    4. Bake in the oven for 30 minutes, or until the outer edges of the endive are golden brown.
    5. While the endive is roasting, fry the prosciutto slices in a skillet over medium heat until crispy. Drain them on paper towels, then crumble and set aside.
    6. Once the endive is done roasting, arrange three pieces on each plate. Add a handful of sliced dried figs and pistachio nuts.
    7. Drizzle a spoonful of honey over each plate, then sprinkle with about 1/4 of the crumbled prosciutto.

    Tips

    For the best results, choose endives that are fresh and crisp. When selecting figs, opt for those that are slightly soft but not mushy. If you’re short on time, you can roast the endive and fry the prosciutto a day ahead, then assemble the salad just before serving.

    Variations & Substitutions

    If you’re looking to mix things up, consider swapping out the dried figs for fresh figs when they’re in season. You can also try using a different type of nut, such as walnuts or almonds, for a different texture and flavor. For a vegetarian version, omit the prosciutto and add a sprinkle of feta cheese for a salty kick.

    Storage

    This salad is best enjoyed fresh, but if you have leftovers, store them in an airtight container in the refrigerator for up to two days. Reheat the endive gently in the oven to retain its texture before serving again.

    FAQ

    Can I make this salad ahead of time?

    Yes, you can prepare the components ahead of time. Roast the endive and fry the prosciutto in advance, then store them separately in the refrigerator. Assemble the salad just before serving for the best taste and texture.

    What can I serve with this salad?

    This salad pairs wonderfully with a light protein like grilled chicken or fish. It also works as a delicious starter for a multi-course meal or as part of a larger spread for a festive gathering.

    Nutrition

    While this salad is a treat for the taste buds, it is also packed with nutrients. Endive is a great source of vitamins A and K, while figs provide dietary fiber and antioxidants. Prosciutto adds protein, and pistachios offer healthy fats and additional fiber. A drizzle of honey rounds out the dish with a natural sweetness, making this salad both nutritious and satisfying.

    Final Thoughts

    Roasted Endive Salad with Prosciutto, Figs, and Pistachios is more than just a dish; it’s a celebration of flavors that come together beautifully. Whether you’re hosting a dinner party or looking for a cozy meal to enjoy with your family, this salad is sure to impress. I hope it becomes a cherished part of your recipe repertoire, just as it has been in mine. Bon appétit!

    Related update: Roasted Endive Salad With Prosciutto, Figs and Pistachios

  • Monte Cristo Egg Rolls | Made by Meaghan Moineau

    Monte Cristo Egg Rolls | Made by Meaghan Moineau

    Monte Cristo Egg Rolls

    Welcome to the delightful world of Monte Cristo Egg Rolls! This unique twist on the classic Monte Cristo sandwich brings together the savory goodness of deli meats and cheese, all wrapped up in a crispy, golden egg roll. Whether you’re a fan of fusion cuisine or just love a good finger food, this recipe is sure to become a favorite in your household.

    Why You’ll Love It

    Imagine biting into a warm, crispy egg roll only to be met with the delightful flavors of ham, turkey, and Swiss cheese melded together with a hint of strawberry sweetness. These Monte Cristo Egg Rolls are perfect for those who enjoy both savory and sweet flavors in one bite. They make for an excellent appetizer at parties, a fun twist for brunch, or a delicious snack to enjoy while watching your favorite movie.

    In addition, these egg rolls are easy to make and require minimal ingredients. You can prepare them ahead of time and fry them just before serving to impress your guests with your culinary creativity. Plus, each bite is a nostalgic reminder of the classic Monte Cristo sandwich, reinvented for modern taste buds.

    Ingredients

    • 1/2 lb black deli forest ham
    • 1/2 lb deli honey ham
    • 1/2 lb smoked deli turkey
    • 12 egg roll wraps
    • 1/2 cup strawberry jam
    • 1/2 lb deli baby Swiss cheese

    Instructions

    1. Chop the black deli forest ham, honey ham, smoked turkey, and baby Swiss cheese into small pieces and place them into a mixing bowl.
    2. Add the strawberry jam to the bowl and stir until the ingredients are well combined.
    3. Lay out one egg roll wrap with one corner facing you.
    4. Place about 2 tablespoons of the filling just above the bottom corner of the wrap.
    5. Fold the bottom corner up over the filling, then fold in each side of the egg roll wrap.
    6. Roll the wrap up toward the other corner, using a little water on your finger to seal the roll and corner together.
    7. Preheat a deep fryer to 320 degrees Fahrenheit.
    8. Deep fry the egg rolls for about 3 minutes or until they are crispy and golden brown.
    9. Serve warm as is or sprinkle with powdered sugar for an extra touch of sweetness.

    Tips

    To ensure your egg rolls come out perfectly every time, here are a few tips:

    • Don’t overfill the egg rolls, as this can cause them to burst while frying.
    • Seal the egg rolls tightly to prevent the filling from leaking out.
    • If you don’t have a deep fryer, you can use a pot with enough oil to submerge the egg rolls.
    • Try using a thermometer to ensure the oil is at the right temperature for frying.

    Variations & Substitutions

    Feel free to get creative with this recipe! Here are some variations and substitutions you can try:

    • Swap out the meats for your favorites, such as roasted chicken or roast beef.
    • Use apricot or raspberry jam instead of strawberry for a different flavor profile.
    • Add a teaspoon of Dijon mustard to the filling for a tangy kick.
    • For a vegetarian version, use roasted vegetables and a variety of cheeses.

    Storage

    If you have any leftover egg rolls, store them in an airtight container in the refrigerator for up to 3 days. To reheat, place them in an oven at 350 degrees Fahrenheit for about 10 minutes or until warm and crispy.

    FAQ

    Can I make these egg rolls ahead of time?

    Yes, you can prepare the egg rolls in advance and freeze them before frying. When you’re ready to serve, fry them directly from frozen, adding an extra minute or two to the frying time.

    What can I serve with Monte Cristo Egg Rolls?

    Monte Cristo Egg Rolls pair well with a side of fresh fruit or a simple green salad. You can also serve them with a variety of dipping sauces, such as honey mustard, raspberry sauce, or even maple syrup.

    Nutrition

    Each Monte Cristo Egg Roll contains approximately:

    • Calories: 200
    • Protein: 12g
    • Fat: 10g
    • Carbohydrates: 18g
    • Sugar: 5g
    • Sodium: 500mg

    Please note that these values are approximate and can vary based on the specific ingredients used.

    Final Thoughts

    Monte Cristo Egg Rolls offer a fun and delicious way to enjoy the classic flavors of a Monte Cristo sandwich in a convenient and crispy package. Whether you’re making them for a special occasion or just as a treat for yourself, these egg rolls are sure to delight your taste buds and bring a smile to your face. Give them a try and enjoy the perfect blend of savory and sweet in every bite!

    Related update: Monte Cristo Egg Rolls

    Related update: Roasted Endive Salad With Prosciutto, Figs and Pistachios

    Related update: Green Monster Ice Pops